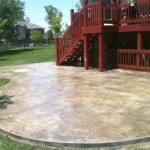
How to Replace a Concrete Patio
Replacing a concrete patio is a significant undertaking that requires careful planning and execution. It involves removing the existing concrete, preparing the subgrade, and pouring new concrete. While it can be a challenging project, with proper preparation and the right tools, you can successfully replace your patio and enjoy a new outdoor space.
1. Planning and Preparation
Before starting the replacement process, it's essential to plan and prepare. Begin by assessing the existing patio and determining the extent of the replacement. If you are replacing the entire patio, you need to consider the size and shape of the new patio, as well as the materials you will be using. Consider the location, drainage, and any existing landscaping features that might affect the layout.
Once you have a clear plan, gather all necessary materials and tools. This includes:
- Concrete breaker or jackhammer
- Shovels and wheelbarrow
- Measuring tape and level
- Form boards and stakes
- Gravel and compacted sand
- Rebar and wire mesh
- Concrete mix or pre-mixed concrete
- Edging materials (optional)
- Safety gear (goggles, gloves, ear protection)
It's also essential to obtain any necessary permits from your local municipality. This will ensure that your project complies with building codes and regulations.
2. Removal of Existing Concrete
The first step is to remove the existing concrete. This can be a laborious process, especially for large patios. Begin by using a concrete breaker or jackhammer to break up the concrete into manageable pieces. Safety is crucial, so wear appropriate protective gear and ensure the area is clear of obstructions.
Once the concrete is broken, use shovels and a wheelbarrow to remove the debris. Dispose of the concrete debris properly, as it may not be accepted at all landfills. If the concrete is in good condition, you can consider breaking it up into smaller pieces and using it as base fill for other projects.
3. Subgrade Preparation
After removing the old concrete, prepare the subgrade for the new patio. This involves excavating the soil to the required depth, typically around 6 to 8 inches. The subgrade should be level, compacted, and free of debris.
To ensure proper drainage, create a slight slope away from the house. You can use a level and stakes to guide the excavation process. Once the subgrade is prepared, lay down a layer of gravel for drainage and stability. Compact the gravel thoroughly before proceeding to the next step.
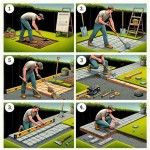
4. Forming and Reinforcing
Once the subgrade is prepared, you can begin forming the new patio. Use form boards and stakes to create a solid foundation for the concrete. The form boards should be level and properly braced. The height of the forms should be determined by the desired thickness of the patio, typically around 4 inches.
For added strength and durability, reinforce the concrete with rebar or wire mesh. Place the rebar or wire mesh within the forms, ensuring it is at least 2 inches from the top of the forms.
5. Pouring Concrete
Once the forming and reinforcement are complete, you can pour the concrete. If using a concrete mix, follow the manufacturer's instructions for mixing proportions and water content. You can also use pre-mixed concrete, which is delivered in ready-to-pour form.
Pour the concrete into the forms in layers, ensuring that it is evenly distributed and compacted to eliminate air pockets. Use a concrete vibrator or tamper to compact the concrete.
6. Finishing and Curing
After pouring the concrete, you need to finish and cure it. Level the concrete surface using a trowel or screed. You can also create decorative patterns with a broom or other tools.
Allow the concrete to cure for at least 24 hours before removing the forms. To accelerate the curing process, you can cover the concrete with plastic sheeting and keep it moist. It's essential to avoid walking on the patio during the curing process to prevent damage.
A newly poured concrete patio will gradually harden over time as it cures. It's essential to avoid any heavy traffic or use of the patio for several days while the concrete gains strength.

How To Tear Down That Concrete Patio

Removing A Concrete Patio By Hand Delineate Your Dwelling

How To Replace Old Patio Cover And Pour A New Concrete

Resurfacing A Concrete Patio For Budget Diy Makeover Fab Everyday

How To Remove Your Concrete Patio Dumpsters Com

Diy Concrete Patio In 8 Easy Steps How To Pour A Cement Slab

Diy Broken Concrete Patio Urbanite Full Tutorial An Oregon Cottage

How To Pour A Concrete Patio Learn About Pouring

How To Tear Down That Concrete Patio

How To Install Patio Pavers Over An Existing Concrete Slab
Related Posts