How to Pour a Concrete Patio in Sections
Constructing a concrete patio can dramatically enhance your outdoor living space, providing a durable and versatile surface for entertaining, dining, or simply relaxing. However, pouring a large concrete slab can be a daunting task, especially for DIY enthusiasts. Fortunately, pouring a concrete patio in sections offers a practical and manageable approach, making the project more achievable. This article will guide you through the essential steps involved in constructing a sectional concrete patio, ensuring a successful and satisfying outcome.
1. Planning and Preparation: Laying the Foundation for Success
Before diving into the construction process, meticulous planning and preparation are key to a successful sectional concrete patio. Begin by determining the desired dimensions and shape of your patio. Consider the surrounding landscape, existing structures, and desired functionality.
Once you have a clear vision, proceed with the following steps:
-
Obtain Necessary Permits:
Check with your local building department for any required permits. -
Determine the Site Grade:
Ensure the area is level or has a slight slope for drainage. Use a level and string line to establish the desired grade. -
Remove Existing Vegetation and Debris:
Clear the construction area of any vegetation, debris, or obstacles. -
Excavate the Area:
Excavate the site to the desired depth, accounting for the thickness of the concrete, gravel base, and any necessary drainage layers. -
Compact the Subgrade:
Thoroughly compact the excavated soil using a tamper or plate compactor to create a stable foundation. -
Install Drainage:
If necessary, install drainage systems, such as gravel trenches or French drains, to prevent water pooling and ensure proper drainage. -
Lay Gravel Base:
Spread a layer of gravel, about 4 inches thick, over the compacted subgrade. The gravel base provides drainage and distributes the load, preventing the concrete from settling or cracking.
2. Defining the Sections and Constructing Forms
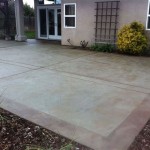
Dividing the patio into manageable sections is crucial for successful pouring. The size of the sections can vary depending on your project's scale and your capabilities. Generally, sections of 4 feet by 8 feet or 6 feet by 6 feet are manageable for a single pour.
After deciding on your section sizes, construct forms using plywood, lumber, or specialized concrete forms. Secure the forms to the ground using stakes, brackets, or concrete nails. Ensure the forms are level and plumb to guarantee a smooth, even surface for your concrete.
To ensure proper adhesion between sections, install control joints (also known as isolation joints) at the edges of each section. These joints prevent cracks from propagating across the entire patio. Control joints are often made using a saw cut, a flexible material like foam board, or a pre-molded joint system.
3. Pouring and Finishing the Concrete in Sections
With the forms in place and your control joints established, you are ready to pour the concrete. Order the required amount of concrete from a local supplier, and ensure it arrives on time. This is a crucial step, as concrete begins to harden within a few hours, requiring a timely and efficient pouring process.
Follow these steps for each section:
-
Pour Concrete:
Slowly pour the concrete into the forms, working from one side to the other to ensure even distribution. -
Consolidate Concrete:
Use a vibrator, also known as a concrete vibrator, to remove air bubbles and ensure a dense, compact concrete surface. -
Level and Smooth Concrete:
Use a screed to level the concrete surface and remove excess material. -
Apply a Finishing Touch:
Finish the concrete surface by using a wood float or a trowel to achieve the desired texture and smoothness. -
Cure the Concrete:
Cover the concrete with a curing compound or plastic sheeting to retain moisture and prevent cracking during the hardening process.
Once a section is poured and finished, allow it to cure for 24 to 48 hours before moving on to the next section. This allows the concrete to harden sufficiently before adding additional weight or traffic.
4. Additional Considerations for Sectional Concrete Patios
While pouring a concrete patio in sections is a practical approach, certain considerations are crucial for achieving a seamless and durable result.
-
Expansion Joints:
Use expansion joints to accommodate the natural movement of the concrete due to temperature changes. Expansion joints are typically installed every 10 to 15 feet and are filled with a flexible sealant. -
Reinforcement:
For larger patios, consider adding reinforcement bars (rebar) to the concrete to increase its strength and prevent cracking. -
Edging:
Install concrete edging or a decorative border around the patio to define the area and protect the edges from erosion or damage. -
Finishing Touches:
Once the concrete has completely cured, you can apply a sealer to protect the surface, or stain it to enhance its appearance.
By following these steps and addressing the crucial considerations, you can successfully construct a durable and visually appealing sectional concrete patio that adds value and enjoyment to your outdoor space.

Mixing Concrete For A 15 Foot Square Slab Jlc

How To Pour A Perfect Concrete Slab Family Handyman

Diy Concrete Patio In 8 Easy Steps How To Pour A Cement Slab

Diy Concrete Patio In 8 Easy Steps How To Pour A Cement Slab

How To Build Concrete Driveways In Sections By Yourself Keeping Things Simple

Diy Concrete Patio How To Pour A Slab Bob Vila

How To Pour A Concrete Slab Diy Family Handyman

Diy Concrete Patio In 8 Easy Steps How To Pour A Cement Slab

How To Build Concrete Driveways In Sections By Yourself Keeping Things Simple

Tips For Pouring A Concrete Patio Fine Homebuilding
Related Posts