How to Build a Wood Patio
A wood patio can transform an outdoor space into a haven for relaxing, entertaining, and enjoying the beauty of nature. Whether you envision a cozy corner for morning coffee or a spacious gathering spot for summer barbecues, constructing a wooden patio is a rewarding DIY project. This guide will walk you through the essential steps, providing a clear, informative roadmap to success.
Step 1: Planning and Preparation
A solid foundation for your project begins with careful planning and preparation. Before embarking on the construction, consider the following factors:
- Location and Size: Determine the ideal location and size for your patio. Consider the existing landscape, sunlight exposure, and the desired functionality of the space.
- Materials and Design: Choose the type of wood best suited to your climate and aesthetic preferences. Factor in the cost, durability, and maintenance requirements of different wood species.
- Permits and Regulations: Check with your local building department to ensure your project conforms to all relevant regulations and obtain any necessary permits.
Once you have a clear vision, create a detailed plan including the dimensions, layout, and materials list. This will serve as a blueprint throughout the construction process.
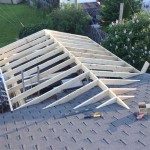
Step 2: Site Preparation and Framing
The next step involves preparing the site and establishing a sturdy framework. This includes:
- Clearing the Area: Remove any existing vegetation, debris, and obstacles from the designated patio area.
- Leveling the Ground: Ensure the ground is level by using a laser level or traditional leveling techniques. Consider using compacted gravel for drainage and stability.
- Installing Pressure-Treated Joists: Lay out and install pressure-treated joists, spaced according to local building codes, to support the patio decking.
The joists should be securely fastened to concrete piers or embedded in a concrete foundation, ensuring proper drainage and support. Remember to double-check all measurements and angles for accuracy.
Step 3: Decking Installation
With the framing complete, you can begin installing the decking boards. Here's a step-by-step guide:
- Laying the First Row: Start by laying the first row of decking boards, ensuring proper spacing and alignment. Secure the boards to the joists using deck screws or nails.
- Adding Subsequent Rows: Stagger the joints of subsequent rows to enhance stability and visual appeal. Ensure each board is securely fastened to the joists.
- Cutting and Finishing: Cut the last few boards as needed to fit the dimensions of the patio. Sand the edges and apply a sealant or stain to protect the wood.
Choose decking boards with the desired width and spacing for the desired aesthetic. Remember to pre-drill holes before driving screws or nails to prevent wood splitting.
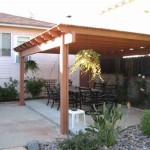
Step 4: Enhancing the Patio
Once the basic structure is complete, you can enhance the patio with additional features and finishing touches:
- Adding Railings: Consider installing railings for safety and aesthetic appeal, particularly around edges or drops.
- Creating a Focal Point: Build a fire pit, a pergola, or a decorative planter to add a focal point and enhance the ambiance of the patio.
- Installing Lighting: Incorporate outdoor lighting to illuminate the space and create a warm, inviting atmosphere for evening gatherings.
These additions can transform your patio into a truly personalized oasis, reflecting your style and preferences.
Step 5: Maintenance and Care
To ensure the longevity and beauty of your wood patio, regular maintenance is crucial:
- Cleaning: Sweep or wash the patio regularly to remove dirt, debris, and stains. Use a mild soap solution and avoid harsh chemicals.
- Re-Applying Sealant: Re-apply sealant or stain every few years to protect the wood from weathering, moisture, and UV damage.
- Inspecting for Damage: Regularly inspect for any signs of damage, rot, or decay. Repair or replace any damaged components promptly.
By following these steps, you can ensure your wood patio remains a beautiful and functional outdoor space for years to come.

How To Build A Deck That Lasts For Decades Family Handyman

How To Build A Low Profile Deck Patio Part 1 Of 2

How To Make A Ground Level Wooden Deck Ehow Building Floating Decks Backyard
:max_bytes(150000):strip_icc()/DIYbackyardrebuiltdeck-58ee72d15f9b582c4dc736e0.jpeg?strip=all "8 Beautiful Easy Diy Backyard Decks")
8 Beautiful Easy Diy Backyard Decks

Building A Ground Level Deck Part 1

Luxurious 12 Build Deck 324987 Home Design Ideas Wood Plans Building A Frame

How To Build A Deck Around Tree

How To Build A Small Freestanding Deck So Much Better With Age

How To Build A Wooden Patio Deck Blog George Hill Timber

How To Build A Low Profile Deck Patio Part 1 Of 2
Related Posts