Creating a Beautiful Concrete Patio with Painted Bricks
A concrete patio offers a versatile and durable foundation for outdoor living spaces. Enhancing its aesthetic appeal with painted bricks introduces an element of personalized design and visual interest. This process blends the strength and longevity of concrete with the vibrant and customizable nature of painted brick, resulting in a unique and inviting patio area.
Planning and Preparation
Careful planning and preparation are crucial for a successful patio project. Begin by determining the desired size and shape of the patio. Consider the surrounding landscape and how the patio will integrate with existing features. Accurate measurements are essential for calculating material quantities. Assess the ground conditions to ensure proper drainage and stability. Finally, gather all necessary tools and materials before starting the project.
Constructing the Concrete Base
Creating a stable and level concrete base is paramount. This involves excavating the area to the appropriate depth, ensuring proper drainage considerations. A layer of compacted gravel forms the foundation, followed by a layer of sand for leveling. Install wooden forms to define the patio's perimeter and shape. Pour the concrete mix, ensuring it's evenly distributed and leveled using a screed. Allow the concrete to cure completely before proceeding to the next stage.
Brick Selection and Painting
Choosing the right bricks is essential for both aesthetic and structural reasons. Consider the brick size, shape, and color. Ensure the bricks are suitable for outdoor use and compatible with the chosen paint. Select exterior-grade paint designed for brick surfaces. This will ensure durability and weather resistance. A primer may be necessary depending on the brick and paint type. Test the paint on a spare brick to ensure the desired color and finish.
Painting Techniques
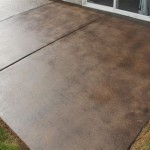
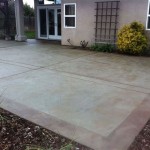
Various painting techniques can achieve different effects. A solid, uniform coat creates a clean and modern look. Distressing techniques, like dry brushing or sponging, can produce a more rustic or antique appearance. Stenciling can add intricate patterns and designs. Consider applying multiple coats for enhanced color saturation and durability. Allow each coat to dry completely before applying the next. Seal the painted bricks with a suitable sealant to protect them from the elements and maintain their appearance.
Laying the Painted Bricks
Once the painted bricks are dry, begin the laying process. A variety of patterns can be utilized, from classic running bond to more intricate herringbone or basket weave designs. Use a string line to ensure straight lines and even spacing. A rubber mallet can help gently tap bricks into place. Consider using spacers to maintain consistent gaps between bricks. These gaps allow for expansion and contraction due to temperature changes.
Filling the Joints
Filling the joints between the bricks provides stability and enhances the overall appearance. A polymeric sand is commonly used for this purpose, offering flexibility and resistance to weed growth. Sweep the sand into the joints, ensuring they are completely filled. Compact the sand using a hand tamper or a vibrating plate compactor. Remove excess sand with a brush or blower. Lightly water the patio to activate the sand's bonding agents.
Finishing Touches and Maintenance
Adding finishing touches completes the patio and enhances its functionality. Consider incorporating features such as built-in seating, planters, or a fire pit. Regular maintenance will prolong the life of the patio. Sweep the surface regularly to remove debris. Periodically clean the patio with a mild detergent and water. Reseal the bricks every few years to maintain their color and protect them from weathering. Address any cracks or damage promptly to prevent further deterioration.
Safety Precautions
Prioritize safety throughout the project. Wear appropriate safety gear, including gloves, eye protection, and sturdy footwear. Follow all manufacturer's instructions for using tools and materials. Be aware of potential hazards associated with working with concrete and paint. Dispose of waste materials responsibly. If working with power tools, follow all safety guidelines and ensure proper ventilation. Consult local building codes and obtain necessary permits before beginning construction.

Painted Concrete Slab And Brick Pavers One Year Later Jamie Lundstrom

Backyard Makeover How To Paint Concrete Look Like Oversize Pavers A House Full Of Sunshine

Painted Concrete Slab And Brick Pavers One Year Later Jamie Lundstrom

Before And After Painted Concrete Patio Thistlewood Farm

Painted Faux Brick Patio In Country Sampler

Painted Concrete Slab And Brick Pavers One Year Later Jamie Lundstrom

From Boring Concrete Wall To Pretty Painted Patio The Palette Muse

10 Painted Concrete Patio Floor Ideas Jamie Lundstrom

20 Design Ideas For Your Concrete Patio

Stamped Concrete Patio Ideas For Outdoor Living
Related Posts