How To Slope A Paver Patio
Creating a beautiful and functional paver patio involves careful planning and execution, and proper drainage is a crucial aspect. A well-sloped patio ensures that rainwater flows away from the house and prevents puddles, erosion, and potential damage. This article provides a comprehensive guide to sloping a paver patio, outlining the essential steps and considerations for achieving a successful outcome.
Determining the Slope
The first step is to determine the appropriate slope for the patio. A general guideline is a slope of 1/8 inch per foot, meaning that for every foot of horizontal distance, the patio should drop by 1/8 inch. This ensures adequate drainage without causing an excessive incline that feels uncomfortable to walk on. However, local building codes might specify different slope requirements, so it is essential to consult the relevant codes in your area.
To determine the desired slope, measure the length and width of the patio area. For example, if the patio is 10 feet wide, a slope of 1/8 inch per foot would result in a total drop of 1.25 inches across the width. You can use a laser level or a long straight edge and a level to mark the desired slope on the ground. This will serve as a guide for the paver installation process.
Preparing the Base
After determining the slope, the next step is to prepare the base for the pavers. This involves excavating the existing soil to the required depth and creating a firm and stable foundation. The base should be compacted to prevent settling and ensure a level surface. Different materials can be used for the base, including compacted gravel, sand, or a combination of both.
A typical base for a paver patio consists of three layers:
Compacted Gravel:
This layer provides drainage and stability, typically ranging from 4 to 6 inches deep.Sand Bedding:
A 2-inch layer of sand is placed on top of the compacted gravel. Sand provides a smooth and level surface for the pavers and allows for adjustments during installation.Polymeric Sand:
After the pavers are laid, polymeric sand is swept into the joints. It hardens and solidifies, creating a durable and water-resistant seal.
Installing the Pavers
Once the base is prepared, you can begin installing the pavers. Start by laying the pavers along the highest elevation point, following the marked slope. Use a level and a rubber mallet to ensure that the pavers are level and flush with each other. It is essential to maintain the desired slope throughout the installation process. As you move down the slope, use spacers to maintain consistent spacing between the pavers.
If you encounter variations in elevation or need to adjust the slope, you can use a combination of sand and gravel to fine-tune the base. Add sand to lower the elevation or gravel to raise it. It is crucial to compact the base materials after making adjustments to ensure stability.
Finishing Touches
After installing the pavers, sweep the joints with polymeric sand. Allow the sand to settle and then wet it thoroughly to activate the hardening process. The hardened sand will provide a durable and waterproof seal to the pavers. Consider adding edging around the perimeter of the patio for a polished look and to prevent the pavers from shifting or settling over time.
Once the sand is fully hardened, you can apply a sealant to the pavers to protect them from stains and water damage. Sealing also enhances the color and appearance of the pavers and makes them easier to maintain.
Key Considerations
Drainage
Ensure that the slope directs the water away from the house and towards a designated drainage area. Consider installing a drainage system such as a French drain or an underground pipe to collect and carry the water away from the patio.
Frost Heaving
In areas prone to frost heaving, it is important to consider the potential for soil expansion and contraction. Use frost-resistant materials for the base and pavers, and ensure that there is adequate drainage to prevent water from accumulating and freezing.
Accessibility
When designing a sloped patio, it is crucial to consider accessibility for people with disabilities. Ensure that the slope is gradual enough for easy access and that there are no tripping hazards.
.jpg?strip=all "How To Install Patio Pavers Lv")
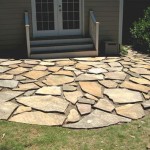
How To Install Patio Pavers Lv

How To Design Build A Paver Patio At Lowe S

How Do I Slope A Patio Toward One Of Its Corners Home Improvement Stack Exchange

Paver Patio On A Slope Outdoor Living Tip Of The Day

Diy Paver Patio On A Slope

Part 1 How To Build A Paver Patio On Slope And Prevent Soil Erosion

How To Measure Slope For Paver Patio S Pavers

Paver Base Prep Steep Slope Clay Sub Soil Open Grade Absolutely

Building Paver Patio On Slope Pics Lawn Care Forum

How To Improve A Sloped Backyard With Grading And Clay Pavers
Related Posts