How to Repaint a Concrete Patio
Repainting a concrete patio is a cost-effective way to revitalize an outdoor space, enhance curb appeal, and protect the concrete surface from the elements. Over time, concrete patios can become stained, faded, and even cracked, diminishing their aesthetic appeal and potentially leading to further deterioration. A fresh coat of paint not only improves its appearance but also seals the concrete, preventing water damage and prolonging its lifespan. This article offers a comprehensive guide on how to repaint a concrete patio, covering the necessary steps from preparation to application, ensuring a durable and visually appealing result.
Key Point 1: Preparation is Paramount
The success of any painting project hinges on thorough preparation. This is especially true for concrete patios, where the porous surface and exposure to the elements demand meticulous cleaning and surface preparation. Skipping or skimping on these steps can lead to adhesion problems, premature peeling, and an unsatisfactory final result. Adequate preparation involves cleaning, repairing, and priming the concrete.
Cleaning the Concrete: The initial step involves removing all furniture, planters, and other items from the patio. Thorough cleaning is essential to remove dirt, debris, mildew, and any existing loose paint or coatings. Start by sweeping the entire surface with a stiff-bristled broom to remove loose dirt and debris. For more stubborn dirt and grime, a pressure washer is highly recommended. Use a pressure washer with a fan tip nozzle (around 25 to 40 degrees) to avoid damaging the concrete surface. Hold the nozzle at a consistent distance from the concrete and work in overlapping strokes. If a pressure washer is unavailable, a scrub brush and a solution of water and trisodium phosphate (TSP) can be used. Follow the manufacturer's instructions for proper dilution and safety precautions when using TSP, including wearing gloves and eye protection.
For particularly stubborn stains, such as oil or grease, a concrete degreaser may be necessary. Apply the degreaser according to the manufacturer's instructions and allow it to dwell for the recommended time before scrubbing and rinsing thoroughly. Mold and mildew can be removed with a solution of bleach and water (1 part bleach to 3 parts water). Apply the solution to the affected areas, let it sit for 10-15 minutes, and then scrub vigorously with a stiff brush before rinsing thoroughly. It is crucial to ensure that all cleaning solutions are completely rinsed off the concrete surface before proceeding to the next step.
Repairing Cracks and Damage: Once the concrete is clean and dry, inspect the surface for any cracks, chips, or other damage. Small cracks (less than 1/4 inch wide) can be filled with a concrete crack filler. Use a wire brush to remove any loose debris from the crack, then apply the crack filler according to the manufacturer's instructions. Use a putty knife to smooth the filler and ensure it is flush with the surrounding concrete surface. For larger cracks or significant damage, a concrete patching compound may be necessary. Follow the manufacturer's instructions for mixing and applying the patching compound. Allow the filler or patching compound to dry completely before proceeding.
Etching the Concrete (If Necessary): If the concrete surface is very smooth or has been previously sealed, it may be necessary to etch the concrete to create a porous surface that will allow the paint to adhere properly. Concrete etching is typically achieved using a muriatic acid solution. However, exercise extreme caution when working with muriatic acid, as it is a corrosive substance. Always wear appropriate personal protective equipment, including gloves, eye protection, and a respirator. Follow the manufacturer's instructions for diluting the muriatic acid. Apply the solution to the concrete surface with a plastic watering can or sprayer, and then scrub with a stiff brush. Allow the acid to react with the concrete for the recommended time, and then rinse thoroughly with water. The concrete surface should have a slightly rough texture after etching. Ensure to neutralize the acid solution with a mixture of baking soda and water after etching and rinse thoroughly to prevent any further reactions. Newer eco-friendly etching products are available, and should be considered for safety concerns.
Priming the Concrete: After cleaning, repairing, and etching (if necessary), it is crucial to apply a concrete primer. A primer will help to seal the concrete surface, improve paint adhesion, and provide a uniform base for the topcoat. Choose a high-quality concrete primer that is specifically designed for exterior use. Apply the primer according to the manufacturer's instructions, typically using a roller or brush. Allow the primer to dry completely before proceeding to the painting stage.
Key Point 2: Selecting the Right Paint and Tools
Choosing the appropriate paint and tools is crucial for achieving a durable, long-lasting, and aesthetically pleasing finish on a concrete patio. The type of paint selected should be specifically formulated for concrete surfaces and suitable for outdoor use. Similarly, using the correct tools will ensure even application and a professional-looking result.
Choosing the Right Paint: For concrete patios, the most common and recommended types of paint are acrylic latex paints and epoxy paints. Acrylic latex paints are water-based, making them easy to apply and clean up. They are also relatively durable and resistant to fading and cracking. Acrylic paints are breathable, allowing moisture to escape from the concrete, which helps to prevent blistering and peeling. Epoxy paints, on the other hand, are more durable and resistant to chemicals, abrasion, and stains. They provide a harder, more protective finish than acrylic paints, making them a good choice for high-traffic areas or patios that are exposed to harsh weather conditions. However, epoxy paints are typically more expensive and require more preparation and application expertise. They also may not be as breathable as acrylic latex paints, which can lead to moisture-related problems if the concrete is not properly prepared. Concrete stains are also an option, providing color while still allowing the concrete to breathe. Stains penetrate the concrete, offering a more permanent solution than paint.
When selecting a paint, consider the climate, the amount of foot traffic the patio will receive, and the desired appearance. Choose a paint that is specifically labeled for exterior use and designed for concrete surfaces. Read the manufacturer's specifications carefully and follow their recommendations for application and cure times. Consider the VOC content (volatile organic compounds) of the paint, especially if you are sensitive to chemicals. Low-VOC paints are more environmentally friendly and have a lower odor.
Choosing the Right Tools: The tools required for painting a concrete patio are relatively simple and readily available. A long-handled paint roller with a nap size appropriate for concrete surfaces (typically 3/8 inch to 1/2 inch) is essential for applying the paint evenly and efficiently. A paint brush is needed for cutting in edges, painting corners, and reaching difficult-to-access areas. A paint tray is necessary for holding the paint and allowing the roller to be loaded evenly. A paint can opener, a stir stick, and drop cloths or plastic sheeting are also essential for protecting surrounding surfaces from paint splatters. A putty knife or scraper is needed for repairing cracks and removing loose paint. A pressure washer or scrub brush and TSP cleaner are needed for cleaning the concrete. Consider using paint grids that fit into five-gallon buckets to remove excess paint from the roller before applying. This helps to prevent drips and runs.
Key Point 3: Paint Application Techniques
Proper paint application is crucial for achieving a smooth, even, and durable finish on a concrete patio. The application technique should be adapted to the type of paint being used and the specific characteristics of the concrete surface. Applying the paint in multiple thin coats, rather than one thick coat, is generally recommended to improve adhesion and prevent cracking or peeling. Consider the weather conditions and temperature when applying the paint.
Applying the Paint: Before beginning, ensure the concrete surface is completely dry and free of any dust or debris. Start by cutting in the edges of the patio with a paint brush. This involves painting a narrow strip along the perimeter of the patio, where it meets walls, landscaping, or other surfaces. This will create a clean, defined edge and prevent the roller from accidentally painting onto these surfaces. Next, load the paint roller evenly with paint from the paint tray. Avoid overloading the roller, as this can lead to drips and runs. Begin rolling the paint onto the concrete surface in smooth, even strokes. Overlap each stroke slightly to ensure complete coverage. Work in small sections, typically 3-4 feet at a time, to maintain a wet edge and prevent the paint from drying unevenly. Apply the paint in the same direction for each coat to achieve a uniform appearance. Avoid painting in direct sunlight or during periods of high humidity, as this can affect the drying time and adhesion of the paint. Paint when the temperature is between 50 and 90 degrees Fahrenheit. If necessary to paint on a warm day, start early in the morning and avoid the hottest hours of the afternoon.
Applying Multiple Coats: After applying the first coat of paint, allow it to dry completely according to the manufacturer's instructions. The drying time will vary depending on the type of paint, the temperature, and the humidity. Once the first coat is dry, inspect the surface for any imperfections or areas that need additional coverage. Apply a second coat of paint using the same technique as the first coat. Again, allow the second coat to dry completely before using the patio. Applying two coats will ensure better coverage, durability, and a more uniform color.
Adding a Topcoat (Optional): For added protection and durability, consider applying a clear topcoat over the painted surface. A topcoat will help to protect the paint from scratches, stains, and UV damage. Choose a topcoat that is specifically designed for exterior use and compatible with the type of paint used. Apply the topcoat according to the manufacturer's instructions, typically using a roller or brush. Allow the topcoat to dry completely before using the patio.
Curing Time and Maintenance: After painting the concrete patio, it is important to allow the paint to cure completely before placing furniture or other items on the surface. The curing time will vary depending on the type of paint, but it is typically at least 24-48 hours. Avoid heavy foot traffic during the curing period. Once the paint is fully cured, the patio can be cleaned with mild soap and water as needed. Avoid using harsh chemicals or abrasive cleaners, as these can damage the paint. Regularly sweep or vacuum the patio to remove dirt and debris. Inspect the surface periodically for any signs of damage or wear. Touch up any areas that need it to maintain the appearance and durability of the painted concrete patio. Consider resealing the patio every few years to protect the paint and extend its lifespan.

How To Paint A Concrete Porch Or Patio

How To Paint A Concrete Porch Or Patio

How To Paint A Concrete Porch Or Patio

Before And After Painted Concrete Patio Thistlewood Farm

How To Paint A Porch Floor With Concrete The Honeycomb Home

How To Paint A Concrete Patio Exquisitely Unremarkable

How To Repaint A Painted Concrete Porch Cuckoo4design
:max_bytes(150000):strip_icc()/cement-tile-1-of-1-683x1024-f5a283b105e04abf8729e7390f9148bc.jpg?strip=all "15 Painted Concrete Patio Designs")
15 Painted Concrete Patio Designs

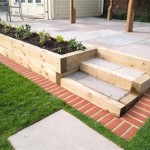
Painted Concrete Slab And Brick Pavers One Year Later So Much Better With Age

How To Paint A Porch Floor With Concrete The Honeycomb Home
Related Posts