How to Re-Level Patio Pavers
Uneven patio pavers can detract from the aesthetic appeal of an outdoor space and create potential tripping hazards. Over time, various factors, including soil settlement, root intrusion, and water erosion, can contribute to the displacement and sinking of pavers. Re-leveling a patio is a project that enhances the safety and appearance of a property. This article details the necessary steps involved in re-leveling patio pavers, ensuring a stable and visually appealing surface.
Before embarking on the re-leveling process, it is crucial to assess the extent of the problem and gather the necessary tools and materials. A thorough inspection will help determine the scope of the project and ensure efficient execution. Ignoring the initial assessment can lead to unnecessary work or overlooking underlying issues that may cause the problem to recur.
Assessing the Damage and Gathering Supplies
The first step involves a visual inspection of the patio. Identify pavers that are sunken, tilted, or otherwise misaligned. Use a level to accurately determine the extent of the unevenness. Note the location of each problem area, as this will inform the order in which the pavers are addressed. Mark the affected pavers with chalk or tape to facilitate easy identification during the repair process. This is especially helpful for larger patios where remembering the exact locations of the problem pavers can be challenging.
Once the problematic pavers are identified, examine the surrounding area for potential causes of the unevenness. Look for signs of root intrusion from nearby trees or shrubs, which can displace the base material beneath the pavers. Check for areas where water may be pooling or running off, as this can contribute to soil erosion and settlement. Understanding the underlying cause of the problem is crucial for implementing a long-term solution. If root intrusion is suspected, consider trimming or removing the offending roots. If water erosion is a concern, address drainage issues by installing French drains or re-grading the surrounding area.
After the assessment, assemble the necessary tools and materials. Essential tools include a rubber mallet, a flathead screwdriver or paver removal tool, a level (preferably a long one), a shovel, a wheelbarrow, a tamper, a broom, and safety glasses. The necessary materials typically include paver leveling sand (also known as bedding sand), polymeric sand, and potentially additional base material, such as gravel, if the existing base is insufficient. The amount of materials needed will depend on the size of the patio and the extent of the unevenness.
Safety is paramount when undertaking any landscaping project. Always wear safety glasses to protect the eyes from flying debris. Work gloves will protect the hands from abrasions and splinters. If cutting pavers is necessary, wear a dust mask to prevent inhalation of silica dust. Consider wearing knee pads for added comfort during extended periods of kneeling. Foot protection is crucial, solid work boots or shoes can prevent injuries if heavy objects fall
Removing and Preparing the Pavers
The next step involves removing the affected pavers. This requires carefully dislodging them from their current position without damaging them or adjacent pavers. Begin by using a flathead screwdriver or a specialized paver removal tool to pry up the edges of the paver. Work slowly and gently to avoid chipping or cracking the paver. If the paver is tightly wedged, try tapping it with a rubber mallet to loosen it. Avoid using excessive force, as this can damage the paver or the surrounding pavers.
Once the paver is loose, carefully lift it out of its place. Set the paver aside in a safe location, away from the work area. Inspect the paver for any signs of damage, such as cracks or chips. If the paver is severely damaged, it may need to be replaced. If the paver is in good condition, clean it with a brush to remove any dirt or debris. This will help ensure a good bond with the leveling sand.
With the paver removed, inspect the base material underneath. Remove any loose debris, weeds, or roots that may be present. This will provide a clean and stable surface for the leveling sand. If the base material is compacted or uneven, loosen it with a shovel or trowel. Add or remove base material as needed to achieve a uniform depth of approximately 4-6 inches. The type of base material will depend on the soil conditions and the intended use of the patio. Gravel is often used as a base because it provides good drainage and stability. For heavy-duty applications, such as driveways, a thicker base may be required.
Compact the base material using a tamper. This will help to create a solid and level foundation for the pavers. Work in overlapping passes to ensure that the entire area is thoroughly compacted. A properly compacted base is essential for preventing future settling and unevenness. Use a level to check the levelness of the base material. Make any necessary adjustments to ensure that it is level and even. A laser level can also be used for greater accuracy, especially for large patios.
Spread a layer of paver leveling sand (bedding sand) over the compacted base material. The sand should be approximately 1 inch thick. Use a screed board or a trowel to level the sand. The sand should be perfectly level and smooth. This layer of sand allows for minor adjustments to be made when laying the pavers. It also helps to distribute the weight of the pavers evenly across the base material. Ensure that the sand is evenly distributed and free of any clumps or debris.
Re-laying and Securing the Pavers
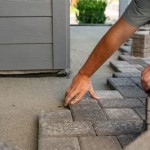
Carefully place the paver back into its original position. Ensure that the paver is aligned with the surrounding pavers and that the joints are consistent. Use a rubber mallet to gently tap the paver into place. Avoid using excessive force, as this can damage the paver or the surrounding pavers. Check the levelness of the paver using a level. Make any necessary adjustments by adding or removing sand beneath the paver. The goal is to achieve a perfectly level surface that is flush with the surrounding pavers.
Repeat the process for each of the affected pavers. Work systematically to ensure that each paver is properly leveled and aligned. Periodically step back and visually inspect the patio to ensure that the overall appearance is consistent. Pay attention to the spacing between the pavers. Consistent spacing is essential for creating a professional-looking finish. Use paver spacers if necessary to maintain uniform gaps.
Once all of the pavers have been re-leveled, sweep polymeric sand into the joints between the pavers. Polymeric sand is a special type of sand that hardens when it is wetted. This helps to lock the pavers in place and prevent weed growth. Follow the manufacturer's instructions for applying polymeric sand. Typically, the sand is swept into the joints and then lightly wetted with a hose. Avoid over-wetting the sand, as this can cause it to cloud the surface of the pavers. The polymeric sand will harden over a period of several hours or days, depending on the temperature and humidity.
After the polymeric sand has hardened, inspect the patio for any remaining debris or imperfections. Sweep the patio clean and remove any excess sand or dirt. If any pavers are still slightly uneven, make minor adjustments by tapping them with a rubber mallet. Avoid making major adjustments after the polymeric sand has hardened, as this can damage the pavers or the joints. Rinse with a gentle spray from the hose, making sure not to flood the area. Over time, the joints will settle, requiring in some cases adding more polymeric sand to the joints.
Regular maintenance is essential for preserving the integrity of a paver patio. Sweep the patio regularly to remove leaves, dirt, and debris. This will help to prevent the growth of weeds and moss. Inspect the patio periodically for any signs of settling or unevenness. Address any problems promptly to prevent them from becoming more severe. Reapply polymeric sand as needed to maintain the stability of the joints. It's important to avoid using a high-pressure washer directly on the pavers, as it can erode the joint material and cause the pavers to shift. If cleaning is necessary, use a mild detergent and a soft-bristled brush.

How To Fix Uneven Patio Pavers

Raise Sunken Patio Pavers

Raising And Leveling Sunken Patio Pavers Toolbox Divas

How To Fix Sunken Patio Pavers Family Handyman

Raising And Leveling Sunken Patio Pavers Toolbox Divas

Dammann S Garden Company Diy Series How To Install Level Pavers And Patio Stones

How To Fix An Uneven Paver Patio Ask This Old House

How To Relevel A Brick Patio 6 Steps With Pictures Instructables

The Ultimate Guide To Perfectly Leveling Your Patio Diy Tips

Dammann S Garden Company Diy Series How To Install Level Pavers And Patio Stones
Related Posts