How to Prepare Base for Patio Slabs
Preparing a solid base is crucial for the longevity and stability of any patio project. Patio slabs come in various materials, including concrete, stone, and porcelain, and their installation requires a well-compacted foundation to prevent sinking, cracking, or uneven surfaces.
Essential Steps to Prepare a Base for Patio Slabs
1. Site Assessment and Excavation
Begin by marking the perimeter of your patio area and excavating the soil to the desired depth. The depth will depend on the thickness of your patio slabs and the presence of any existing sub-base. As a general rule, excavate at least 150mm (6 inches) deep.
2. Sub-Base Installation
Once the excavation is complete, install a sub-base layer. This layer provides additional drainage and support for the patio slabs. Choose a sub-base material such as crushed stone, pea gravel, or MOT Type 1, and spread it evenly over the excavated area. Compact the sub-base thoroughly using a plate compactor or a heavy-duty tamper.
3. Compacting the Sub-Base
Proper compaction is key to creating a stable base. Use a plate compactor to compact the sub-base material in layers of 100mm (4 inches) at a time. Each layer should be thoroughly compacted before moving on to the next. Continue compacting until the sub-base is firm and shows minimal movement when walked on.
4. Levelling the Sub-Base
Once the sub-base is compacted, level it using a spirit level and a straight edge. Add or remove sub-base material as needed to create a flat and even surface. Ensure that the sub-base slopes away from the patio area to promote drainage.
5. Laying a Screed
A screed is used to create a level surface for the patio slabs. To make a screed, cut wooden stakes to the desired height of the finished patio and drive them into the sub-base around the perimeter of the area. Run a length of string between the stakes and use it as a guide to level the sub-base using a straight edge.
6. Laying a Sharp Sand Bedding Layer
Spread a layer of sharp sand over the compacted sub-base. This layer provides a fine levelling surface for the patio slabs and allows for minor adjustments during installation. The depth of the sharp sand bedding should be approximately 50mm (2 inches).
7. Compacting the Sharp Sand Bedding
Compact the sharp sand bedding using a light tamper or a vibrating plate. This will ensure that the sand is firm and evenly distributed, providing a stable base for the patio slabs.
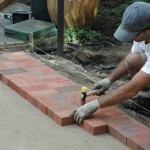
8. Laying the Patio Slabs
Before laying the patio slabs, check their level, thickness, and consistency. Start laying the slabs from one corner and work your way across the area. Use a rubber mallet to gently tap the slabs into place, ensuring they are level with each other using a spirit level.
9. Jointing and Finishing
Once the patio slabs are laid, fill the joints between them with a suitable jointing compound. This could be a mortar mix, sand, or a specialized jointing compound. Brush away any excess jointing material and clean the surface of the patio slabs.
10. Curing Time
Allow the patio slabs to cure properly before using them. Curing time varies depending on the weather and the type of jointing material used. Typically, it takes around 24-48 hours for the patio to become fully stable and ready for use.
By following these essential steps, you can ensure that your patio slab base is solid, well-drained, and provides a durable foundation for your outdoor space.

How To Lay Patio Slabs Buy Garden Paving

How To Lay A Paving Slab Base

How To Guides Paving Stones Direct

How To Lay Slabs On Soil Sand Grass Concrete Checkatrade

How To Build And Lay A Patio Marshalls

Preparing Ground For Concrete Slab In Melbourne A Comprehensive Guide

How To Build A Paving Slab Shed Base Waltons

Stone Paving Recommended Installation Details Boyle Patio Tralee

How To Lay Paving Slabs I Stone Zone Landscaping Centre The South S Most Reliable Supplier

Low Cost Solution Laying Paving Slabs
Related Posts