```html
How To Patch a Concrete Patio
Concrete patios, valued for their durability and versatility, are a common feature in residential landscapes. However, exposure to weather, heavy foot traffic, and general wear and tear can lead to cracks, pitting, and other forms of damage over time. Addressing these issues promptly is crucial to prevent further deterioration and extend the lifespan of the patio. Patching concrete is a practical and cost-effective solution for repairing minor damage and restoring the patio's appearance and functionality. This article provides a detailed guide on how to successfully patch a concrete patio.
Preparing the Damaged Area
Proper preparation is paramount for achieving a durable and aesthetically pleasing concrete patch. This phase involves cleaning, removing loose debris, and ensuring adequate bonding between the existing concrete and the patching material. Neglecting these steps can compromise the integrity of the repair and lead to premature failure.
Cleaning the Area: Begin by thoroughly cleaning the damaged area and the surrounding concrete. This involves removing any loose debris, dirt, oil, grease, or other contaminants. A stiff-bristled brush, a pressure washer (used with caution to avoid further damage), or a combination of both can be employed. For oil or grease stains, use a concrete degreaser and scrub the area thoroughly, following the manufacturer's instructions. Rinse the area with clean water and allow it to dry completely before proceeding.
Removing Loose Concrete: Carefully inspect the damaged area for any loose or crumbling concrete. Use a chisel and hammer or a wire brush to remove all unsound material. Avoid excessive hammering, as this can create further damage to the surrounding concrete. The goal is to create a sound, stable base for the patch to adhere to. Small cracks can be widened slightly to allow for better penetration of the patching compound.
Creating a Clean Edge: Undercutting the edges of the damaged area can improve the patch's mechanical interlock with the existing concrete. This can be achieved by angling the chisel slightly inward as you remove loose material. This creates a reverse bevel, which helps to hold the patch in place and prevent it from popping out over time. Ensure the edges are clean and free of dust or debris.
Applying a Bonding Agent: A bonding agent is crucial for ensuring a strong and lasting bond between the old concrete and the new patching material. Choose a bonding agent specifically designed for concrete repair. Apply the bonding agent according to the manufacturer's instructions, typically with a brush or roller. Generally, apply a thin, even coat to the prepared surface, ensuring it penetrates into the pores of the concrete. Allow the bonding agent to become tacky before applying the patching material. Some bonding agents require that the patching material be applied while the bonding agent is still wet.
Selecting and Mixing the Patching Material
Choosing the right patching material is essential for a successful repair. Various types of concrete patching compounds are available, each with different properties and suitable for specific applications. Understanding the characteristics of each type will help in selecting the most appropriate material for the specific damage and environmental conditions.
Types of Patching Material:
- Cement-Based Patching Compounds: These are the most common type of patching material and are suitable for a wide range of repairs on concrete patios. They are typically a blend of Portland cement, sand, and various additives to improve workability, adhesion, and durability.
- Epoxy-Based Patching Compounds: Epoxy patching compounds are known for their high strength and excellent adhesion. They are ideal for repairing cracks and spalls that require a very durable and long-lasting repair. Epoxy-based compounds are generally more expensive than cement-based options.
- Acrylic-Modified Patching Compounds: These compounds combine the properties of cement and acrylic polymers to enhance adhesion, flexibility, and water resistance. They are suitable for repairing surfaces that are subject to expansion and contraction due to temperature changes.
- Vinyl Patching Compounds: Vinyl patching compounds offer good adhesion and flexibility and are often used for thin repairs or resurfacing. They are generally less durable than epoxy or cement-based options for larger, deeper repairs.
Mixing the Patching Material: Follow the manufacturer's instructions carefully when mixing the patching material. The correct water-to-powder ratio is crucial for achieving the desired consistency and performance. Use a clean mixing container and a mixing paddle or trowel. Add water gradually to the powder, mixing continuously until a smooth, lump-free consistency is achieved. Avoid adding too much water, as this can weaken the patch. The patching material should be stiff enough to hold its shape but workable enough to spread and trowel smoothly.
Tinting the Patching Material: If desired, the patching material can be tinted to match the color of the existing concrete. Concrete coloring pigments are available in various shades. Add the pigment to the dry patching material before adding water, and mix thoroughly to ensure even distribution. Start with a small amount of pigment and gradually add more until the desired color is achieved. Remember that the color of the patch may lighten slightly as it dries.
Applying and Finishing the Patch
The application and finishing stages are critical for achieving a seamless and durable concrete patch. Proper techniques ensure that the patching material is properly compacted, level with the surrounding surface, and has a suitable finish.
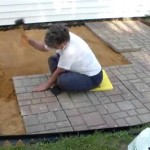
Applying the Patching Material: Using a trowel, apply the patching material to the prepared area, pressing it firmly into the cracks or voids. Ensure that the material completely fills the damaged area. Overfill the area slightly, as the patching material will shrink slightly as it cures. For deeper repairs, apply the patching material in layers, allowing each layer to partially cure before applying the next. This helps to prevent cracking and ensures proper bonding between layers.
Leveling the Patch: Once the patching material has been applied, use a trowel to level it with the surrounding concrete surface. Start by removing any excess material and then use a smooth, sweeping motion to blend the patch into the existing concrete. Pay close attention to the edges of the patch to ensure a seamless transition. A magnesium float can be used to further smooth the surface and remove any imperfections. For larger patches, a screed board can be used to ensure that the patch is level across the entire area.
Finishing the Patch: The appropriate finish depends on the desired aesthetic and functional requirements. A smooth finish is typically achieved by troweling the surface repeatedly as the patching material begins to harden. A broom finish, which provides better slip resistance, can be achieved by dragging a broom across the surface of the patch while it is still slightly wet. Experiment with different finishing techniques on a test area to determine the desired result. Consider if the existing patio had a specific finish and try to match the new patch to it.
Curing the Patch: Proper curing is essential for ensuring the strength and durability of the concrete patch. Curing involves keeping the patch moist for several days to allow the cement to hydrate properly. This can be achieved by covering the patch with plastic sheeting, burlap, or a curing compound. Keep the covering moist by spraying it with water regularly. The curing period is typically three to seven days, depending on the type of patching material and the environmental conditions. Avoid heavy foot traffic on the patch during the curing period.
Following these steps will contribute to a successful concrete patio patch, enhancing the appearance and longevity of the outdoor space. Regular inspections and timely repairs can prevent minor damage from escalating into more significant and costly problems.
```
5 Ways To Fix Ed Or Damaged Concrete Patio Cricket Pavers

How Can I Salvage A Crumbling Ed 24x24 Triangle Shaped Concrete Patio Without Tearing It Out Hometalk

Concrete Patching How To Bond Existing For Best Results Sakrete

How To Repair Concrete Patios Resurfacing Sealing Resin

Repairing Common Concrete Slab Problems Network

How To Patch A Ed Sidewalk Or Concrete Patio The Seattle Times

Ed Concrete Patio Restoration For 60

Avoid Safety Hazards Fix Ed Uneven Concrete Now

5 Key Considerations For Concrete Repairs Sakrete

How To Repair Concrete Steps Fix Chipped Twofeetfirst
Related Posts