How To Paint a Concrete Patio: A Comprehensive Guide
Painting a concrete patio can dramatically enhance the aesthetic appeal of an outdoor space, transforming a drab, utilitarian surface into a vibrant and inviting area. This process involves careful preparation, selection of appropriate materials, and precise application techniques. This guide provides a comprehensive overview of the steps required to successfully paint a concrete patio, ensuring a durable and visually pleasing result.
Before embarking on this project, it is crucial to assess the condition of the concrete surface. Cracks, spalling, and other forms of damage must be addressed prior to painting to prevent further deterioration and ensure proper paint adhesion. Additionally, consider the intended use of the patio and the desired aesthetic outcome. This will influence the choice of paint, color, and any additional protective coatings.
Key Point 1: Preparing the Concrete Surface
Surface preparation is arguably the most critical step in painting a concrete patio. Failure to adequately prepare the surface can lead to premature paint failure, including peeling, blistering, and cracking. The preparation process typically involves cleaning, repairing, and priming the concrete.
The first step in cleaning the concrete is to remove any loose debris, such as leaves, dirt, and dust. This can be accomplished with a broom or leaf blower. Following the removal of loose debris, the patio should be thoroughly washed to remove any surface contaminants, such as grease, oil, and mildew. A pressure washer is highly effective for this purpose, though a garden hose with a scrub brush can also be used. When using a pressure washer, exercise caution to avoid damaging the concrete surface. Maintain a safe distance and use a fan nozzle to distribute the water pressure evenly.
For stubborn stains, such as grease or oil, a concrete cleaner or degreaser may be required. Follow the manufacturer's instructions carefully when using these products, ensuring proper dilution and application. After applying the cleaner, scrub the affected area with a stiff-bristled brush and rinse thoroughly with water. In the case of mildew, a solution of bleach and water (typically a 1:3 ratio) can be applied to the affected area. Allow the solution to sit for 10-15 minutes before scrubbing and rinsing thoroughly.
After cleaning, allow the concrete surface to dry completely. This may take several days, depending on the weather conditions. It is crucial to ensure that the concrete is dry before proceeding to the next step, as moisture can interfere with paint adhesion.
Once the concrete is dry, inspect the surface for any cracks or other damage. Small cracks can be filled with a concrete patching compound. Follow the manufacturer's instructions for application, ensuring that the compound is properly mixed and applied to the crack. Use a putty knife to smooth the surface of the patching compound, ensuring that it is flush with the surrounding concrete. Allow the patching compound to dry completely before proceeding. For larger cracks or more extensive damage, professional concrete repair may be necessary.
Finally, after repairs, apply a concrete primer to the prepared surface. A concrete primer helps to improve paint adhesion and prevent moisture from penetrating the concrete. Choose a primer that is specifically designed for use on concrete surfaces. Apply the primer according to the manufacturer's instructions, using a brush, roller, or sprayer. Ensure that the primer is applied evenly and that all areas of the patio are covered. Allow the primer to dry completely before proceeding to the painting step.
Key Point 2: Selecting the Right Paint and Tools
The selection of appropriate paint and tools is crucial for achieving a durable and visually appealing finish. The type of paint chosen should be specifically formulated for use on concrete surfaces and should be resistant to weathering, abrasion, and chemicals.
Acrylic latex paint is a popular choice for concrete patios due to its durability, ease of application, and wide range of available colors. Epoxy paint is another option that offers excellent durability and resistance to chemicals, but it may be more expensive and require more specialized application techniques. Concrete stain is also a viable option, offering a more natural look while still providing protection to the concrete surface. When selecting a paint, consider the intended use of the patio, the desired aesthetic outcome, and the local climate conditions. Choose a paint that is specifically formulated for outdoor use and that is resistant to fading and cracking.
In addition to the paint itself, it is important to select the right tools for the job. A high-quality paint brush, roller, and paint tray are essential for applying the paint evenly and efficiently. A paint brush with synthetic bristles is recommended for use with latex paints, while a natural bristle brush may be more suitable for oil-based paints. Choose a roller with a nap length that is appropriate for the texture of the concrete surface. A longer nap roller is typically recommended for rough surfaces, while a shorter nap roller is suitable for smooth surfaces.
Other essential tools include a paint scraper, putty knife, drop cloths, painter's tape, and a mixing stick. A paint scraper is useful for removing any loose paint or debris from the concrete surface. A putty knife is used to apply patching compound to cracks and other imperfections. Drop cloths protect surrounding surfaces from paint splatters. Painter's tape is used to mask off areas that should not be painted, such as edges and trim. A mixing stick is used to thoroughly mix the paint before and during application.
When selecting tools, prioritize quality over price. High-quality tools will last longer and provide better results. Invest in brushes and rollers that are easy to clean and maintain. This will ensure that they are ready for future painting projects.
Key Point 3: Applying the Paint
The application of the paint is the final step in the process and requires careful attention to detail. Apply the paint in thin, even coats, allowing each coat to dry completely before applying the next.
Begin by stirring the paint thoroughly with a mixing stick. This ensures that the pigment is evenly distributed throughout the paint. If using multiple cans of paint, mix them together in a larger container to ensure color consistency.
Apply the paint to the edges and corners of the patio using a paint brush. This is known as "cutting in." Use painter's tape to create a clean edge along any adjoining surfaces, such as walls or landscaping. Apply the paint in smooth, even strokes, avoiding drips and runs.
Once the edges and corners have been painted, use a roller to apply the paint to the main surface of the patio. Load the roller with a moderate amount of paint, avoiding over-saturation. Apply the paint in overlapping strokes, ensuring that all areas of the patio are covered. Maintain a consistent pressure on the roller to ensure an even application. Work in small sections at a time, rolling the paint in multiple directions to eliminate any streaks or roller marks.
Allow the first coat of paint to dry completely before applying the second coat. The drying time will vary depending on the type of paint used and the ambient weather conditions. Consult the manufacturer's instructions for recommended drying times. Before applying the second coat, inspect the surface for any imperfections, such as drips or runs. Use a paint scraper to remove any imperfections before proceeding.
Apply the second coat of paint in the same manner as the first coat. Ensure that all areas of the patio are covered and that the paint is applied evenly. Allow the second coat to dry completely before using the patio. The curing time for the paint may be longer than the drying time. Consult the manufacturer's instructions for recommended curing times.
After the paint has cured, consider applying a clear sealant to protect the painted surface from weathering and abrasion. A sealant will also help to prevent staining and fading. Choose a sealant that is specifically designed for use on concrete surfaces and that is compatible with the paint that was used. Apply the sealant according to the manufacturer's instructions.
Regular maintenance is essential for preserving the appearance and durability of the painted concrete patio. Sweep the patio regularly to remove any dirt or debris. Wash the patio periodically with a mild detergent and water. Avoid using harsh chemicals or abrasive cleaners, as these can damage the painted surface. Repair any cracks or chips in the paint as soon as they appear to prevent further deterioration.
By following these steps carefully, it is possible to successfully paint a concrete patio and transform an outdoor space into a beautiful and inviting area. Proper preparation, selection of appropriate materials, and precise application techniques are crucial for achieving a durable and visually pleasing result.

How To Paint A Concrete Porch Or Patio

How To Paint A Porch Floor With Concrete The Honeycomb Home

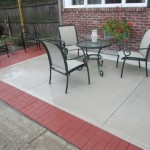
Before And After Painted Concrete Patio Thistlewood Farm

How To Paint A Concrete Porch Or Patio

How To Paint A Concrete Patio Exquisitely Unremarkable

How To Paint A Concrete Porch Or Patio
:max_bytes(150000):strip_icc()/cement-tile-1-of-1-683x1024-f5a283b105e04abf8729e7390f9148bc.jpg?strip=all "15 Painted Concrete Patio Designs")
15 Painted Concrete Patio Designs
:max_bytes(150000):strip_icc()/faux-painted-rug2-5d0d2b1a8ddd4c60a39ffd329840874e.jpg?strip=all "15 Painted Concrete Patio Designs")
15 Painted Concrete Patio Designs

Backyard Makeover How To Paint Concrete Look Like Oversize Pavers A House Full Of Sunshine

Painted Concrete Slab And Brick Pavers One Year Later So Much Better With Age
Related Posts