How To Make A Small Patio Area On Grass
Creating a small patio area on grass can significantly enhance the usability and aesthetic appeal of a lawn. It provides a designated space for outdoor seating, dining, relaxation, or even a small fire pit. The process, while requiring some effort, is achievable for most homeowners with basic DIY skills and the right tools. This article details the necessary steps, considerations, and best practices for constructing a functional and attractive small patio on grass.
Before commencing any physical work, careful planning is crucial. This involves assessing the site, determining the desired dimensions and shape of the patio, and selecting appropriate materials. A well-defined plan will not only streamline the construction process but also minimize potential errors and wasted resources.
1. Planning and Preparation
The initial step in planning involves accurately measuring the intended patio area. Consider the purpose of the patio and how many people it will need to accommodate. A small patio intended for a bistro set might only require a 6x6 foot area, while one intended for a small dining table and chairs might need a 10x10 foot space or larger. Use measuring tape and stakes to mark the perimeter of the intended patio directly on the grass. Visualizing the space in this manner allows for easy adjustments before any digging begins.
Once the dimensions are confirmed, consider the shape of the patio. While rectangular or square patios are the easiest to construct, curved or irregular shapes can add visual interest. However, more complex shapes require more material waste and skill in cutting and laying the patio surface. If contemplating a curved design, use a flexible material like garden hose or rope to delineate the shape before finalizing it.
Material selection is another critical aspect of the planning phase. Common patio materials include pavers, flagstone, gravel, and composite decking. Each material offers unique aesthetic qualities, durability characteristics, and cost considerations. Pavers, for example, offer a wide variety of colors, shapes, and sizes and are relatively easy to install. Flagstone provides a natural, rustic look but can be more challenging to lay due to its irregular shapes. Gravel is a cost-effective option for informal patios but may require more maintenance to keep it level and contained. Composite decking offers a low-maintenance, weather-resistant alternative, but may be more expensive upfront.
Regardless of the chosen material, it is essential to calculate the required quantity. Measure the area of the patio in square feet (or square meters) and consult with a local supplier to determine the appropriate amount of material to purchase. It is generally advisable to order slightly more material than calculated to account for cuts, breakage, and potential future repairs. Don't forget to factor in the materials for the base, such as gravel and sand, and any edging materials like timber, metal, or plastic edging.
Before proceeding with construction, it is crucial to check for underground utilities, such as gas lines, water pipes, and electrical cables. Contact the local utility companies to request a utility locate service. This free service will mark the location of any buried utilities on the property, preventing accidental damage during excavation. Neglecting this step can lead to costly repairs and, in some cases, serious injury.
2. Excavation and Base Preparation
Once the planning phase is complete, the next step is to prepare the site by excavating the grass and soil. Using a spade or shovel, carefully remove the sod and topsoil within the marked patio area. The depth of excavation will depend on the chosen patio material and the desired finished height. Generally, an excavation depth of 6-8 inches is sufficient for most paver or flagstone patios. For gravel patios, a shallower depth of 4-6 inches may suffice.
Ensure that the excavation is level and consistent across the entire patio area. Use a spirit level and a long board to check for levelness. Any high spots can be removed with a shovel, and any low spots can be filled with soil. Compacting the soil at the bottom of the excavation is crucial to provide a stable base for the patio. Use a hand tamper or a plate compactor to compact the soil thoroughly. This step helps prevent settling and ensures that the patio remains level over time.
After compacting the soil, a layer of gravel is typically installed as a base. This layer provides drainage and helps to distribute the weight of the patio more evenly. A 4-inch layer of crushed gravel is recommended for most patios. Spread the gravel evenly across the excavated area and use a rake to distribute it. Again, use a hand tamper or plate compactor to compact the gravel layer thoroughly. This will create a solid and stable foundation for the patio surface.
On top of the gravel base, a layer of sand is often added to provide a smooth and level surface for laying the patio material. A 1-inch layer of leveling sand is typically sufficient. Use a rake to spread the sand evenly across the gravel base. Screed the sand with a long, straight board to create a perfectly level surface. This is a critical step for ensuring that the patio surface is even and that pavers or flagstones are easy to lay.
If using edging materials, install them at this stage. Edging helps to contain the patio material and prevent it from spreading into the surrounding lawn. Timber edging can be installed by driving stakes into the ground behind the timber. Metal or plastic edging typically has built-in stakes that are driven into the ground to secure it. Ensure that the edging is level with the surrounding lawn and that it is securely anchored.
3. Laying the Patio Surface
With the base prepared and the edging installed, the next step is to lay the patio surface. This involves carefully placing the chosen material (pavers, flagstone, gravel, or composite decking) onto the prepared base. The specific technique for laying the surface will depend on the chosen material.
For pavers, start by laying the pavers along one edge of the patio. Use a rubber mallet to gently tap each paver into place. Ensure that the pavers are level with each other and that there are consistent gaps between them. Use paver spacers to maintain consistent gaps. As you lay the pavers, periodically check the levelness with a spirit level and adjust as needed. Cut pavers to fit around the edges of the patio using a paver splitter or a circular saw with a masonry blade. Always wear safety glasses and gloves when cutting pavers.
For flagstone, the laying process is similar to that of pavers, but it requires more attention to detail due to the irregular shapes of the stones. Start by selecting the largest and most visually appealing stones for the center of the patio. Arrange the stones in a pattern that is pleasing to the eye. Use a rubber mallet to gently tap each stone into place. Fill the gaps between the stones with polymeric sand or gravel. Wet the polymeric sand with water to activate the binding agents.
For gravel patios, simply spread the gravel evenly across the prepared base. Use a rake to distribute the gravel and create a level surface. The gravel may need to be replenished periodically as it settles or washes away. Consider using a landscape fabric underneath the gravel to prevent weeds from growing through.
For composite decking, follow the manufacturer's instructions for installation. Typically, this involves attaching the decking boards to a frame made of pressure-treated lumber. Ensure that the frame is level and that the decking boards are properly spaced. Use corrosion-resistant screws to secure the decking boards to the frame.
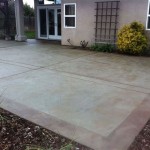
After laying the patio surface, sweep the area to remove any debris. If using pavers or flagstone, consider sealing the surface with a paver sealer to protect it from stains and weathering. This will also enhance the color of the stones and make them easier to clean. Allow the sealer to dry completely before placing furniture on the patio.
Creating a small patio area on grass involves careful planning, thorough preparation, and precise execution. By following these steps and paying attention to detail, homeowners can create a functional and aesthetically pleasing outdoor space that will enhance their enjoyment of their property. Remember to prioritize safety throughout the construction process and to consult with professionals if you are unsure about any aspect of the project.

10 Small Backyard Ideas For Artificial Grass Purchase Green

How To Make Outdoor Space Feel Bigger From Interior Designers

12 Stunning Backyard Landscaping Ideas For A Small Area

17 Small Yard Landscaping Ideas Extra Space Storage

50 Stylish Small Patio Ideas Designer Patios Tips And Tricks

The Best Small Patio Ideas To Enjoy This Summer

10 Small Backyard Ideas For Artificial Grass Purchase Green

16 Green Upgrades For Your Backyard Extra Space Storage

28 Small Backyard Turf Ideas For Your Outdoor Space

1 Dozen Ways To Make The Most Of A Small Yard Landscaping Modern Backyard Ideas For Yards
Related Posts