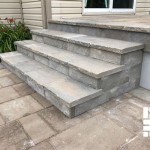
How to Level Ground for Patio Slabs by Hand
A level foundation is crucial for a stable and aesthetically pleasing patio. While heavy machinery can expedite the process, leveling ground by hand offers a cost-effective solution for smaller projects and situations where access for machinery is limited. This article outlines the necessary steps and considerations for manually preparing a level base for patio slabs.
1. Planning and Marking the Area
Accurate planning is the first step in any successful patio project. Begin by clearly marking the desired patio area using stakes and string. This outline provides a visual guide for excavation and ensures accurate dimensions. Consider the desired height of the patio in relation to surrounding features, accounting for the thickness of the patio slabs and the base material. This planning stage also involves checking for any underground utilities and obtaining necessary permits if required.
Once the area is marked, calculate the required depth of excavation. This depth is determined by the combined thickness of the patio slabs and the base material, typically a layer of compacted gravel. A general rule of thumb is a 4-6 inch gravel base for standard patio slabs. Adding a layer of sand on top of the compacted gravel, about 1 inch thick, provides a final leveling layer for the slabs.
2. Excavating and Removing Soil
Excavation begins within the marked area, removing the topsoil and existing vegetation. A flat-nosed shovel is effective for removing sod and loosening soil, while a pointed shovel assists in digging deeper. Gradually excavate the area to the planned depth, consistently checking the level throughout the process. A spirit level placed on a straight board spanning the excavated area helps ensure an even depth. Remove excavated soil responsibly, either by distributing it throughout the garden or arranging for its removal.
During excavation, consider the natural slope of the land. Ideally, the patio area should have a slight slope away from any structures to facilitate water runoff and prevent pooling. A slope of approximately 1/8 inch per foot is generally recommended. This can be achieved by gradually excavating to slightly different depths across the area.
3. Compacting the Base
A compacted base is essential for preventing settling and ensuring the long-term stability of the patio. Once the excavation is complete, add the gravel base material in layers, compacting each layer before adding the next. A hand tamper, readily available at most hardware stores, is effective for compacting smaller areas. For larger areas, consider renting a plate compactor for more efficient compaction.
Each layer of gravel should be approximately 2-3 inches thick before compaction. Thorough compaction is crucial to achieve a stable base. Multiple passes with the hand tamper or plate compactor ensures optimal compaction and minimizes the risk of future settling.
After compacting the gravel base, add a 1-inch layer of sand. This layer provides a final leveling surface for the patio slabs and allows for minor adjustments during installation. The sand layer is leveled using a straight edge and screed, ensuring a smooth and even surface for the slabs to rest upon.
4. Checking and Maintaining Level
Throughout the entire process, consistently check the level of the excavated area and the compacted base. Use a long, straight board and a spirit level to ensure an even surface. Address any high or low spots by adding or removing material as needed. This meticulous attention to level during the preparation phase simplifies the slab installation process and ensures a professional finish.
Once the slabs are laid, regular maintenance helps preserve the level and integrity of the patio. Periodically inspect the patio for any signs of settling or movement. Address any issues promptly to prevent further damage and maintain the longevity of the patio.

Full Article Design Of Pavement Structures Consisting Paving Slabs With Hydraulically Bound Joints And Bedding

Full Article Design Of Pavement Structures Consisting Paving Slabs With Hydraulically Bound Joints And Bedding

Full Article Effect Of Tie Bars On The Field Performance Depth Repair Concrete Pavement

Full Article Optimal Design For Concrete Pavement Situated Above Box Culvert Experimental And Numerical Study

Full Article Stone Pavement Materials And Construction Methods In Europe North America Between The 19th 20th Century

Full Article Stone Pavement Materials And Construction Methods In Europe North America Between The 19th 20th Century

Full Article Design Of Pavement Structures Consisting Paving Slabs With Hydraulically Bound Joints And Bedding

How Hardscaping Works Howstuffworks

Assessment Of The Performance Spread Footings And Mat Foundations On Expansive Soils Sciencedirect

Sampietrini Stone Pavements Distress Ysis Using Pavement Condition Index Method
Related Posts