How To Lay Patio Stones On Dirt: A Comprehensive Guide
Creating a patio can significantly enhance outdoor living spaces, providing an area for relaxation, entertainment, and dining. Laying patio stones directly on dirt, instead of a concrete base, offers a more economical and flexible option, particularly for smaller or temporary patios. While this method requires meticulous preparation and execution, the resulting patio can be both functional and aesthetically pleasing. This article outlines the essential steps involved in successfully laying patio stones on dirt, ensuring a durable and attractive outdoor feature.
Planning and Preparation: The Foundation of a Successful Patio
Proper planning and preparation are paramount to the longevity and stability of a patio laid on dirt. This stage involves assessing the site, determining the layout, and gathering the necessary materials and tools. A thorough approach at this point minimizes potential issues later in the project.
The first step is to evaluate the intended site. Consider the existing landscape, including the slope of the ground, drainage patterns, and the presence of any underground utilities. A slight slope away from the house is desirable for effective water runoff. Marked utility lines must be avoided to prevent damage during excavation.
Next, determine the desired size and shape of the patio. Using stakes and string, outline the perimeter of the patio area. This allows for a visual representation of the finished project and facilitates accurate measurements for material calculations. Consider the dimensions of the patio stones being used to optimize layout and minimize cuts.
Calculating the amount of materials needed is crucial for staying within budget and avoiding unnecessary trips to the hardware store. The primary materials include the patio stones themselves, landscape fabric, paver base (crushed gravel or stone), and leveling sand. Calculate the square footage of the patio area to determine the quantity of patio stones required. Add an additional 5-10% to account for cuts and breakage.
The paver base provides a stable foundation for the patio stones. The depth of the paver base depends on the soil type and the anticipated foot traffic. A minimum of 4 inches is generally recommended for light-use patios, while 6-8 inches is preferable for areas subjected to heavier loads. Calculate the volume of paver base needed based on the patio area and desired depth. Similarly, determine the amount of leveling sand required, typically a 1-inch layer. Landscape fabric is used to prevent weed growth and stabilize the soil. Calculate the amount needed by adding an overlap of about 1 foot around the perimeter of the patio area.
Gather the necessary tools for the project. Essential tools include a shovel, garden rake, tamper (either manual or powered), level, measuring tape, wheelbarrow, safety glasses, work gloves, and a rubber mallet. Depending on the type of patio stones and the complexity of the layout, a circular saw with a masonry blade or a paver splitter may also be required for cutting stones.
Excavation and Base Preparation: Creating a Stable Foundation
With the planning phase complete, the next step involves excavating the area and preparing a solid base. This is a physically demanding stage, but it is critical for preventing settling and ensuring a level patio surface.
Using a shovel, excavate the soil within the marked perimeter to the desired depth. The depth should account for the thickness of the patio stones, the leveling sand, and the paver base. For example, if the patio stones are 2 inches thick, the leveling sand is 1 inch thick, and the paver base is 4 inches thick, the excavation depth should be 7 inches. Ensure the excavated area is level, using a level and measuring tape to check the depth at various points. Maintain a slight slope (approximately 1/4 inch per foot) away from any buildings for proper drainage.
Once the excavation is complete, compact the exposed soil using a tamper. This helps to create a firm and stable surface for the paver base. Pay particular attention to the edges of the excavated area, ensuring that the soil is well compacted to prevent erosion.
Next, lay down the landscape fabric. This fabric acts as a barrier, preventing weeds from growing up through the patio stones and also helping to stabilize the soil. Overlap the edges of the fabric by at least 6 inches and extend the fabric beyond the perimeter of the patio area.
Now, spread the paver base material evenly over the landscape fabric. Use a shovel and garden rake to distribute the material, aiming for a consistent depth across the entire area. Once the paver base is spread, compact it thoroughly using a tamper. Multiple passes with the tamper may be necessary to achieve a dense and stable base. Use a level to check for any inconsistencies and add or remove material as needed.
After compacting the paver base, add a 1-inch layer of leveling sand. This sand provides a smooth and uniform surface for setting the patio stones. Use a garden rake to spread the sand evenly and then compact it lightly with a tamper. A screed board can be used to create a perfectly level surface. A screed board is a long, straight piece of wood or metal that is dragged across the sand to level it. Rest the screed board on two parallel pipes or boards placed at the desired sand depth.
Laying the Patio Stones: Achieving a Level and Aesthetically Pleasing Surface
With the base meticulously prepared, the final step involves laying the patio stones. This phase requires careful attention to detail to ensure a consistent surface and an attractive appearance.
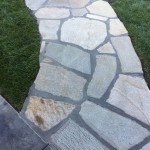
Begin by laying the patio stones along one edge of the patio area, working your way across the entire surface. Position each stone carefully, ensuring that it is level with the surrounding stones. Use a rubber mallet to gently tap the stones into place. Check for levelness frequently using a level.
Maintain consistent spacing between the stones to create uniform joints. The width of the joints will depend on the type of patio stones being used and the desired aesthetic. Typically, joints are between 1/4 inch and 1 inch wide. Spacers can be used to maintain consistent joint widths during installation.
If necessary, cut the patio stones to fit the edges of the patio area. This can be done using a circular saw with a masonry blade or a paver splitter. Always wear safety glasses when cutting stones to protect the eyes from flying debris. Measure and mark the stones accurately before cutting to ensure a precise fit.
As the patio stones are laid, periodically check the overall levelness of the surface using a long level or a string level. Adjust the height of individual stones by adding or removing leveling sand beneath them. Take care to avoid disturbing the surrounding stones during this process.
Once all the patio stones are laid, sweep sand into the joints between the stones. This helps to lock the stones in place and prevent them from shifting. Use a broom or a brush to work the sand into the joints, ensuring that they are completely filled. Water the patio lightly to help settle the sand.
After watering, re-inspect the joints and add more sand as needed. Repeat this process until the joints are completely filled and the sand is compacted. The patio is now ready for use. Regular maintenance, such as sweeping and occasional washing, will help to keep the patio looking its best for years to come.

How To Prep Lay A Base For Pavers Western Interlock

How To Lay Patio Pavers On Dirt Jim The Handyman

Diy Booster Learn How To Lay Pavers Like A Pros

Dry Laying Slabs On Gravel Or Sand Instruction Kronos Ceramiche Floor Coverings In Porcelain Stoneware

Dry Laying Slabs On Gravel Or Sand Instruction Kronos Ceramiche Floor Coverings In Porcelain Stoneware

How To Lay Pavers On Sand Or Dirt Premier Stone

Diy Pea Gravel Patio With Pavers Love Renovations

Paver Installation Landscaping Network

Installing Patio Stones 5 Easy Steps Shaw Brick

How To Build And Lay A Patio Marshalls
Related Posts