How To Install Patio Pavers: A Home Depot USA Guide
Installing a paver patio can significantly enhance outdoor living space and increase property value. Home Depot USA offers a wide range of pavers and necessary materials, making it a convenient option for homeowners undertaking this project. This article provides a comprehensive guide to installing a paver patio, drawing on commonly recommended practices and materials available at Home Depot.
Planning and Preparation
Before commencing the physical installation, meticulous planning is paramount. This stage involves assessing the area, determining the desired size and shape of the patio, and selecting the appropriate pavers and other materials. Accurate planning ensures a smooth and efficient installation process, minimizing material waste and potential rework.
The initial step is to define the patio area. Mark the perimeter using stakes and string lines. Ensure the marked area accurately reflects the intended design. Home Depot offers various marking paints and tools to facilitate this process. Consider the surrounding landscape and existing structures to ensure the patio seamlessly integrates with the overall aesthetic.
Next, calculate the necessary materials. Determine the square footage of the patio area. Pavers are typically sold by square foot or by the pallet. Home Depot sales associates can assist in calculating the required quantity based on the chosen paver size and pattern. It is prudent to order slightly more pavers than calculated to account for cuts and potential breakage. Typically, adding 5-10% extra is sufficient.
Besides pavers, other essential materials include base material (gravel), leveling sand, edge restraints, and paver sealant (optional). The base material provides a stable foundation for the pavers and ensures proper drainage. Leveling sand creates a smooth surface for setting the pavers. Edge restraints prevent the pavers from shifting over time. Home Depot offers various options for each of these materials, and choosing the right ones is crucial for the patio's longevity.
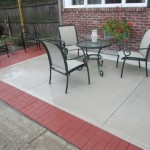
When selecting pavers, consider factors such as color, texture, size, and material. Home Depot offers a wide variety of concrete pavers, brick pavers, and natural stone pavers. Concrete pavers are durable and cost-effective, while brick pavers offer a classic aesthetic. Natural stone pavers provide a unique and natural look but may be more expensive. It's advisable to order samples of different pavers to assess their appearance and suitability for the project.
Finally, gather the necessary tools. Essential tools include a shovel, rake, tamper, level, measuring tape, circular saw with a masonry blade (for cutting pavers), safety glasses, work gloves, and a wheelbarrow. Home Depot sells or rents all these tools. Proper tools not only make the job easier but also contribute to a professional-looking outcome.
Excavation and Base Preparation
Proper excavation and base preparation are critical for the stability and longevity of the paver patio. The base provides a solid foundation that prevents settling and ensures proper drainage. Inadequate base preparation can lead to uneven surfaces, cracked pavers, and ultimately, a failed patio.
First, excavate the area to the required depth. The depth will depend on the thickness of the pavers, the depth of the base material, and the depth of the leveling sand. As a general guideline, excavate to a depth of approximately 8-10 inches below the desired finished surface. The exact depth will vary depending on the specific materials and soil conditions. Consult with Home Depot staff or online resources to determine the appropriate excavation depth for the specific project.
After excavation, compact the subgrade. Use a plate compactor to thoroughly compact the soil. A well-compacted subgrade provides a stable base for the subsequent layers. Home Depot rents plate compactors, making them readily accessible for this step. Ensure the subgrade is level and free of debris.
Next, install the base material. Typically, crushed gravel is used as the base material. Spread the gravel evenly over the excavated area and compact it in lifts (layers) of approximately 2-4 inches. This ensures thorough compaction and prevents voids within the base. Home Depot offers various types of gravel suitable for paver bases. Choose a gravel that is well-graded, meaning it contains a range of particle sizes. This will provide better compaction and stability.
After compacting the base material, ensure it is level and sloped slightly for drainage. A slight slope of approximately 1/4 inch per foot is sufficient to allow water to drain away from the patio. Use a level and a measuring tape to check the slope. Correct any low spots by adding more gravel and re-compacting.
Finally, install edge restraints. Edge restraints prevent the pavers from shifting and maintain the patio's shape. Home Depot offers various types of edge restraints, including plastic, metal, and concrete options. Choose an edge restraint that is compatible with the chosen pavers and the overall design. Install the edge restraints around the perimeter of the patio, ensuring they are securely anchored to the base material.
Paver Installation and Finishing
The final stage involves laying the pavers, leveling them, and securing them in place. This requires patience and attention to detail to ensure a uniform and visually appealing surface. Rushing this stage can lead to uneven surfaces and aesthetically displeasing results.
Begin by spreading a layer of leveling sand over the compacted base material. The leveling sand should be approximately 1 inch thick. Use a screed board or a straightedge to level the sand, creating a smooth and even surface. Home Depot sells leveling sand specifically designed for paver installations. Avoid using too much sand, as this can lead to instability. The goal is to create a thin, uniform layer that provides a stable bedding for the pavers.
Next, lay the pavers according to the chosen pattern. Start in one corner and work outwards. Place each paver carefully and gently press it into the leveling sand. Maintain consistent spacing between the pavers. Home Depot offers paver spacers that help maintain uniform spacing. Use a rubber mallet to gently tap the pavers into place, ensuring they are level with each other.
As pavers are laid, continuously check for level. Use a level to ensure each paver is level both individually and in relation to the surrounding pavers. If a paver is too high or too low, adjust the leveling sand beneath it. Add or remove sand as needed to achieve a level surface.
When reaching the edges of the patio, it may be necessary to cut pavers to fit. Use a circular saw with a masonry blade to cut the pavers. Always wear safety glasses and work gloves when cutting pavers. Home Depot sells or rents circular saws and masonry blades suitable for this task. Make precise cuts to ensure a clean and professional finish.
Once all the pavers are laid, sweep joint sand into the joints between the pavers. Joint sand fills the gaps and locks the pavers together. Home Depot offers polymeric sand, which is a type of joint sand that hardens when wetted, providing increased stability and weed resistance. Sweep the sand into the joints using a broom. Compact the sand by running a plate compactor over the pavers. Protect the paver surface with a geotextile fabric to prevent scratching during compaction. After compaction, sweep away any excess sand.
Finally, consider applying a paver sealant. Paver sealant protects the pavers from stains, fading, and weathering. Home Depot offers various paver sealants. Choose a sealant that is compatible with the chosen pavers and the desired finish. Follow the manufacturer's instructions for application. Sealing the pavers can significantly extend their lifespan and maintain their appearance.
Key points of the installation:
Accurate Measurement and Material Calculation
The success of any paver installation hinges on the precision of measurements and the accuracy of material calculations. This element ensures the project stays within budget, reduces waste, and prevents delays caused by material shortages. Using tools like measuring tapes, calculators, and online estimating tools from Home Depot can aid in determining the required quantities of pavers, base materials, and sand. It also involves factoring in potential cuts and breakages, necessitating the purchase of extra materials to prevent unforeseen disruptions during the installation process.
Proper Base Preparation
The base layer serves as the backbone of a paver patio, offering stability and facilitating drainage. Inadequate base preparation is a common cause of paver patios failing prematurely. The guide highlights the importance of excavating to the right depth, compacting the subgrade, and layering crushed gravel evenly. Proper compaction ensures the base can withstand weight and environmental factors without shifting or settling, which can cause uneven surfaces and other problems later on. Using equipment like plate compactors and ensuring the base is sloped slightly supports water runoff and reduces moisture-related damage.
Consistent Leveling and Spacing
Maintaining consistent leveling and spacing between pavers is essential for both the aesthetic and functional aspects of the patio. Uneven pavers create tripping hazards and detract from the visual appeal. This section stresses the importance of using leveling sand effectively and utilizing tools such as levels and rubber mallets. Regular checking and adjustment during installation helps in achieving a uniform and visually appealing surface. Consistent spacing ensures proper joint filling and prevents pavers from rubbing against one another, which can cause damage over time.

How To Install Patio Pavers The Home Depot

How To Install Patio Pavers The Home Depot

How To Install Patio Pavers The Home Depot

How To Install Patio Pavers The Home Depot

How To Install Patio Pavers The Home Depot

How To Install A Paver Patio The Home Depot

How To Build A Paver Patio Rogue Engineer

How To Build A Paver Patio Rogue Engineer

How To Install A Diy Paver Patio The Easy Way Angela Marie Made

How To Install A Diy Paver Patio The Easy Way Angela Marie Made
Related Posts