How To Install Patio Pavers DIY: A Comprehensive Guide
Installing a patio using pavers is a rewarding DIY project that enhances outdoor living spaces and increases property value. While the process requires physical effort and attention to detail, it's achievable for homeowners with basic construction skills and a willingness to learn. This guide provides a step-by-step approach to ensure a successful paver patio installation.
Planning and Preparation: Laying the Groundwork for Success
Before commencing any physical work, thorough planning is crucial. This phase involves determining the patio's size, shape, and location, choosing the appropriate paver type, and calculating the necessary materials. Accurate planning minimizes waste and ensures a visually appealing and structurally sound result.
Determining the Patio Area: Begin by visualizing the desired patio size and shape within the yard. Consider the intended use of the patio – will it primarily serve as a dining area, a relaxation space, or a combination of both? Mark the perimeter of the proposed patio using marking paint or stakes and string. Ensure the area is suitable in terms of sunlight exposure, proximity to the house, and overall landscape integration.
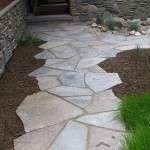
Selecting the Paver Type: Pavers are available in a wide variety of materials, shapes, colors, and textures. Common choices include concrete pavers, brick pavers, and natural stone pavers. Concrete pavers offer a balance of affordability and durability and come in numerous styles. Brick pavers provide a classic, traditional aesthetic. Natural stone pavers, such as flagstone or bluestone, offer a unique, organic look but are generally more expensive and may require specialized installation techniques. Consider the overall aesthetic of the surrounding landscape and choose pavers that complement the existing style. Beyond aesthetics, consider the paver's thickness and intended use. Areas subject to heavy foot traffic or vehicle traffic will require thicker, more robust pavers.
Calculating Materials: Once the paver type is selected and the patio area is defined, calculate the required quantity of pavers, base material (typically gravel), and bedding sand. Measure the length and width of the patio area to determine the square footage. Add a 5-10% allowance for cuts and breakage. Consult the paver manufacturer's specifications to determine the number of pavers required per square foot. Calculate the volume of base material needed by multiplying the patio area by the desired depth of the base layer (typically 4-6 inches). Similarly, calculate the volume of bedding sand, typically 1 inch thick. It's advisable to purchase slightly more material than calculated to account for unforeseen circumstances.
Gathering Tools and Equipment: A successful paver installation requires a specific set of tools and equipment. Essential items include a shovel, a wheelbarrow, a tamper (hand tamper or plate compactor), a level (both a long level and a torpedo level), a rubber mallet, a measuring tape, a circular saw with a diamond blade (for cutting pavers), safety glasses, work gloves, and marking paint or stakes and string. Renting a plate compactor can greatly simplify the compaction process, especially for larger patios.
Preparing the Site: Excavation and Base Construction
Proper site preparation is paramount for the long-term stability and performance of the paver patio. This involves excavating the designated area, constructing a solid base, and ensuring proper drainage.
Excavating the Area: Excavate the soil within the marked perimeter to a depth that accounts for the paver thickness, the bedding sand layer (approximately 1 inch), and the base layer (typically 4-6 inches). The total excavation depth will vary depending on the chosen paver thickness and the desired base depth. Remove all vegetation, roots, and debris from the excavated area. Ensure the excavation is level and uniform.
Installing the Base Layer: The base layer provides a stable foundation for the pavers, distributing weight and preventing settling. Spread the base material evenly over the excavated area, using a shovel and rake. The base material should consist of compacted gravel, typically crushed stone or gravel with a diameter of 3/4 inch or less. Compact the base material in layers, using a hand tamper or plate compactor. Each layer should be no more than 2-3 inches thick. Thorough compaction is essential to prevent the base from settling over time. Check the level of the base layer frequently using a long level. Ensure the base slopes slightly away from the house to facilitate drainage. A slope of 1/4 inch per foot is generally sufficient.
Installing Edge Restraints: Edge restraints, such as paver edging or concrete curbing, are crucial for containing the pavers and preventing them from shifting horizontally over time. Install the edge restraints around the perimeter of the patio, following the manufacturer's instructions. Secure the edge restraints firmly in place using spikes or stakes. Ensure the top of the edge restraints is flush with the desired finished paver level.
Laying the Pavers: Creating the Patio Surface
With the site properly prepared, the pavers can be laid according to the chosen pattern. Accuracy and attention to detail are essential during this phase to ensure a visually appealing and structurally sound patio surface.
Spreading the Bedding Sand: Spread a 1-inch layer of bedding sand evenly over the compacted base material. The bedding sand provides a level surface for the pavers to rest on. Use a screed board to smooth and level the sand. A screed board is a long, straight piece of lumber that is pulled across the sand surface to create a uniform thickness. Ensure the sand layer is consistently 1 inch thick and free of any lumps or debris. Avoid walking on the prepared sand bed.
Laying the Pavers: Begin laying the pavers according to the chosen pattern. Start in a corner or along an edge and work outwards. Gently place each paver onto the prepared sand bed, ensuring it is level and aligned with the adjacent pavers. Use a rubber mallet to gently tap the pavers into place, ensuring they are firmly seated in the sand. Maintain consistent spacing between the pavers. A gap of 1/8 to 1/4 inch is typically recommended. Use paver spacers to ensure consistent spacing. Periodically check the level of the pavers using a torpedo level. If a paver is not level, adjust the sand beneath it accordingly. To cut pavers to fit around edges or obstacles, use a circular saw with a diamond blade. Always wear safety glasses and a dust mask when cutting pavers.
Compacting the Pavers: After all the pavers have been laid, compact the entire patio surface using a plate compactor. This will further seat the pavers in the sand bed and ensure a uniform level. Spread a thin layer of fine sand over the paver surface before compacting to prevent damage to the pavers. Run the plate compactor over the patio surface in overlapping passes. Pay particular attention to the edges and corners.
Finishing Touches: Enhancing the Patio's Appearance and Stability
The final steps involve filling the joints between the pavers with sand, sealing the pavers (optional), and cleaning the patio. These finishing touches enhance the patio's appearance and provide added stability and protection.
Filling the Joints: After compacting the pavers, sweep fine sand into the joints between the pavers. The sand helps to lock the pavers together and prevent weeds from growing in the joints. Use a broom to sweep the sand back and forth across the patio surface, ensuring all the joints are completely filled. Repeat this process several times, allowing the sand to settle into the joints. Use a hose with a gentle spray nozzle to lightly wet the paver surface. This will help the sand to settle further into the joints. Avoid overwatering, as this can wash the sand away.
Sealing the Pavers (Optional): Sealing the pavers provides added protection against stains, fading, and weathering. Paver sealers are available in a variety of finishes, including matte, semi-gloss, and high-gloss. Choose a sealer that is appropriate for the chosen paver type and desired aesthetic. Apply the sealer according to the manufacturer's instructions. Typically, the sealer is applied with a roller or sprayer. Allow the sealer to dry completely before using the patio.
Cleaning the Patio: Once the sealer (if applied) has dried, clean the patio thoroughly to remove any remaining sand, dust, or debris. Use a broom or a hose with a spray nozzle to clean the patio surface. If necessary, use a mild detergent to remove stubborn stains. Avoid using harsh chemicals or abrasive cleaners, as these can damage the pavers.
Addressing Common Problems
Even with careful planning and execution, certain problems can arise during or after paver patio installation. Addressing these issues promptly is crucial to maintaining the patio's integrity and aesthetics.
Settling Pavers: Settling pavers are a common issue, particularly if the base was not properly compacted. To fix settled pavers, carefully remove the affected pavers. Add more base material to the area and compact it thoroughly. Re-lay the pavers, ensuring they are level with the surrounding pavers. If settling continues to occur, it may be necessary to rebuild the base entirely.
Weed Growth: Weeds can grow in the joints between the pavers, detracting from the patio's appearance. To prevent weed growth, regularly sweep the patio to remove any debris that may accumulate in the joints. Apply a weed killer to the joints as needed. Consider using polymeric sand, which hardens when wet and helps to prevent weed growth. Polymeric sand requires careful application according to the manufacturer's instructions.
Staining: Pavers can be susceptible to staining from spills, dirt, and algae. To prevent staining, clean up spills promptly. Regularly clean the patio with a mild detergent and water. Consider using a paver cleaner specifically designed to remove stains. For stubborn stains, you may need to use a pressure washer, but be careful not to damage the pavers.

How To Build A Paver Patio Budget Dumpster

Diy Paver Patio For Normal People

Installing A Diy Paver Patio Is The Ultimate Spring Project

Diy Patio With Grass Between Pavers And A Fire Pit

Installing A Diy Paver Patio Is The Ultimate Spring Project

Dammann S Garden Company Diy Series How To Install Level Pavers And Patio Stones

Diy Pea Gravel Patio With Pavers Love Renovations

How To Easily Install A Paver Patio That Doesn T Look Like Diy Installation Two Brothers Pavers And Poo Garden Design

Diy Paver Patio For Normal People

How To Lay A Paver Patio The Easy Way Build With Roman
Related Posts