How to Install 12x215 Patio Pavers: A Comprehensive Guide
Installing patio pavers is a significant undertaking that can dramatically enhance the aesthetic appeal and functionality of outdoor spaces. This article provides a detailed, step-by-step guide on how to install 12x215 pavers, a specific dimension that offers a sleek, modern look. The process, while requiring physical labor and attention to detail, can be successfully managed by diligent individuals willing to invest the necessary time and effort.
Before commencing the installation of 12x215 patio pavers, careful planning and preparation are essential. This initial phase lays the groundwork for a successful and long-lasting patio. It encompasses site assessment, material acquisition, and tool preparation.
The first step involves assessing the intended patio area. This includes determining the dimensions of the patio and mapping out any existing features such as trees, utility lines, or structures. Accurate measurements are critical for calculating the precise number of pavers required and for efficiently laying out the design. Consideration should be given to drainage. Proper grading is crucial to prevent water from pooling on the patio surface and potentially damaging the paver installation over time. A slope of approximately ¼ inch per foot is generally recommended for effective water runoff.
Next, determine the desired layout or pattern for the 12x215 pavers. Several options exist, including running bond (also known as brick pattern), herringbone, and stack bond. The chosen pattern will influence the overall visual effect of the patio and impact the amount of paver cutting required. Consider the existing architectural style of the house and adjacent landscaping when selecting a pattern. A well-chosen pattern can complement the existing aesthetics and create a cohesive outdoor space.
Following the layout design, calculate the required materials. This includes the 12x215 pavers themselves, base aggregate (typically crushed stone), bedding layer (usually sand), and edge restraints. Calculating the amount of base aggregate and bedding layer requires knowing the depth of each layer. A typical installation involves a base aggregate layer of 4 to 6 inches, followed by a bedding layer of 1 to 2 inches. Accurate material estimations are crucial for avoiding material shortages or overages, both of which can impact the project's timeline and budget. It is often wise to order slightly more pavers (around 5-10%) than calculated to account for cuts and potential breakage.
Finally, gather the necessary tools. Essential tools include a shovel, rake, wheelbarrow, level (both long and short), measuring tape, tamper (hand or plate compactor), rubber mallet, paver splitter (or wet saw with a diamond blade), safety glasses, work gloves, and string line. Having the correct tools readily available will streamline the installation process and ensure a professional-looking outcome.
Preparing the Site for Paver Installation
Site preparation is a critical step that directly influences the stability and longevity of the paver patio. This process primarily involves excavation, grading, and compaction of the base layer.
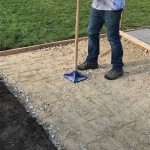
Begin by excavating the area to the required depth. This depth will depend on the planned thickness of the base aggregate and bedding layer, plus the thickness of the pavers themselves. Remember to account for the desired final grade of the patio. Typically, the excavation should extend beyond the planned patio perimeter by at least a foot on each side to allow for edge restraints. Use a shovel and wheelbarrow to remove excavated soil. Dispose of excess soil properly, ensuring compliance with local regulations.
Following excavation, begin the process of grading the subsoil. This involves leveling the surface and establishing the desired slope for drainage. Use a rake to distribute the soil evenly and a level to check for proper slope. Ensure that the subsoil is firm and compacted before proceeding to the next step. A hand tamper can be used to compact the subsoil, or a plate compactor may be used for larger areas.
Next, install the base aggregate. The base aggregate provides a stable foundation for the pavers and facilitates drainage. Spread the aggregate evenly over the excavated area in layers of 2 to 3 inches. After each layer, compact the aggregate thoroughly using a tamper or plate compactor. This is a critical step for preventing settling and ensuring a level patio surface. Repeat this process until the base aggregate reaches the desired thickness. Using a plate compactor is highly recommended, as it provides more consistent and effective compaction compared to a hand tamper.
Edge restraints are installed around the perimeter of the patio to prevent paver shifting and maintain the integrity of the design. Edge restraints can be made of plastic, stone, or concrete. They should be secured to the ground using spikes or stakes, following the manufacturer's instructions. Ensure the edge restraints are level and aligned properly before proceeding to the bedding layer.
Laying the Bedding Layer and Pavers
The bedding layer is a thin, level layer of sand that provides a smooth surface for setting the pavers. The accuracy of this layer is crucial for achieving a level and visually appealing patio.
Spread the bedding layer material (typically coarse sand) evenly over the compacted base aggregate. Use two metal pipes or straight boards as guides to screed the sand to the desired thickness. A 1- to 2-inch layer is generally sufficient. Drag a straight board across the pipes to create a smooth, level surface. Remove the pipes and fill the resulting gaps with sand. Avoid walking on the screeded sand to prevent indentations and inconsistencies. Any disturbances to the bedding layer prior to paver placement can compromise the final level surface.
Begin laying the 12x215 pavers according to the chosen pattern. Start at one corner of the patio and work outwards, placing each paver snugly against its neighbor. Avoid dragging the pavers across the sand, as this can disturb the bedding layer. Use a rubber mallet to gently tap each paver into place, ensuring it is level with adjacent pavers. Use a long level regularly to check for any unevenness. If a paver is too high, remove it and add or remove sand as needed. If a paver is too low, add sand underneath it.
When you reach the edges of the patio or encounter obstacles such as walls or curves, you will need to cut pavers to fit. Use a paver splitter or a wet saw with a diamond blade to make precise cuts. Always wear safety glasses and work gloves when cutting pavers. Measure the required cut carefully and mark the paver accordingly. Make clean, straight cuts for a professional-looking finish. Uneven or jagged cuts will be highly visible and detract from the overall aesthetic. Ensure cut pavers fit snugly into place, maintaining consistent spacing between pavers.
Final Steps: Compaction and Joint Sand
The final stages of paver installation involve compaction and filling the joints between pavers with sand. These steps are essential for locking the pavers in place and enhancing the overall stability of the patio.
Once all the pavers are laid, use a plate compactor to compact the entire patio surface. This will help to settle the pavers into the bedding layer and ensure a level surface. Use a protective pad under the plate compactor to prevent scratching or damaging the paver surface. Compact the patio in multiple passes, overlapping each pass slightly to ensure uniform compaction. Pay particular attention to the edges of the patio and any areas where pavers were cut.
Finally, spread joint sand evenly over the patio surface. Use a broom to sweep the sand into the joints between the pavers. The sand will help to lock the pavers together and prevent weed growth. Compact the patio again with the plate compactor to settle the sand into the joints. Sweep away any excess sand from the paver surface. Repeat this process several times to ensure that the joints are completely filled with sand. Polymeric sand is a superior option, as it hardens when wet, further stabilizing the pavers and inhibiting weed growth. If using polymeric sand, follow the manufacturer's instructions carefully, including properly watering the sand to activate the binding agents.
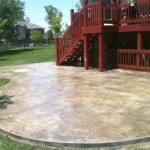
After the final compaction and sanding, inspect the patio for any remaining unevenness or imperfections. Address any issues promptly to ensure a professional-looking and long-lasting patio. The installation of 12x215 patio pavers is a rewarding project that can significantly enhance the value and enjoyment of outdoor living spaces.

Paver Installation Materials Tools And Process Plant Design Group

Patio Pavers Peachtree City Hardscape Patios Fayetteville Ga Landscape Innovations

How To Install A Beautiful Decomposed Granite Patio South House Designs

Cambridge Pavingstones Offer Do It Yourself Pavement System For Your Driveway Pool Deck Patio Or Sunroom Thereporter

Havenbrick Pavers Best Bricks Adelaide Concrete

Premium Blend Pavers Best S Exclusice

Premium Blend Pavers Best S Exclusice

Stradapave Pavers Budget Adelaide Concrete

Flagstone Pavers Best S Adelaide

2024 Paver Patio Cost Installation Costs
Related Posts