How to Fix Old Cement Patio Doors
Cement patio doors, once a popular choice for their durability and stylistic appeal, often face deterioration due to age, weather exposure, and ground movement. Addressing these issues promptly is crucial to prevent further damage, maintain structural integrity, and preserve the aesthetic value of the doorway. This article provides a comprehensive guide on diagnosing common problems with old cement patio doors and detailing the steps involved in effective repair.
Identifying Common Problems
Before undertaking any repair work, a thorough inspection is paramount. Identifying the precise nature and extent of the damage will dictate the appropriate repair methods and materials. Several common problems plague old cement patio doors, each requiring specific attention.
Cracking: This is perhaps the most prevalent issue. Cracks can range from hairline fractures to significant gaps that compromise the structure’s integrity. Hairline cracks are often superficial, caused by shrinkage during the curing process or minor temperature fluctuations. However, wider cracks, especially those that are jagged or expanding, may indicate more serious underlying problems such as foundation settling or water damage. Observe the pattern and width of the cracks to assess their severity. Vertical cracks may point to settling, while horizontal cracks could be due to pressure from the surrounding structure. Diagonal cracks can be indicative of a combination of factors.
Spalling: Spalling refers to the chipping, flaking, or crumbling of the cement surface. This occurs when moisture penetrates the cement and subsequently freezes and expands, exerting pressure that weakens the material. The process is exacerbated by the use of de-icing salts or exposure to harsh weather conditions. The severity of spalling can range from minor surface imperfections to significant material loss, exposing the rebar (reinforcing steel) within the cement. Exposed rebar is particularly problematic as it is susceptible to rust, which can further weaken the structure.
Water Damage and Staining: Cement is porous and susceptible to water absorption. Over time, this can lead to staining, discoloration, and the growth of mold and mildew. Water infiltration can also weaken the cement and contribute to spalling and cracking. Staining can be caused by a variety of factors, including rust from exposed rebar, mineral deposits from hard water, and organic matter. Mold and mildew thrive in damp environments and can disfigure the cement surface, creating an unsightly appearance and potentially posing health risks. Efflorescence, a white, powdery deposit on the surface, is another common sign of water intrusion. It occurs when water dissolves salts within the cement and carries them to the surface as it evaporates.
Shifting and Misalignment: Ground movement, foundation settling, or improper installation can cause cement patio doors to shift out of alignment. This can result in difficulty opening and closing the door, gaps between the door and the frame, and uneven surfaces. Misalignment can also place stress on the door hardware, leading to premature wear and tear. Use a level to check for any significant deviation from a plumb or level position. Observe the gaps around the door frame to identify areas where realignment is necessary. Check the functionality of the door latch and hinges to determine if misalignment is affecting their operation.
Repairing Cracks and Spalling
Once the problem areas have been identified, the process of repair can begin. This usually involves cleaning the affected areas, preparing the surface for patching, and applying appropriate repair materials.
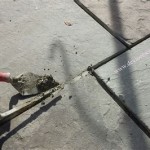
Preparation: The initial step is to thoroughly clean the area around the crack or spalled section. Remove any loose debris, dirt, mold, mildew, or efflorescence using a wire brush, scraper, or pressure washer. For mold and mildew, use a solution of water and bleach or a commercially available mildew remover. Rinse the area thoroughly with clean water and allow it to dry completely. For wider cracks, use a chisel or masonry hammer to widen the crack slightly, creating a "V" shape. This will allow for better adhesion of the patching material.
Patching: For hairline cracks, a cement crack filler or epoxy sealant can be used. Apply the filler or sealant according to the manufacturer's instructions, using a putty knife or caulk gun to ensure it penetrates the crack thoroughly. Smooth the surface to blend with the surrounding cement. For wider cracks and spalled areas, a cement patching compound or mortar mix is necessary. Premixed patching compounds are often easier to use, but mortar mix can be more cost-effective for larger repairs. Mix the patching compound or mortar according to the manufacturer's instructions, ensuring it has a thick, workable consistency. Dampen the area to be patched with water to improve adhesion. Apply the patching material using a trowel, pressing it firmly into the crack or spalled area. Overfill the area slightly to allow for shrinkage during drying. Once the patch has partially dried, use a trowel to smooth and shape it to match the surrounding surface. For deeper repairs, apply the patching material in layers, allowing each layer to dry before applying the next.
Curing: After patching, it is crucial to allow the repair to cure properly. This typically involves keeping the patched area moist for several days by covering it with plastic sheeting or spraying it with water periodically. Curing helps to prevent the patch from drying out too quickly, which can lead to cracking and weakening. Follow the manufacturer's instructions for the specific curing time required for the patching material used.
Rebar Treatment: If the rebar is exposed and rusted, it must be treated before patching the area. Remove any loose rust with a wire brush or grinder. Apply a rust converter to the rebar to help prevent further corrosion. Once the rust converter has dried, apply a concrete bonding agent to the rebar and the surrounding cement before patching.
Addressing Water Damage and Staining
Preventing further water intrusion is essential to preserving the integrity of the cement patio door. Cleaning the surface and applying a sealant or waterproof coating can help mitigate water damage and staining.
Cleaning: Begin by thoroughly cleaning the cement surface with a pressure washer or a stiff brush and a solution of water and detergent. Remove any dirt, grime, mold, mildew, or efflorescence. For stubborn stains, use a commercially available concrete cleaner or a solution of water and vinegar. Rinse the area thoroughly with clean water and allow it to dry completely.
Sealing: Once the cement is clean and dry, apply a concrete sealant or waterproof coating. These products penetrate the cement and create a barrier that prevents water from entering. Choose a sealant or coating that is specifically designed for outdoor use and is compatible with cement surfaces. Follow the manufacturer's instructions for application, typically using a brush, roller, or sprayer. Apply multiple coats for maximum protection, allowing each coat to dry before applying the next. Different types of sealants offer varying levels of protection. Penetrating sealants are absorbed into the cement and provide long-lasting protection without altering the appearance of the surface. Film-forming sealants create a protective layer on the surface of the cement, providing a glossy or matte finish. Choose the appropriate sealant based on the desired level of protection and aesthetic appearance.
Drainage Improvement: Ensuring proper drainage around the patio door is critical to preventing water accumulation and potential damage. Inspect the surrounding area and identify any areas where water may be pooling or draining towards the door. Correct any drainage issues by grading the soil away from the foundation, installing drainage pipes, or adding gravel or other permeable materials to promote water runoff.
Correcting Shifting and Misalignment
Addressing shifting and misalignment requires a more structural approach, often involving shimming, leveling, or rebuilding sections of the cement door frame.
Assessment: Use a level to determine the extent of the misalignment. Identify the areas that are not level or plumb and determine the direction and magnitude of the shift. Check the foundation for any signs of settling or cracking, which may be contributing to the misalignment. Examine the door frame for any signs of damage or deterioration that may be affecting its stability.
Shimming: For minor misalignment, shimming can be used to level and align the door frame. Insert shims between the frame and the surrounding structure to fill any gaps and correct the alignment. Use a level to ensure the frame is plumb and level before securing the shims in place. Cut off any excess shim material that protrudes from the frame. Secure the shims with construction adhesive or screws.
Leveling: If the ground beneath the cement patio door has settled, it may be necessary to lift and level the door. This can be a complex and potentially dangerous task that may require professional assistance. One method involves using hydraulic jacks to carefully lift the door and then filling the void beneath with a gravel base or concrete mix. Ensure the door is properly supported and stabilized before proceeding with the leveling process. Use a level to ensure the door is level and plumb before removing the jacks. Allow the concrete mix to cure completely before placing any weight on the door.
Rebuilding: In severe cases of misalignment or damage, it may be necessary to rebuild sections of the cement door frame. This involves removing the damaged or misaligned sections and replacing them with new cement or concrete. Ensure the new sections are properly reinforced with rebar and are securely connected to the existing structure. Use a level to ensure the new sections are plumb and level. Allow the new concrete to cure completely before applying any finishes or installing the door.
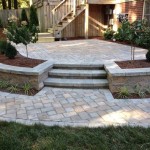
Properly fixing old cement patio doors requires careful assessment, appropriate materials, and diligent execution. Addressing underlying issues such as water damage and ground movement is crucial for long-term durability and structural integrity. Regular maintenance and prompt repairs are vital for preserving the lifespan and functionality of cement patio doors.

Concrete Threshold Repair At Patio Door Fine Homebuilding

How Can I Salvage A Crumbling Ed 24x24 Triangle Shaped Concrete Patio Without Tearing It Out Hometalk

Ed Concrete See How We Repaired Our Gross Patio 2024

Ed Concrete See How We Repaired Our Gross Patio 2024

How Can I Salvage A Crumbling Ed 24x24 Triangle Shaped Concrete Patio Without Tearing It Out Hometalk

Covering An Ugly Concrete Porch Hometalk

How Can I Salvage A Crumbling Ed 24x24 Triangle Shaped Concrete Patio Without Tearing It Out Hometalk

Before And After Painted Concrete Patio Thistlewood Farm

Patio Door Repair The Threshold Az Diy Guy

Before And After Painted Concrete Patio Thistlewood Farm
Related Posts