How To Build A Wood Patio Cover: A Comprehensive Guide
A wood patio cover offers a functional and aesthetically pleasing addition to any home. It provides shade from the sun, protection from light rain, and creates an inviting outdoor living space. Building a wood patio cover is a project that requires careful planning, precise execution, and a fundamental understanding of construction techniques. This guide provides a detailed, step-by-step approach to constructing a durable and attractive wood patio cover.
Before initiating the construction process, a thorough understanding of local building codes and regulations is required. Contact the local permitting office to determine the specific requirements for patio covers, including height restrictions, setback requirements from property lines, and necessary inspections. Failure to comply with these regulations can result in fines and the need to dismantle the structure.
Additionally, consider the existing architecture of the house. The patio cover should complement the existing design lines and materials of the home. Take into account the roof pitch, color scheme, and overall style to ensure a cohesive and visually appealing result. A well-integrated patio cover will enhance the property's value and aesthetic appeal.
Planning and Design
The first step in building a wood patio cover involves meticulous planning and design. Begin by measuring the area where the patio cover will be located. This includes determining the length, width, and desired height of the structure. The dimensions will dictate the amount of lumber and other materials needed for the project.
Next, develop a detailed plan or blueprint of the patio cover. This plan should include the following elements:
-
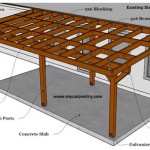
Support Posts:
Determine the number and placement of support posts. The spacing between posts will depend on the size and design of the patio cover. Generally, posts are spaced between 8 and 12 feet apart.-
Beams:
Beams are horizontal structural members that span the distance between the support posts. They provide the primary support for the roof rafters. The size and spacing of the beams will depend on the span and the expected load.-
Rafters:
Rafters are sloping structural members that extend from the beam to the house or to another beam on the opposite side of the patio cover. They provide support for the roofing material. The spacing of the rafters will depend on the type of roofing material used.-
Roofing Material:
Choose a suitable roofing material for the climate and aesthetic preferences. Common options include wood shingles, asphalt shingles, metal roofing, and polycarbonate panels.-
Footings:
Footings are concrete bases that support the support posts. They provide a stable foundation for the patio cover and prevent it from settling or shifting.The plan should specify the dimensions of all structural members, the type of lumber to be used, and any necessary hardware. Using a software program or consulting with a structural engineer can aid in the design process and ensure the structure's stability and safety.
Once the plan is finalized, create a detailed materials list. This list should include the quantity and dimensions of all lumber, hardware, roofing materials, and any other necessary supplies. Accurate material estimations will help to avoid unnecessary trips to the hardware store and minimize waste.
Framing the Structure
The framing stage is where the patio cover begins to take shape. It involves constructing the support posts, beams, and rafters that will form the structural framework of the cover.
First, excavate holes for the support post footings. The depth and diameter of the holes will depend on the local frost line and soil conditions. Generally, the holes should be at least 12 inches in diameter and extend below the frost line. Consult with local building codes to determine the specific requirements for footing depth.
Pour concrete into the footing holes, ensuring that the tops of the footings are level and flush with the ground. Embed metal post anchors into the wet concrete, ensuring they are properly aligned and positioned. The post anchors will provide a secure connection between the support posts and the concrete footings.
Allow the concrete to cure completely before proceeding. This typically takes several days, depending on the weather conditions. Prematurely placing weight on the footings can compromise their strength and stability.
Once the footings have cured, install the support posts into the post anchors. Ensure the posts are plumb, using a level to verify their vertical alignment. Secure the posts to the anchors using bolts or screws, as specified by the anchor manufacturer.
Next, install the beams onto the support posts. The beams should be securely attached to the posts using metal connectors, such as post caps or beam hangers. Ensure the beams are level and properly aligned before fastening them to the posts.
With the support posts and beams in place, the rafters can be installed. Attach the rafters to the beams using metal rafter ties or by toenailing them in place. The spacing of the rafters should be consistent and according to the design plan. Ensure the rafters are securely fastened to the beams and that they are properly aligned and level.
If the patio cover is attached to the house, proper flashing is crucial to prevent water damage. Install flashing where the rafters meet the house to redirect water away from the structure. The flashing should extend up under the siding and over the rafters to provide a watertight seal.
Roofing and Finishing
The final stage involves installing the roofing material and adding the finishing touches to the patio cover. This includes applying any necessary sealants, painting or staining the wood, and adding any decorative elements.
Begin by installing the chosen roofing material onto the rafters. The installation process will vary depending on the type of roofing material used. Follow the manufacturer's instructions carefully to ensure proper installation and weather resistance.
For wood shingles or asphalt shingles, start at the bottom of the roof and work upwards, overlapping each row of shingles. Secure the shingles with roofing nails, ensuring they are properly aligned and spaced. For metal roofing, follow the manufacturer's recommendations for fastening and sealing the panels.
After the roofing material is installed, apply any necessary sealants or caulking to seal any gaps or openings. This will help to prevent water from entering the structure and causing damage.
Next, prepare the wood surfaces for painting or staining. Sand the wood to create a smooth surface and remove any imperfections. Apply a primer to the wood to improve adhesion and protect it from moisture. Then, apply the chosen paint or stain to the wood, following the manufacturer's instructions.
Consider using a high-quality exterior paint or stain that is designed to withstand the elements. This will help to protect the wood from sun, rain, and other environmental factors. Apply multiple coats of paint or stain to ensure adequate coverage and protection.
Finally, add any decorative elements to the patio cover, such as trim, lattice, or lighting. These elements can enhance the aesthetic appeal of the structure and create a more inviting outdoor living space. Install the trim around the edges of the patio cover to conceal any exposed framing and create a finished look. Add lattice panels to the sides or back of the patio cover to provide shade and privacy. Install outdoor lighting to illuminate the patio cover at night and create a more inviting atmosphere.
Regular maintenance is essential to prolong the life of the wood patio cover. Inspect the structure regularly for signs of damage, such as rot, insect infestation, or water damage. Repair any damage promptly to prevent it from worsening. Clean the patio cover regularly to remove dirt, debris, and mildew. Applying a fresh coat of paint or stain every few years will help to protect the wood from the elements and keep the patio cover looking its best.
When selecting lumber for the patio cover, consider the type of wood and its intended use. Pressure-treated lumber is suitable for posts and beams that will be in contact with the ground, as it is resistant to rot and insect infestation. Cedar and redwood are naturally resistant to decay and insects and are good choices for rafters and trim. Select clear, straight lumber that is free from knots and other defects. This will ensure the structural integrity and aesthetic appeal of the patio cover.

Building A Covered Patio With 30ft Span The Awesome Orange

Patio Cover Plans Build Your Or Deck

Patio Cover Plans Build Your Or Deck

How To Build A Diy Covered Patio

Patio Cover Plans Build Your Or Deck

Diy Patio Cover Plans New Zealand

Solid Wood Patios Cover Kits Discover Ideas For Free Standing Patio Covers Pergola Depot

Patio Cover Plans Gardenplansfree Covered Design Diy

Building A Patio Cover Plans For An Almost Free Standing Roof

Patio Roof Gazebo Construction Hometips Diy
Related Posts