How To Build A Small Patio With Pavers And Stones In Your Garden
Constructing a small patio using pavers and stones can significantly enhance the aesthetic appeal and functionality of a garden. This project, suitable for homeowners with basic DIY skills, involves careful planning, preparation, and execution. The following article provides a comprehensive guide to building a durable and visually pleasing patio in a garden setting.
Planning and Design
The initial stage of patio construction involves meticulous planning and design. This phase determines the size, shape, and location of the patio, as well as the selection of appropriate materials. Careful consideration of these factors ensures that the final product seamlessly integrates with the existing garden landscape and fulfills the intended purpose.
First, assess the available space within the garden. Determine the ideal dimensions for the patio based on its intended use. Will it primarily serve as a seating area, a dining space, or a pathway extension? Consider the number of people who will typically use the patio and the furniture that will be placed upon it. A well-proportioned patio enhances the garden's aesthetics, avoiding an overwhelming or underwhelming presence.
Next, select a location that complements the garden's overall design. Factors to consider include sunlight exposure, proximity to the house, and existing landscaping features. A sunny location is ideal for relaxation and sunbathing, while a shaded area might be preferable for dining during hot summer months. Ensure the chosen location provides adequate drainage to prevent water accumulation, which can damage the patio and surrounding vegetation.
The design phase also involves sketching a preliminary layout of the patio. This visual representation aids in determining the quantity and arrangement of pavers and stones. Consider incorporating curves or angles to add visual interest and complement the garden's natural contours. Mark the intended patio area using stakes and string to visualize the proposed design in the actual garden space. This allows for adjustments before commencing any physical work.
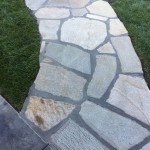
Material selection is critical to the patio's durability and aesthetic appeal. Pavers are available in various shapes, sizes, colors, and materials, including concrete, brick, and natural stone. Natural stones, such as flagstone or slate, offer a unique and rustic appearance. Concrete pavers provide a more uniform and cost-effective option. When choosing materials, consider the overall style of the garden and the desired level of maintenance. Darker pavers tend to absorb more heat, while lighter colors reflect sunlight. Select materials that are resistant to weathering and can withstand the local climate conditions.
Drainage considerations are paramount. A properly designed patio incorporates a slight slope to facilitate water runoff. A gradient of approximately one inch per eight feet is generally recommended. This slope directs water away from the house and prevents puddling on the patio surface. Integrate drainage solutions, such as French drains or permeable paver systems, if necessary, to manage excess water effectively. Consult with a landscaping professional if complex drainage issues are anticipated.
Site Preparation and Base Construction
Proper site preparation and base construction are essential for a stable and durable patio. A well-prepared base prevents settling, shifting, and cracking of the pavers and stones over time. This stage involves excavation, leveling, and compaction to create a solid foundation for the patio surface.
Begin by removing any existing vegetation, including grass, weeds, and roots, from the designated patio area. Excavating the area to the appropriate depth is crucial. The depth of excavation depends on the type of soil and the thickness of the pavers or stones. Generally, excavate to a depth of approximately 6-8 inches to accommodate the base materials and the pavers themselves. A deeper excavation may be required for areas with poor soil drainage.
After excavation, leveling the ground is necessary. Use a shovel and rake to create a smooth and even surface. A laser level or string line can aid in achieving accurate leveling. Ensure the ground slopes slightly away from the house to facilitate water runoff. Correct any significant irregularities or dips in the soil to prevent water accumulation.
The base of the patio typically consists of two layers: a sub-base of compacted gravel and a leveling layer of sand. The gravel sub-base provides drainage and load-bearing support. Spread a layer of gravel, typically 4-6 inches thick, evenly over the excavated area. Use a plate compactor to thoroughly compact the gravel, creating a solid and stable foundation. Compaction is critical to prevent settling and ensure the longevity of the patio.
After compacting the gravel, spread a layer of leveling sand, typically 1-2 inches thick, over the gravel sub-base. The sand provides a smooth and even surface for setting the pavers or stones. Use a rake to distribute the sand evenly and a screed board to level the surface. A screed board is a long, straight board used to smooth and level the sand. Ensure the sand layer maintains the desired slope for water runoff. Lightly dampen the sand to aid in compaction and prevent settling.
Before installing the pavers, consider installing an edge restraint. Edge restraints prevent the pavers from shifting outward over time. These restraints can be made of plastic, metal, or concrete. Install the edge restraints around the perimeter of the patio, ensuring they are securely anchored in the ground. This step is particularly important for patios with irregular shapes or those located on slopes.
Paver and Stone Installation
The installation of pavers and stones is the final step in building the patio. This phase requires careful attention to detail to ensure proper alignment, spacing, and stability. A well-executed installation results in a visually appealing and durable patio surface.
Begin by laying the pavers or stones according to the planned design. Start in one corner of the patio and work outwards, placing each paver or stone firmly in the sand. Maintain consistent spacing between the pavers or stones to create a uniform appearance. Use spacers or small pieces of cardboard to ensure accurate spacing. The specific spacing will depend on the type of paver or stone and the desired aesthetic.
For pavers of uniform size and shape, a repeating pattern can be easily achieved. For natural stones, which often vary in size and shape, a more random pattern may be aesthetically pleasing. Experiment with different arrangements to find the most visually appealing layout. Larger stones can be used as focal points, while smaller stones fill in the gaps.
Use a rubber mallet to gently tap each paver or stone into place. This ensures that the pavers are firmly seated in the sand and are level with each other. Use a level to check the alignment of each paver or stone. If a paver is too high or too low, adjust the sand beneath it accordingly. Add or remove sand as needed to achieve a level surface.
Cutting pavers or stones may be necessary to fit the edges of the patio or to create specific design elements. Use a wet saw equipped with a diamond blade for clean and precise cuts. Wear safety glasses and gloves when using a wet saw to protect against flying debris. Cut the pavers or stones to the required size and shape, and then install them in the designated locations.
After all the pavers or stones are installed, fill the gaps between them with polymeric sand. Polymeric sand is a special type of sand that hardens when it is wet, creating a durable and weed-resistant joint. Sweep the polymeric sand into the gaps between the pavers or stones, making sure to fill them completely. Use a broom to remove any excess sand from the surface of the pavers.
Lightly mist the patio with water to activate the polymeric sand. Follow the manufacturer's instructions regarding the amount of water to use. Avoid overwatering the sand, as this can lead to staining or discoloration. Allow the polymeric sand to dry and harden according to the manufacturer's instructions. This typically takes 24-48 hours. During this time, avoid walking on the patio to prevent disturbing the sand.
Once the polymeric sand has hardened, the patio is ready for use. Inspect the patio for any loose or uneven pavers or stones. Make any necessary adjustments to ensure a smooth and stable surface. Add edging plants or other decorative elements to enhance the aesthetic appeal of the patio. Periodically clean the patio with a garden hose or pressure washer to remove dirt and debris. With proper care and maintenance, a paver and stone patio can provide years of enjoyment in a garden setting.

Diy Pea Gravel Patio With Pavers Love Renovations

How To Diy A Concrete Paver Pea Gravel Patio The Collected House

Diy Pea Gravel Patio With Pavers Love Renovations

Diy Pea Gravel Patio With Pavers Love Renovations

Diy Pea Gravel Patio With Pavers Love Renovations

Paver Patios Install A Diy Patio With Brick Or Stone Decks Com

How To Build A Patio An Easy Do It Yourself Project

How To Make A Modern Patio With Pavers Pea Gravel The Savvy Heart Interior Design Décor And Diy

Landscape Design 50 Beautiful Backyard Paver Patio Ideas

Planning For A Paver Patio Ideas And Inspiration Town Country Living
Related Posts