How to Build a Small Patio with Pavers and Stones
Constructing a small patio with pavers and stones represents a manageable and cost-effective way to enhance outdoor living spaces. This project can be undertaken by individuals with basic DIY skills and requires readily available materials and tools. The process involves careful planning, site preparation, laying the base, and finally, installing the pavers and stones. A well-built patio not only adds aesthetic value to a property but also provides a durable and functional area for relaxation and entertainment.
Planning and Design
Before commencing any physical work, detailed planning is crucial. This stage encompasses assessing the available space, determining the desired shape and size of the patio, and selecting appropriate materials. The size of the patio should be proportionate to the surrounding landscape and consider its intended usage. A small patio is typically adequate for a seating area accommodating a small table and a few chairs, while a larger patio might be required for outdoor dining or entertaining.
The shape of the patio can significantly impact the overall aesthetic. Common shapes include square, rectangular, circular, and irregular designs. Irregular shapes often blend seamlessly with natural landscapes, while geometric shapes offer a more structured and formal appearance. Choosing a shape that complements the existing architecture and landscaping is essential.
Material selection is another critical aspect of the planning phase. Pavers are available in various materials, including concrete, brick, and natural stone. Concrete pavers are a popular choice due to their affordability, durability, and wide range of colors and styles. Brick pavers offer a classic and timeless appeal, while natural stone pavers, such as flagstone and bluestone, provide a unique and elegant look. The selected materials should be durable enough to withstand local weather conditions and foot traffic.
Furthermore, drainage considerations should be addressed during the planning stage. Proper drainage is essential to prevent water from pooling on the patio surface, which can lead to safety hazards and structural damage. The patio should be sloped slightly away from the house or any other structures to facilitate water runoff. Installation of a drainage system, such as a French drain or a surface drain, may be necessary in areas with poor drainage.
Finally, it is important to check local building codes and regulations before starting the project. Some municipalities may require permits for patio construction, especially if it exceeds a certain size or affects drainage patterns. Neglecting to obtain the necessary permits can result in fines and delays.
Site Preparation and Base Installation
Once the planning phase is complete, the next step involves preparing the site for patio construction. This process includes clearing the area, excavating the soil, and installing a solid base. Proper site preparation is crucial for ensuring the stability and longevity of the patio.
The first step in site preparation is to remove any existing vegetation, including grass, weeds, and roots. This can be done using a shovel, spade, or sod cutter. The area should be cleared of any debris, such as rocks, branches, and other obstructions. A clean and level surface is essential for subsequent steps.
Next, the soil needs to be excavated to a depth that allows for the installation of the base and the pavers. The depth of excavation will depend on the type of base material used and the thickness of the pavers. As a general guideline, excavate to a depth of approximately 6-8 inches. This depth allows for a 4-inch base of compacted gravel and a 2-inch layer of sand or decomposed granite.
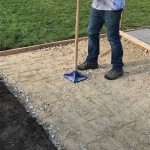
After excavating the soil, compact the subgrade using a plate compactor or a hand tamper. Compacting the subgrade provides a firm and stable foundation for the base material. Ensure that the subgrade is level and free of any soft spots or inconsistencies. Addressing these issues now will prevent future settling and unevenness in the patio surface.
The next step is to install the base material. Crushed gravel is the most common choice for the base, as it provides excellent drainage and stability. Spread the gravel evenly over the excavated area and compact it using a plate compactor. Multiple passes with the compactor may be necessary to achieve adequate compaction. The base should be level and consistent throughout the entire patio area.
After compacting the gravel base, a layer of sand or decomposed granite is spread over the top. This layer acts as a bedding material for the pavers, providing a smooth and uniform surface. Use a screed board or a long, straight edge to level the sand or decomposed granite. The bedding layer should be approximately 1-2 inches thick and perfectly level to ensure that the pavers are installed evenly.
Paver and Stone Installation
With the base properly prepared, the final step is to install the pavers and stones. This process requires careful placement and attention to detail to ensure a visually appealing and structurally sound patio. The arrangement of pavers and stones can significantly impact the overall aesthetic of the patio, so take time to experiment with different patterns and layouts.
Begin by laying the pavers along the perimeter of the patio. This will create a border that defines the shape of the patio and provides a reference point for the remaining pavers. Use a rubber mallet to gently tap each paver into place, ensuring that it is level with the surrounding pavers. A level should be used frequently to check the alignment and elevation of the pavers.
Continue laying the pavers in the desired pattern, working from the perimeter towards the center of the patio. Maintain consistent spacing between the pavers to create a uniform and visually appealing surface. Use paver spacers to ensure consistent spacing. If using natural stone, variations in size and shape are expected, so adjust the spacing accordingly to create a natural and organic look.
When cutting pavers or stones to fit around obstacles or along the edges of the patio, use a paver splitter or a wet saw. A paver splitter is a manual tool that cracks the paver along a predetermined line, while a wet saw uses a diamond blade to cut through the paver with precision. Always wear safety glasses and ear protection when using these tools.
Once all the pavers and stones are installed, fill the joints between them with polymeric sand. Polymeric sand is a special type of sand that contains polymers that bind the sand particles together when activated with water. This helps to prevent weeds from growing in the joints and stabilizes the pavers.
To apply polymeric sand, sweep it over the patio surface, ensuring that all the joints are completely filled. Use a broom or a brush to remove any excess sand from the paver surfaces. Then, use a fine spray of water to activate the polymers in the sand. Follow the manufacturer's instructions for the specific type of polymeric sand being used. Avoid overwatering, as this can damage the patio surface.
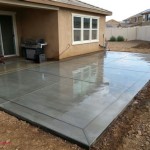
Finally, allow the polymeric sand to cure completely before allowing foot traffic on the patio. This typically takes 24-48 hours, depending on the weather conditions. Once the patio is cured, it is ready to be enjoyed. Regular maintenance, such as sweeping and occasional cleaning, will help to keep the patio looking its best for years to come.
Ensuring Proper Drainage
Effective drainage is paramount for the longevity and structural integrity of a paver patio. Poor drainage leads to water accumulation, which can cause pavers to shift, create slippery surfaces, and encourage weed growth. Integrating drainage solutions during the planning and installation phases mitigates these risks.
The first step in ensuring proper drainage is to establish a slight slope away from any adjacent structures, such as homes or garages. A gradual slope of approximately 1/4 inch per foot is generally sufficient to direct water away from the building and prevent water pooling on the patio surface. This slope should be consistent across the entire patio area.
In areas with heavy rainfall or poor soil drainage, installing a subsurface drainage system may be necessary. A French drain is a common type of subsurface drainage system consisting of a trench filled with gravel and a perforated pipe. The trench is typically located along the lower edge of the patio, intercepting water that flows through the soil and directing it away from the area.
Surface drains can also be used to collect and remove water from the patio surface. These drains are typically installed at low points in the patio and are connected to a drainage pipe that carries the water away. Surface drains are available in various sizes and styles to suit different applications.
Proper compaction of the base material is also crucial for drainage. A well-compacted base provides a stable and permeable foundation that allows water to drain freely. If the base is not properly compacted, water can become trapped beneath the pavers, leading to settling and unevenness.
Selecting permeable paver materials can further enhance drainage. Permeable pavers are designed with wider joints that allow water to infiltrate the ground. These pavers are often used in conjunction with a permeable base material to create a highly effective drainage system.
Finally, maintaining the patio surface is essential for drainage. Regularly sweep the patio to remove debris and leaves that can clog the joints and prevent water from draining properly. Periodically inspect the patio for any signs of settling or unevenness and address these issues promptly to prevent further damage.

How To Build A Paver Patio Young House Love

Diy Pea Gravel Patio With Pavers Love Renovations

How To Build A Patio In Weekend Fine Gardening

How To Build A Paver Patio Young House Love

How To Build A Patio An Easy Do It Yourself Project

How To Build A Paver Patio Rogue Engineer

Installing A Diy Paver Patio Is The Ultimate Spring Project

How To Build A Paver Patio Young House Love

Paver Patios Install A Diy Patio With Brick Or Stone Decks Com

How To Build A Backyard Paver Patio All By Yourself
Related Posts