How To Build A Small Patio Cover
A patio cover offers numerous benefits, including protection from the elements, increased outdoor living space, and enhanced property value. Building a small patio cover can be a manageable DIY project, even for individuals with limited construction experience. This article provides a detailed guide on how to construct a small patio cover, outlining the necessary steps, materials, and tools to ensure a successful outcome.
Before commencing any construction, careful planning is crucial. This initial phase involves assessing the patio's dimensions, selecting the desired style of the cover, and obtaining any required permits. Ignoring this preliminary stage can result in costly errors and potential legal issues later on.
First, accurately measure the patio area to determine the dimensions of the cover. Consider the desired overhang, the height of the cover, and any obstructions, such as doors or windows. Precise measurements are essential for accurate material procurement and construction. The style of the cover should complement the existing architecture of the house. Options include attached covers, freestanding structures, and various roof designs, such as flat, gable, or shed roofs. Research different designs to find one that suits both aesthetic preferences and skill level. Be aware that a more complex design, such as a vaulted ceiling, will require advanced carpentry skills and may be best left to a professional.
Local building codes often require permits for structures exceeding a certain size or affecting property lines. Contact the local building department to determine the specific requirements for the project. Obtain all necessary permits before starting construction to avoid potential fines or legal complications. Failure to acquire necessary permits can lead to the project being halted or even demolished.
Key Point 1: Gathering Tools and Materials
The success of the project hinges on having the right tools and materials readily available. A comprehensive list eliminates delays and ensures the work proceeds smoothly and efficiently. The following is a breakdown of suggested tools and materials.
Tools:
- Circular saw: For cutting lumber to size.
- Drill/driver: For drilling pilot holes and driving screws.
- Level: To ensure the structure is level and plumb.
- Measuring tape: For accurate measurements.
- Safety glasses: To protect eyes from debris.
- Gloves: To protect hands from splinters and abrasions.
- Ladder: For reaching elevated areas.
- Post hole digger or shovel: For excavating post holes.
- Concrete mixer (optional): Simplifies concrete mixing.
- Hammer: For driving nails (if needed).
- Wrench set: For tightening bolts and nuts.
Materials:
- Lumber (pressure-treated): For posts, beams, rafters, and framing. The appropriate lumber grade will depend on local building codes and structural requirements.
- Concrete: For setting posts.
- Fasteners: Screws, nails, bolts, and connectors appropriate for outdoor use. Galvanized or stainless steel fasteners are recommended for their resistance to corrosion.
- Roofing material: Shingles, metal roofing, polycarbonate panels, or other chosen roofing material.
- Flashing: To prevent water damage where the cover attaches to the house.
- Post anchors (optional): For securing posts to a concrete slab.
- Wood stain or paint: To protect and enhance the appearance of the wood.
Pressure-treated lumber is essential for any part of the structure that will be in contact with the ground or exposed to the elements. The specific type of pressure treatment will depend on the intended use and local regulations. When selecting roofing materials, consider factors such as cost, durability, weather resistance, and aesthetic appeal. Ensure adequate ventilation to prevent moisture buildup under the cover, which can lead to rot and mold growth.
Key Point 2: Constructing the Frame
Building a solid and structurally sound frame is the foundation of the patio cover. Precise execution of each step, from setting the posts to securing the rafters, is critical for longevity and safety.
Step 1: Setting the Posts. Mark the locations for the posts, ensuring they are evenly spaced and aligned. Dig post holes to the required depth, typically 2-3 feet, depending on local frost line depths. Place the posts in the holes and use temporary bracing to hold them plumb. Mix concrete according to the manufacturer's instructions and pour it into the holes, ensuring the posts are completely encased. Allow the concrete to cure for at least 48 hours before proceeding. Using post anchors embedded in a concrete slab simplifies the process and provides a more secure connection.
Step 2: Installing the Beams. Once the concrete has cured, cut the beams to the appropriate length. Lift the beams into place and secure them to the posts using bolts or screws. Ensure the beams are level and properly aligned. For longer spans, consider using multiple beams to increase structural support. The beam size will depend on the span and the load it needs to support.
Step 3: Attaching the Ledger Board (for attached covers). If the patio cover is attached to the house, a ledger board must be securely fastened to the wall. Use lag bolts and appropriate flashing to prevent water damage. Ensure the ledger board is level and properly aligned with the beams. The ledger board must be attached to structural members of the house, such as studs or rim joists, to provide adequate support.
Step 4: Installing the Rafters. Cut the rafters to the appropriate length and angle. Space the rafters evenly, typically 16-24 inches apart, depending on the roofing material and local building codes. Attach the rafters to the beams and ledger board (if applicable) using screws or nails. Ensure the rafters are plumb and properly aligned. For gable roofs, accurately calculate the rafter angles to ensure a proper fit. Use rafter ties or hurricane clips to strengthen the connection between the rafters and the beams.
Properly bracing the structure during construction is crucial for maintaining stability and preventing collapses. Use temporary supports as needed to hold the components in place until they are permanently secured. Regularly check the structure for level and plumbness throughout the construction process.
Key Point 3: Installing the Roofing and Finishing Touches
Applying the roofing material and adding finishing touches not only protect the structure from the elements but also significantly enhance its aesthetic appeal. Correct application is therefore essential. This stage requires careful attention to detail.
Step 1: Installing the Roofing Material. Install the chosen roofing material according to the manufacturer's instructions. For shingles, start at the bottom and overlap each row. For metal roofing, use appropriate fasteners and sealants to prevent leaks. For polycarbonate panels, ensure proper venting to prevent condensation buildup. Proper overlap is crucial for preventing water penetration. Use flashing around any penetrations, such as vents or chimneys, to ensure a watertight seal. Consult with a roofing professional if unsure about proper installation techniques.
Step 2: Applying Flashing. Install flashing where the patio cover meets the house to prevent water damage. Ensure the flashing is properly sealed to prevent leaks. Use appropriate flashing materials for the specific type of roofing and siding. Inspect the flashing regularly for any signs of damage or deterioration.
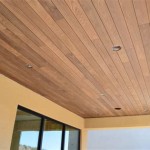
Step 3: Adding Finishing Touches. Once the roofing is complete, add any desired finishing touches, such as trim, fascia, and gutters. Apply wood stain or paint to protect and enhance the appearance of the wood. Consider adding lighting or ceiling fans to enhance the functionality and comfort of the patio cover. Choose exterior-grade stains or paints that are designed to withstand the elements. Applying multiple coats of stain or paint provides better protection and a longer-lasting finish.
Step 4: Inspecting the Structure. After completing the construction, thoroughly inspect the structure for any defects or areas that require attention. Ensure all fasteners are tight and all connections are secure. Check for any signs of leaks or water damage. Address any issues promptly to prevent further damage. Regular maintenance, such as cleaning and re-staining, will help prolong the life of the patio cover.
Building a small patio cover requires careful planning, attention to detail, and adherence to safety guidelines. By following these steps, individuals can create a functional and aesthetically pleasing outdoor space that enhances their property.

Easy Ways To Cover A Patio 15 Steps With Pictures Wikihow

11 Patio Cover Ideas Anyone Can Diy The Garden Glove

Diy Patio Cover Under 500 In Materials Budget Friendly Backyard 2 Year Update

Building A Patio Cover Plans For An Almost Free Standing Roof

How To Build A Small Privacy Screen

20 Best Patio Cover Ideas Covered Designs

Building A Patio Cover Plans For An Almost Free Standing Roof

20 Best Patio Cover Ideas Covered Designs

How To Attach A Patio Roof An Existing House And 10 Fantastic Ideas Homivi Building Deck

10 Patio Shades Ideas Tips To Cool Off Outdoors From Bob Vila
Related Posts