How to Build a Simple Paver Patio
Creating an outdoor living space can significantly enhance a property's appeal and functionality. A paver patio offers a durable, aesthetically pleasing, and relatively low-maintenance solution for achieving this goal. Building a paver patio, while requiring some physical effort, is a project that can be successfully undertaken by homeowners with basic DIY skills. This article outlines the necessary steps for constructing a simple paver patio, focusing on preparation, installation, and finishing.
### Planning and Preparation: Laying the Foundation for SuccessBefore commencing any physical work, meticulous planning is paramount. This stage involves determining the patio's size and location, selecting the appropriate paver type, and calculating the necessary materials. Accurate planning minimizes material waste and ensures a structurally sound and visually appealing final product.
The first step involves selecting the patio's location. Consider factors such as sunlight exposure, proximity to the house, existing landscaping, and drainage. Ensure the chosen location is relatively level and easily accessible. Once the location is determined, define the patio's dimensions. Smaller patios are easier to construct, especially for first-time paver patio builders. Mark the perimeter of the patio using stakes and string. The string should be taut and level, serving as a visual guide throughout the excavation process.
Selecting the right paver is crucial. Pavers come in various materials, shapes, sizes, and colors. Concrete pavers are a popular choice due to their durability, affordability, and wide availability. Brick pavers offer a classic aesthetic, while natural stone pavers provide a more rustic and unique look. Consider the overall design of the property and choose pavers that complement the existing architecture and landscaping. Once the paver type is selected, calculate the quantity needed. Measure the patio's area in square feet and consult the paver manufacturer's specifications to determine the number of pavers required per square foot. Add an extra 5-10% to account for cuts and potential breakage.
In addition to pavers, other essential materials include: gravel base, leveling sand, landscape fabric, paver edging, and polymeric sand (optional). The gravel base provides a stable foundation, while the leveling sand creates a smooth surface for the pavers to rest on. Landscape fabric prevents weed growth and stabilizes the soil. Paver edging confines the pavers and prevents them from shifting. Polymeric sand fills the joints between the pavers, inhibiting weed growth and further stabilizing the patio. Calculate the required quantities of these materials based on the patio's dimensions and the manufacturer's recommendations.
Essential tools for this project include: a shovel, a wheelbarrow, a tamper (hand or plate), a level, a measuring tape, a rubber mallet, a circular saw with a masonry blade (for cutting pavers), a landscape fabric knife, and safety glasses and gloves. Having all the necessary tools and materials readily available will streamline the construction process and minimize delays.
### Excavation and Base Preparation: Building a Solid FoundationProper excavation and base preparation are critical for the longevity and stability of the paver patio. A well-prepared base prevents settling, shifting, and weed growth. This stage involves removing existing vegetation and topsoil, installing landscape fabric, and compacting a gravel base.
Begin by removing all vegetation, topsoil, and any other debris within the marked perimeter of the patio. The depth of excavation will depend on the thickness of the pavers, the thickness of the leveling sand, and the desired depth of the gravel base. A general guideline is to excavate a depth of approximately 6-8 inches. Ensure the bottom of the excavation is level and slopes slightly away from the house or any structures to facilitate water drainage. Use a level and a measuring tape to ensure consistent depth throughout the excavation.
After excavation, install landscape fabric over the exposed soil. Overlap the edges of the fabric by at least 12 inches to prevent weed growth. The landscape fabric acts as a barrier, preventing weeds from growing up through the pavers and stabilizing the soil. Secure the fabric with landscape staples or rocks to prevent it from shifting during the subsequent steps.
Next, spread a layer of gravel base over the landscape fabric. The gravel base should be approximately 4-6 inches thick. Use a coarse gravel material, such as crushed stone or road base. Spread the gravel evenly using a shovel and rake. Once the gravel is spread, compact it thoroughly using a tamper (hand or plate). Compaction is crucial for creating a solid and stable base. Pass over the entire area multiple times to ensure uniform compaction. Use a level to check for any low spots or inconsistencies and add more gravel as needed. A well-compacted gravel base is the foundation for a durable and long-lasting paver patio.
### Paver Installation and Finishing: Creating the Patio SurfaceWith the base properly prepared, the paver installation process can begin. This stage involves spreading the leveling sand, laying the pavers, cutting pavers to fit, installing paver edging, and filling the joints between the pavers. Attention to detail during this stage will result in a visually appealing and structurally sound patio surface.
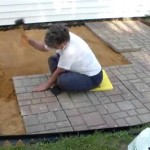
Spread a layer of leveling sand over the compacted gravel base. The leveling sand should be approximately 1 inch thick. Use a fine sand, such as mason sand or paver sand. Spread the sand evenly using a shovel and rake. Use a screed board (a straight piece of lumber) to create a smooth and level surface. Drag the screed board across the sand to remove excess material and fill in any low spots. Take care not to compact the sand excessively. The goal is to create a uniform and level surface for the pavers to rest on.
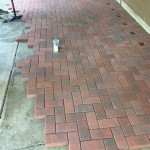
Begin laying the pavers according to the desired pattern. Start at one corner of the patio and work your way across. Ensure the pavers are tightly butted together, leaving minimal gaps between them. Use a rubber mallet to gently tap the pavers into place. Regularly check the level of the pavers using a level. Adjust the sand beneath the pavers as needed to ensure they are level with each other. Maintain consistent spacing between the pavers. If using a complex paver pattern, it may be helpful to dry-lay the pavers first to visualize the final layout.
When the pavers reach the edge of the patio, it will likely be necessary to cut some pavers to fit. Use a circular saw with a masonry blade to cut the pavers. Wear safety glasses and gloves to protect yourself from debris. Measure the required length or shape of the paver and mark it with a pencil. Carefully cut along the marked line. Use a utility knife to score the paver before cutting with the saw to ensure a clean and accurate cut.
Install paver edging around the perimeter of the patio to confine the pavers and prevent them from shifting. Paver edging comes in various materials, such as plastic, metal, or concrete. Install the edging according to the manufacturer's instructions. Typically, the edging is secured with spikes or stakes driven into the ground. Ensure the edging is flush with the top of the pavers. The paver edging provides a clean and finished look to the patio and contributes to its overall stability.
Finally, fill the joints between the pavers with polymeric sand (optional). Polymeric sand is a special type of sand that contains polymers that bind together when activated with water. This helps to prevent weed growth and further stabilize the patio. Sweep the polymeric sand over the surface of the pavers, ensuring it fills all the joints. Use a broom to remove any excess sand from the surface of the pavers. Lightly mist the patio with water to activate the polymers in the sand. Follow the manufacturer's instructions for watering. Allow the polymeric sand to dry completely according to the manufacturer's instructions. The polymeric sand will harden and create a durable and weed-resistant joint between the pavers.
The completion of these steps will result in a functional and aesthetically pleasing paver patio, ready for outdoor furniture, landscaping, and enjoyment. Regular maintenance, such as sweeping and occasional power washing, will help to preserve the patio's appearance and prolong its lifespan.

How To Build A Patio In Weekend Finegardening

Diy Paver Patio For Normal People

How To Build A Paver Patio It S Done Young House Love

How To Build A Diy Patio For Under 120 Outdoor Spaces

Diy Easy Steps For Laying Pavers The Gardeners Paradise

Diy Paver Patio For Normal People

Installing A Diy Paver Patio Is The Ultimate Spring Project

How To Build A Paver Patio Budget Dumpster

Diy Paver Patio Backyard Project Old Salt Farm

How To Build A Patio An Easy Do It Yourself Project
Related Posts