How To Build A Simple Patio Roof: A Step-by-Step Guide
Building a simple patio roof can significantly enhance outdoor living space, providing shade and protection from the elements. This project, while requiring some construction skills and physical effort, can be accomplished by a homeowner with a solid understanding of basic carpentry principles and a commitment to following safety precautions. This article provides a comprehensive, step-by-step guide to constructing a basic patio roof, covering all aspects from planning and material selection to the final construction phase.
Before commencing any construction, it is imperative to check local building codes and regulations. Most municipalities require permits for structures of this type, and adherence to code ensures safety and prevents potential legal issues down the line. Familiarize yourself with requirements for setbacks, maximum height, and approved building materials in your area. Contacting the local building department is the best way to obtain this information. In addition to codes, consider any homeowner association rules that may apply to exterior building projects.
Thorough planning is essential for a successful patio roof project. This includes determining the size and shape of the roof, choosing appropriate materials, and creating a detailed construction plan or blueprint. The plan should include measurements, beam and rafter spacing, and attachment points to the existing structure. Accurately estimating material quantities will help avoid unnecessary trips to the hardware store and minimize material waste.
Key Point 1: Planning and Design
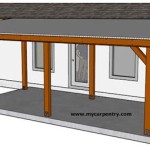
The design phase involves several critical considerations. First, determine the desired coverage area of the patio roof. This will dictate the dimensions of the structure. Next, choose the roof style. Common options include a simple flat roof, a shed roof (sloping in one direction), or a gable roof (two slopes meeting at a ridge). A shed roof is the easiest to construct for beginners, while a gable roof offers better drainage and aesthetics.
Consider the existing structure to which the patio roof will be attached. If attaching to a house, the existing roofline, siding material, and foundation type will influence the design. The attachment points must be structurally sound and capable of supporting the weight of the new roof. If the patio roof is freestanding, plan for sturdy posts that are properly anchored in the ground using concrete footings.
Material selection is a vital aspect of the planning stage. Choose durable, weather-resistant materials appropriate for the local climate. Pressure-treated lumber is recommended for all framing members that are in contact with the ground or exposed to the elements. Common roofing materials include asphalt shingles, metal roofing, polycarbonate panels, or even wooden lattice for a more open, shaded effect. Each material has its own advantages and disadvantages in terms of cost, durability, and ease of installation. Consider the aesthetic integration with the existing house's style when selecting materials.
Creating a detailed blueprint, even a simple hand-drawn sketch with accurate measurements, is crucial. This blueprint should specify the dimensions of all framing members, including beams, rafters, and posts. It should also indicate the spacing between rafters, the overhang dimensions, and the method of attachment to the existing structure or posts. Accurate measurements and a well-defined plan will minimize errors and ensure a sound, structurally safe roof.
Key Point 2: Materials and Tools
The following list outlines the common materials required for a basic patio roof project. Quantities will vary depending on the size and design of the roof:
- Pressure-treated lumber for posts, beams, and rafters
- Fasteners: galvanized nails, screws, and lag bolts
- Roofing material: asphalt shingles, metal roofing, polycarbonate panels, or lattice
- Flashing (if attaching to an existing structure)
- Concrete mix for post footings (if freestanding)
- Post anchors (if freestanding)
- Wood sealant or stain
Essential tools include:
- Measuring tape
- Level
- Circular saw
- Drill/driver
- Hammer
- Safety glasses
- Gloves
- Ladder
- Miter saw (optional, but recommended for precise cuts)
- Post hole digger or power auger (if freestanding)
- Framing square
Prioritize safety when working with power tools and at heights. Always wear safety glasses to protect your eyes from flying debris. Use gloves to protect your hands from splinters and rough materials. Employ a sturdy ladder and ensure it is properly positioned before climbing. If working with power tools, read and understand the manufacturer's instructions before use. Consider having a helper available, especially when lifting heavy materials or working at heights.
When purchasing lumber, carefully inspect each piece for straightness and absence of defects. Warped or cracked lumber can compromise the structural integrity of the roof. Choose fasteners that are appropriate for outdoor use and compatible with pressure-treated lumber to prevent corrosion. Proper material selection is crucial for the longevity and safety of the patio roof.
Key Point 3: Construction Process
The construction process involves several distinct steps:
1. Preparing the Site (Freestanding Roof): If the patio roof is freestanding, begin by marking the locations for the support posts. Dig post holes to the required depth, typically below the frost line. Position the posts in the holes, ensuring they are plumb (perfectly vertical) using a level. Secure them in place with temporary bracing. Pour concrete mix into the holes around the posts, ensuring the concrete is properly mixed and compacted. Allow the concrete to cure for the manufacturer's recommended time before proceeding.
2. Attaching the Ledger Board (Attached Roof): If the patio roof is being attached to an existing structure, begin by attaching a ledger board to the house's wall. The ledger board is a horizontal board that provides support for the rafters. Ensure the ledger board is level and securely attached to the wall studs or framing members using lag bolts. Proper flashing should be installed above the ledger board to prevent water penetration into the house. The installation of flashing is a critical step in preventing water damage and must be performed correctly.
3. Installing the Beams: Beams are horizontal structural members that span between the posts (freestanding) or the posts and the ledger board (attached). The beams support the rafters and the roofing material. Attach the beams to the posts using appropriate fasteners, such as lag bolts or through bolts. Ensure the beams are level and securely fastened. If using multiple beams, ensure they are evenly spaced according to the plan.
4. Installing the Rafters: Rafters are the sloped framing members that extend from the beams to the roof's ridge (if applicable) or to the edge of the roof. Cut the rafters to the correct length and angle, using a miter saw for precise cuts. Space the rafters evenly apart, typically 16 or 24 inches on center, according to the plan. Attach the rafters to the beams and the ledger board (if applicable) using nails or screws. Ensure the rafters are aligned and securely fastened.
5. Installing the Roofing Material: Once the framing is complete, install the chosen roofing material. For asphalt shingles, start at the bottom edge of the roof and work upwards, overlapping each row of shingles. For metal roofing, follow the manufacturer's instructions for installation, ensuring proper sealing and fastening. For polycarbonate panels, cut the panels to size and attach them to the rafters using appropriate fasteners. For lattice, simply attach the lattice panels to the rafters using screws or staples.
6. Finishing Touches: After the roofing material is installed, add any finishing touches, such as trim boards or fascia boards. Apply a wood sealant or stain to the lumber to protect it from the elements and enhance its appearance. Inspect the entire roof for any loose fasteners or gaps and address them as needed. Clean the area and remove any construction debris.
Throughout the construction process, continually check for level and plumb to ensure the roof is square and structurally sound. Take regular breaks to avoid fatigue and maintain focus. If any uncertainties arise, consult with a qualified carpenter or building professional.
Maintaining the patio roof after construction is crucial for its longevity. Regularly inspect the roof for any signs of damage, such as loose shingles, cracked lumber, or water leaks. Address any issues promptly to prevent further damage. Clean the roof periodically to remove debris and prevent the growth of mold or algae. Regularly re-apply wood sealant or stain to protect the lumber from the elements. By following these maintenance tips, the patio roof can provide years of enjoyment and enhance the value of the property.

How To Build A Diy Covered Patio

Diy Patio Cover Plans

11 Patio Cover Ideas Anyone Can Diy The Garden Glove

Diy Building A Covered Patio With The Awesome Orange Strong

Patio Cover Free Diy Plans Howtospecialist How To Build Step By

Build A Patio Pergola Attached To The House Houseful Of Handmade

Diy Turning A Concrete Slab Into Covered Deck Catz In The Kitchen

Patio Roof Gazebo Construction Hometips Diy

Diy Patio Cover Under 400 In Materials Budget Friendly Backyard

Building A Patio Cover Plans For An Almost Free Standing Roof
Related Posts


