How to Build a Roof for Your Patio: A Comprehensive Guide
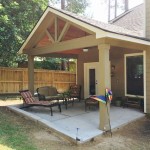
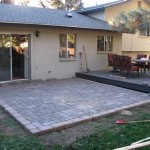
Adding a roof to a patio significantly enhances its usability and protects it from the elements. A covered patio becomes a versatile outdoor living space, offering shade from the sun, shelter from rain, and increased protection for outdoor furniture. Building a patio roof is a project that requires careful planning, precise execution, and adherence to local building codes. This article provides a comprehensive guide to constructing a patio roof, covering essential considerations, structural elements, and step-by-step instructions.
Planning and Preparation
Before commencing any construction, a thorough planning phase is crucial. This involves several critical steps, including determining the desired style and dimensions of the patio roof, obtaining necessary permits, and gathering all required materials and tools.
Design Considerations: The design of the patio roof should complement the existing architecture of the house. Common styles include gable roofs, shed roofs (also known as lean-to roofs), and flat roofs. A gable roof offers a traditional aesthetic and good water runoff, while a shed roof is simpler to construct and often less expensive. Flat roofs, although appearing simpler, require careful attention to waterproofing and drainage. The dimensions of the roof should be proportional to the patio area and provide adequate coverage. Consider the amount of sunlight desired; a larger overhang will offer more shade but may also darken the adjacent interior spaces.
Permits and Regulations: Building codes vary significantly depending on the location. It is imperative to check with the local municipality or building department regarding permit requirements. Failure to obtain necessary permits can result in fines or even the forced removal of the structure. The building department will likely require detailed plans showing the dimensions, materials, and construction methods. They will also ensure the roof meets structural requirements for wind and snow loads in the region.
Material Selection: The choice of materials will affect the appearance, durability, and cost of the patio roof. Common framing materials include pressure-treated lumber, which is resistant to rot and insect damage. Roofing materials can range from asphalt shingles to metal panels to polycarbonate sheets. Asphalt shingles are a cost-effective option but may require more frequent replacement than metal. Metal roofing is durable and energy-efficient but can be more expensive. Polycarbonate sheets offer transparency and allow natural light to filter through but may not provide as much shade. Consider the aesthetic appeal, longevity, and maintenance requirements of each material before making a decision.
Tools and Equipment: The following tools are generally required for building a patio roof: measuring tape, level, circular saw, drill, hammer, ladder, safety glasses, work gloves, and possibly a nail gun or screw gun for faster fastening. Depending on the complexity of the project, specialized tools like a post hole digger (if setting posts) or a miter saw (for precise cuts) may also be necessary.
Constructing the Support Structure
The support structure is the foundation of the patio roof and must be strong enough to withstand the weight of the roofing materials, as well as wind and snow loads. This typically involves setting posts (if the roof is freestanding) or attaching a ledger board to the existing house (for a lean-to or attached roof), followed by the construction of rafters and beams.
Setting Posts (Freestanding Roof): If the patio roof is not attached to the house, posts will need to be set deep enough to provide adequate support. The depth will depend on the frost line in the area; below the frost line is necessary to prevent heaving during freezing and thawing cycles. Use a post hole digger to create holes to the appropriate depth and diameter. Place the posts in the holes and ensure they are plumb (perfectly vertical) using a level. Backfill the holes with concrete, ensuring the posts remain plumb during the setting process. Allow the concrete to cure completely before proceeding to the next step.
Attaching a Ledger Board (Attached Roof): A ledger board is a horizontal piece of lumber that is attached to the house and serves as the primary support for the rafters. The ledger board must be securely fastened to the house framing, not just the siding. Locate the wall studs using a stud finder and mark their locations. Pre-drill holes through the ledger board at these locations and use lag screws to attach the ledger board to the studs. Ensure the ledger board is perfectly level before tightening the screws. Flashing above the ledger board is crucial to prevent water from seeping behind the ledger and into the house wall. This flashing should extend up under the existing siding and over the top of the ledger board.
Installing Beams and Rafters: Beams are horizontal structural members that span between the posts (for a freestanding roof) or between the posts and the ledger board (for an attached roof). Rafters are angled structural members that connect the beams to the ledger board (or to a ridge board in the case of a gable roof) and provide support for the roofing material. The spacing of the rafters will depend on the type of roofing material used and the anticipated load. Typically, rafters are spaced 16 inches or 24 inches on center. Use metal rafter ties or hurricane ties to securely connect the rafters to the ledger board and beams. These ties provide additional resistance against uplift from wind.
Installing the Roofing Material
The installation of the roofing material is the final step in building the patio roof. This process varies depending on the type of material chosen, but generally involves installing sheathing, underlayment, and the roofing material itself.
Installing Sheathing: Sheathing is a layer of plywood or OSB (oriented strand board) that is attached to the rafters and provides a solid surface for the roofing material. Cut the sheathing to size and attach it to the rafters using nails or screws. Ensure the sheathing is properly spaced to allow for expansion and contraction. Leave a small gap (approximately 1/8 inch) between the sheets of sheathing.
Installing Underlayment: Underlayment is a waterproof barrier that is installed over the sheathing to protect it from moisture. Common types of underlayment include roofing felt and synthetic underlayment. Roll out the underlayment and overlap the seams by several inches. Attach the underlayment to the sheathing using staples or roofing nails. Start at the bottom of the roof and work your way up, ensuring each layer overlaps the one below it.
Installing Roofing Material (Asphalt Shingles Example): Begin by installing drip edge along the eaves and rakes of the roof. Drip edge is a metal flashing that prevents water from running behind the fascia board. Start installing the shingles at the bottom edge of the roof, overlapping each course of shingles according to the manufacturer's instructions. Use roofing nails to attach the shingles to the sheathing. Be sure to properly flash around any penetrations in the roof, such as chimneys or vents. Follow the manufacturer's instructions carefully to ensure a watertight installation.
Additional Considerations: Regardless of the roofing material chosen, proper ventilation is crucial. Vents allow warm, moist air to escape from the attic or roof space, preventing condensation and extending the lifespan of the roof. Common types of vents include ridge vents, soffit vents, and gable vents. Ensure that the venting system is properly sized to meet the needs of the patio roof. Consider the aesthetic integration of the roof with the existing structure. Paint or stain the exposed wood to match or complement the house. Add decorative trim or molding to enhance the appearance of the roof. Regularly inspect the roof for any signs of damage and perform necessary maintenance to ensure its longevity.
Key Points: Safety, Precision, and Local Codes
Building a patio roof involves inherent risks. Safety should be the paramount consideration throughout the entire project. Working at heights requires appropriate safety equipment, including a secure ladder and fall protection. Wear safety glasses and work gloves to protect your eyes and hands. Use power tools carefully and follow the manufacturer's instructions. Have a second person to assist with lifting heavy materials and holding tools.
Precision is Key: Accurate measurements and precise cuts are essential for a structurally sound and aesthetically pleasing patio roof. Double-check all measurements before cutting any materials. Use a level and a square to ensure that all components are plumb and level. Take your time and pay attention to detail. Even small errors can accumulate and compromise the integrity of the roof.
Adhering to Local Codes: Building codes are in place to ensure the safety and structural integrity of buildings. It is imperative to comply with all local building codes when constructing a patio roof. Failure to do so can result in fines, delays, or even the forced removal of the structure. Consult with the local building department to obtain a complete list of applicable codes and regulations. Obtain necessary permits before commencing any construction. Schedule inspections at various stages of the project to ensure compliance with the codes.
By following these guidelines and taking the necessary precautions, a durable and attractive patio roof can be constructed, providing years of enjoyment and enhancing the value of the property.

Patio Cover Plans Build Your Or Deck

Patio Cover Plans Build Your Or Deck

Patio Cover Plans Build Your Or Deck

Porch Roof Construction How To Build Designs Pergola Patio Truss Design

How To Build Roof Over Deck

Patio Cover Plans Build Your Or Deck

Patio Cover Free Diy Plans Howtospecialist How To Build Step By

Building A Patio Cover Plans For An Almost Free Standing Roof

Patio Cover Plans Build Your Or Deck Diy Covered

How To Build A Patio Cover With Corrugated Metal Roof Building
Related Posts