How To Build A Pergola On A Patio
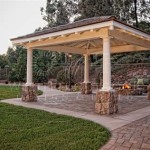
Constructing a pergola on an existing patio offers a structured and visually appealing outdoor living space. This architectural feature provides partial shade, enhances privacy, and creates a focal point for relaxation and entertainment. Successfully building a pergola requires careful planning, precise execution, and adherence to local building codes. This article outlines the essential steps and considerations for creating a durable and aesthetically pleasing pergola on a patio.
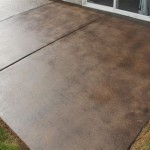
Before commencing any construction, assess the suitability of the patio for supporting a pergola. Consider the patio's existing structure, material, and drainage. Concrete patios typically offer a solid foundation, while paver patios may require additional stabilization. Ensure adequate drainage to prevent water accumulation around the pergola posts. Check local building codes and homeowner association regulations for any required permits or restrictions on structure height, placement, or materials.
Planning and Design Considerations
The design phase is crucial for ensuring the pergola meets functional and aesthetic requirements. Determine the desired size and shape of the pergola, considering the patio dimensions and intended use. Pergola size will affect the structural member dimensions; larger pergolas will need larger posts and beams. Common pergola shapes include rectangular, square, and arched designs. Select the appropriate materials, balancing durability, cost, and aesthetic appeal. Pressure-treated lumber is a cost-effective and weather-resistant option, while cedar and redwood offer natural beauty and longevity but are typically more expensive. Consider incorporating design elements such as climbing plants, lighting, or screens to enhance the pergola’s functionality and visual appeal.
Accurate measurements are essential for a successful build. Create a detailed plan, including the dimensions of the posts, beams, rafters, and any decorative elements. Calculate the required lumber based on the plan, adding extra material for cuts and potential errors. Decide on the post spacing, considering the structural integrity and desired aesthetic. Typical post spacing ranges from 8 to 12 feet. The type of wood also impacts the post spacing requirements. Sturdier woods, such as cedar, may allow for wider spacing without compromising structural integrity.
Proper planning includes selecting the correct fasteners and hardware. Use galvanized or stainless steel screws and bolts to prevent rust and corrosion. Choose post anchors appropriate for the patio surface, ensuring they can securely support the pergola posts. Consider decorative hardware to enhance the pergola’s appearance. These choices will contribute to the long-term durability and stability of the pergola.
Foundation and Post Installation
The foundation and post installation is a critical step in the pergola construction process. Securely anchoring the posts to the patio is essential for the pergola's stability and longevity. There are different methods for anchoring posts, depending on the patio material and local building codes.
For concrete patios, consider using surface-mounted post bases that are bolted directly to the concrete. These bases distribute the load evenly and provide a secure connection. Drill pilot holes into the concrete using a hammer drill and insert concrete anchors to secure the post bases. Ensure the post bases are level before attaching the posts. Alternatively, core drilling can be used to create holes for setting the posts in concrete, however, this is usually more difficult and is generally best done with new patio construction.
For paver patios, remove the pavers where the posts will be located and dig down to create a solid footing. Pour concrete into the footing and set the post anchors in the wet concrete. Ensure the anchors are level and plumb. Once the concrete has cured, replace the pavers around the posts, cutting them to fit as needed. Another approach is to use a wider paver area around the posts that are mortared together, so that it doesn't require cutting the pavers around the edges for a cleaner look. This adds stability to the pergola, and visually integrates it with the patio.
Once the post bases are secured, carefully position and attach the posts. Use a level and plumb bob to ensure the posts are perfectly vertical. Temporarily brace the posts with lumber to keep them in place while attaching the beams. Precise alignment of the posts is crucial for the pergola’s overall structural integrity and aesthetic appeal. Check alignment repeatedly during the installation process.
Beam and Rafter Installation
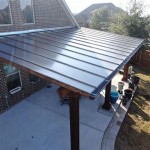
With the posts securely in place, the next step involves installing the beams and rafters. These structural elements provide the pergola's horizontal support and create the desired shade and aesthetic. The beams typically run along the top of the posts, while the rafters span the distance between the beams.
Begin by attaching the beams to the posts. Use appropriate fasteners, such as lag screws or bolts, to create a strong connection. Ensure the beams are level and aligned with each other. For longer spans, consider using multiple beams to increase structural support. When installing the beams, use a laser level to ensure accuracy in height and alignment. This will help create a visually appealing and structurally sound pergola.
Next, install the rafters. Determine the desired spacing between the rafters, considering the amount of shade required and the overall aesthetic. Evenly space the rafters along the beams and attach them using screws or nails. Consider using decorative rafter tails for added visual appeal. Cut the rafter tails to the desired shape using a jigsaw or circular saw. Ensure the rafter tails are consistent in length and shape for a professional finish.
For added stability, consider installing purlins, which are horizontal members that run perpendicular to the rafters. Purlins help to distribute the load evenly and prevent the rafters from sagging. Space the purlins evenly along the rafters and attach them using screws or nails. In some designs, lattice or decorative panels can be installed between the rafters for additional shade and visual interest. These elements can be customized to match the overall style of the pergola.
Properly installing the beams and rafters is essential for creating a sturdy and visually appealing pergola. Take the time to ensure all connections are secure and aligned. This will contribute to the pergola's long-term durability and enjoyment.
Finishing and Enhancements
Once the structural components are in place, the final step is to finish and enhance the pergola. This includes applying a weather-resistant finish, adding decorative elements, and incorporating features such as lighting or climbing plants. These enhancements will transform the pergola into a comfortable and inviting outdoor living space.
Apply a high-quality stain or sealant to protect the wood from the elements. Choose a finish that complements the surrounding landscape and provides adequate protection against moisture, sunlight, and insects. Apply multiple coats of finish, following the manufacturer's instructions. Regular maintenance and reapplication of the finish will help prolong the life of the pergola.
Consider adding decorative elements to enhance the pergola's visual appeal. These may include decorative post caps, intricate rafter tails, or custom-designed screens. Incorporate lighting to create a warm and inviting ambiance. String lights, pendant lights, or spotlights can be used to illuminate the pergola and surrounding patio area. Consider installing a dimmer switch to control the intensity of the lighting.
Climbing plants, such as wisteria, clematis, or grapevines, can add natural beauty and enhance the pergola's shade. Train the plants to grow along the posts and rafters, creating a lush and verdant canopy. Ensure the plants are appropriate for the local climate and growing conditions. Consider installing trellises or wires to support the climbing plants. Over time, these plants will transform the pergola into a beautiful and inviting outdoor retreat. Integrating the pergola with the surrounding landscaping can further enhance its aesthetic appeal and functionality.

How To Build A Pergola With Ease The Simple Secrets Success

Patio With Pergola Explore Modern Designs For Patios At Depot

Build A Patio Pergola Attached To The House Houseful Of Handmade

6 Free Pergola Plans Plus Pavilions Patios And Arbors Building Strong

Diy Pergola Kits Order Do It Yourself Depot

27 Lovely Pergola Ideas From Our Design Team Yardzen

Build A Pergola Diy Houselogic

Small Pergola Ideas Designs For Patios Backyards Now

How To Build A Pergola Plans Diy Family Handyman

How To Build A Pergola On Concrete Full Hearted Home
Related Posts