How To Build A Pergola On Concrete Patio
Constructing a pergola on an existing concrete patio offers an attractive and functional upgrade to outdoor living spaces. Pergolas provide partial shade, define areas for relaxation or dining, and enhance the aesthetic appeal of a property. This article details the process of building a pergola on a concrete patio, covering planning, material selection, construction steps, and important safety considerations.
Before commencing any construction, thorough planning is essential. This involves determining the desired size and location of the pergola, obtaining necessary permits, and ensuring compliance with local building codes. Failure to address these preliminary steps can lead to costly delays and potential legal issues.
Planning and Preparation
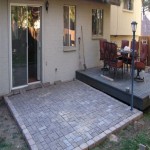
The initial step in building a pergola is to determine the desired dimensions and location. Consider the size of the patio, the amount of shade desired, and the overall architectural style of the home. A pergola that is out of proportion to the patio or clashes with the house's design will detract from the property's aesthetic value. Mark the proposed location of the pergola posts on the concrete patio. Accurate measurements are critical for ensuring a structurally sound and visually appealing pergola.
Following the establishment of dimensions, it is imperative to investigate local zoning regulations and building codes. Many municipalities require permits for structures exceeding a certain size or height. Failure to obtain the necessary permits can result in fines and potentially the forced removal of the pergola. Contact the local building department to determine the specific requirements in the area.
Concrete patios often contain embedded utilities, such as electrical conduits or irrigation lines. Before drilling into the concrete, it is essential to locate any buried utilities to avoid damaging them. Contacting local utility companies to mark the location of underground lines is a prudent step. Alternatively, employing a ground-penetrating radar service can provide a detailed map of subsurface infrastructure.
Once the planning phase is complete, gather all necessary materials and tools. This typically includes lumber for the posts, beams, and rafters; post anchors; concrete fasteners; a drill; a level; a measuring tape; a saw; and safety equipment. The type and quantity of materials will depend on the size and design of the pergola.
Material Selection and Tool Acquisition
The choice of materials significantly impacts the durability, appearance, and cost of the pergola. Common wood options include pressure-treated lumber, cedar, redwood, and composite materials. Pressure-treated lumber is a cost-effective choice for posts and beams, as it resists rot and insect infestation. Cedar and redwood offer natural beauty and are also resistant to decay, but they are typically more expensive. Composite materials are a low-maintenance alternative that mimics the look of wood but does not require painting or staining.
The selection of post anchors is also crucial. These anchors secure the pergola posts to the concrete patio, providing stability and preventing movement. Several types of post anchors are available, including surface-mount anchors, which are bolted directly to the concrete; and embedded anchors, which are set into the concrete during the pouring process. For existing concrete patios, surface-mount anchors are the most practical option. Choose anchors made of galvanized steel or stainless steel to resist corrosion.
In addition to lumber and post anchors, a variety of tools are needed for constructing the pergola. A power drill with concrete drill bits is essential for creating holes in the concrete for the post anchors. A level is necessary for ensuring that the posts and beams are plumb and level. A measuring tape and saw are needed for cutting the lumber to the correct size. Safety equipment, such as safety glasses, gloves, and a dust mask, should always be worn when working with power tools and concrete.
Consider the type of fasteners to be used. Expansion bolts are often suitable for anchoring the post base to concrete. The specific type and size of the bolts might vary based on the load requirements and the specifications of the post anchor being used.
Construction Process
The construction process involves several key steps, including installing the post anchors, erecting the posts, attaching the beams, and installing the rafters. Each step requires precision and attention to detail to ensure a structurally sound and aesthetically pleasing pergola.
The first step is to install the post anchors. Position the anchors at the marked locations on the concrete patio. Use a power drill with a concrete drill bit to create pilot holes for the anchor bolts. Insert the anchor bolts into the holes and tighten them securely. Ensure that the anchors are level and properly aligned before proceeding.
Once the post anchors are installed, erect the pergola posts. Place the posts into the anchors and secure them with bolts or screws. Use a level to ensure that the posts are plumb. Temporarily brace the posts with wooden supports to keep them upright while the beams are attached. The post height will dictate the overall height of the pergola, so ensure consistency in post length.
Next, attach the beams to the tops of the posts. The beams run horizontally along the length of the pergola, providing structural support and defining the overall shape. Secure the beams to the posts with screws or bolts. Ensure that the beams are level and properly aligned. Depending on the size of the pergola, additional support beams may be needed to prevent sagging.
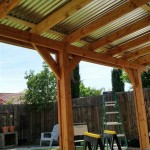
After the beams are in place, install the rafters. The rafters are the horizontal boards that run across the width of the pergola, providing shade and adding visual interest. Space the rafters evenly apart, typically 12 to 24 inches. Secure the rafters to the beams with screws or nails. The spacing and orientation of the rafters can be adjusted to control the amount of shade provided by the pergola.
Once the basic structure of the pergola is complete, consider adding decorative elements such as climbing vines, hanging plants, or outdoor lighting. These additions can enhance the aesthetic appeal of the pergola and create a more inviting outdoor space. Remember to use appropriate fasteners and supports for any added weight. For example, if hanging plants are to be installed, ensure the rafters and beams are appropriately sized to handle the additional weight.
Inspect all connections to ensure they are secure. Check the level and plumb of all components one final time. Apply a sealant or stain to the wood to protect it from the elements and enhance its appearance. Allow the sealant or stain to dry completely before using the pergola.
Safety Considerations
Safety should be a primary concern throughout the pergola construction process. Always wear appropriate safety gear, such as safety glasses, gloves, and a dust mask, when working with power tools and concrete. Use caution when drilling into concrete to avoid damaging buried utilities. Enlist the help of others when lifting heavy lumber or equipment. Follow the manufacturer's instructions for all tools and materials. By taking these precautions, the risk of accidents and injuries can be minimized.
When drilling into concrete, it's crucial to use the correct type of drill bit and to apply consistent pressure. Avoid forcing the drill bit, as this can cause it to break or overheat. If the drill bit becomes stuck, stop drilling and try a different technique. Use a hammer drill for more efficient and safer drilling of concrete.
When working at heights, use a stable ladder or scaffolding. Ensure that the ladder is properly positioned and secured before climbing. Avoid overreaching or leaning too far to one side. Enlist the help of a spotter when working at heights to prevent falls. Never work alone when performing tasks that require significant physical exertion or pose a risk of injury.
Be mindful of electrical safety when installing outdoor lighting or other electrical components. Use weatherproof wiring and fixtures that are designed for outdoor use. Ensure that all electrical connections are properly grounded and protected from moisture. If unsure about electrical work, consult a qualified electrician.
Adhering to these safety guidelines throughout the pergola construction process will help ensure a safe and successful project. Proper planning, careful execution, and a focus on safety are essential for creating a durable and attractive pergola that will enhance the enjoyment of outdoor living spaces.

How To Build A Pergola On Concrete Patio In Two Days 18 Steps With Pictures Instructables

How To Build A Pergola On Concrete Full Hearted Home

How To Build A Pergola On Cement Patio

How To Build A Pergola On Concrete Patio In Two Days 18 Steps With Pictures Instructables

Building A Pergola On Concrete Patio Diy Slab And Attached To The House

Pergola Placement Attaching Over A Deck Installing On Concrete Grass

Pergola On A New Concrete Patio Which Looks Like Great Area For Hamburgers And Hotdogs Looking Wor Backyard Design Designs

Diy Backyard Makeover Building A Concrete Patio With Pergola

Pergola Posts Discover How To Build A On Concrete Patio Or In Ground At Depot

Diy Overview A Pergola On Concrete Patio In 3 Days It S Possible
Related Posts