How to Build a Freestanding Patio Cover
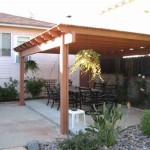
A freestanding patio cover is a fantastic way to add shade and style to your outdoor living space. It offers protection from the sun, rain, and other elements, creating a more enjoyable and comfortable area for entertaining, dining, or simply relaxing. Building a freestanding patio cover can be a rewarding DIY project, but it requires careful planning and execution. This article will guide you through the essential steps involved in constructing a sturdy and aesthetically pleasing freestanding patio cover.
1. Planning and Design
The first step is to carefully plan and design your patio cover. Consider the following factors:
-
Size:
Determine the desired dimensions of the cover, ensuring it fits comfortably within your patio space and meets your needs. -
Shape:
Popular shapes include rectangular, square, and gable. The choice depends on your aesthetic preferences and the available space. -
Materials:
Select durable and weather-resistant materials like treated lumber, cedar, or composite for the frame and roofing. Consider the style and desired longevity. -
Style:
Explore different roof styles (flat, pitched, vaulted) and decorative elements (beams, columns, fascia) to create a unique and appealing cover design. -
Permits:
Check with your local building department about any required permits for construction, especially if the cover is substantial in size.
Once you have a clear design in mind, create detailed plans and sketches to guide your construction process. This will ensure accuracy and prevent costly mistakes.
2. Preparing the Foundation
A sturdy foundation is crucial for supporting the weight of the patio cover. The foundation should be level and capable of handling the load. Here are common options:
-
Concrete piers:
These are strong and durable but require more labor and time for construction. Concrete piers need to be set at a sufficient depth below the frost line to prevent heaving. -
Pressure-treated wood posts:
These are easier to install and offer a cost-effective solution. However, they may require regular maintenance and are susceptible to rot over time. -
Metal posts:
Metal posts provide strength and durability, but they may require special considerations for attachment and waterproofing.
Regardless of the foundation type chosen, ensure that the posts are spaced adequately to support the weight of the roof and any additional load. Use a level and plumb line to ensure the posts are installed straight and in the correct position.
3. Framing and Roofing
Once the foundation is in place, proceed with the framing of the patio cover. This stage involves connecting the posts with beams, joists, and rafters to create the structural support for the roof.
-
Framing:
Use lumber that is sufficiently strong and durable to withstand the weight of the roof and potential snow loads. Connect pieces using galvanized screws or nails and ensure all joints are secure and properly reinforced. -
Roofing:
Choose a roofing material that suits your style and budget. Options include shingles, metal panels, tile, or polycarbonate sheets. Follow the manufacturer's instructions for installation to ensure proper waterproofing and longevity. -
Gutter System:
Install a gutter system to collect rainwater and divert it away from the foundation, preventing water damage.
Pay attention to the proper slope of the roof to allow for adequate water drainage and prevent water pooling. Ensure the roofing material is securely fastened and overlaps correctly to create a waterproof seal.
4. Finishing Touches
After completing the framing and roofing, you can add finishing touches that enhance the aesthetics and functionality of your patio cover.
-
Decking:
Install a deck or patio flooring material beneath the cover to create a comfortable and attractive surface. Choose a material that suits your style and outdoor usage. Options include wood, concrete, pavers, or composite decking. -
Lighting:
Add lighting fixtures to illuminate the space and enhance the ambiance during evening hours. Choose lighting that complements the style of the cover and provides adequate visibility. -
Ceiling Fan:
Install a ceiling fan to provide cooling relief on hot days and improve air circulation. -
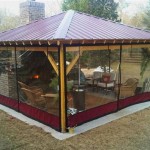
Screens or Curtains:
Consider adding screens or curtains to provide shade, privacy, and protection from insects.
These finishing touches will further elevate the enjoyment and functionality of your freestanding patio cover, creating a welcoming outdoor oasis.

Building A Patio Cover Plans For An Almost Free Standing Roof

How To Build A Freestanding Patio Cover With Best 10 Samples Ideas Homivi Pátio De Quintal Pérgula Em Design Pátios

How To Build A Freestanding Patio Cover With Best 10 Samples Ideas

Building A Patio Cover Plans For An Almost Free Standing Roof

Patio Cover Plans Wood S Creative Builders

Building A Patio Cover Plans For An Almost Free Standing Roof

Patio Roof Gazebo Construction Hometips Diy

How To Build A Diy Covered Patio

How To Build A Freestanding Patio Cover With Best 10 Samples Ideas Homivi Covered Design Plans

Building A Patio Cover Plans For An Almost Free Standing Roof
Related Posts