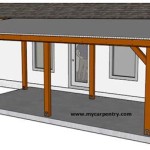
How to Build a Free-Standing Patio Cover: A Step-by-Step Guide
A free-standing patio cover offers a welcome respite from the sun's harsh rays and inclement weather. Whether you envision a relaxing shaded retreat for enjoying a morning coffee or a cozy space for entertaining guests, building a free-standing patio cover is a rewarding DIY project. This comprehensive guide will provide you with a step-by-step plan to erect a stylish and sturdy patio cover, empowering you to transform your outdoor area into a comfortable and functional haven.
1. Planning and Design
Before embarking on construction, meticulous planning is essential. This involves carefully considering the following aspects:
- Desired Dimensions: Determine the ideal size and shape of your patio cover, ensuring it complements the existing patio space and meets your needs.
- Material Selection: Choose materials that align with your aesthetic preferences and budget. Common options include wood, metal, and composite materials. Wood offers a natural feel, metal provides durability, and composite materials boast low maintenance requirements.
- Roof Style: Explore various roof styles, such as flat, pitched, or gable, to find one that complements your home's architecture and personal taste.
- Support System: Select the appropriate support system for your chosen roof style. This could involve posts, beams, and rafters.
- Local Building Codes: Consult local building codes to ensure your patio cover meets regulatory standards, including requirements for wind and snow loads.
Once you have a clear vision of your desired patio cover, create a detailed design plan. This plan should include specifications for the dimensions, materials, and construction methods.
2. Preparing the Site
Proper site preparation is crucial for ensuring a stable and level base for your patio cover. Follow these steps:
- Clear the Area: Remove any debris, vegetation, or existing structures from the designated space.
- Level the Ground: Use a level and a shovel to create a flat and level surface for the support posts. This ensures that the patio cover remains stable.
- Mark Post Locations: Measure and mark the precise locations for the support posts, considering the design plan and building codes.
- Excavate Post Holes: Dig holes for the support posts, ensuring they are deep enough and wide enough to accommodate concrete footings.
Ensure the post holes are dug to the required depth according to local building codes and the weight of the patio cover.
3. Installing the Support Posts
The installation of the support posts is a critical step, as they provide the structural foundation for the patio cover.
- Concrete Footings: Pour concrete into the excavated holes, ensuring the posts are set in the correct location and level. Allow the concrete to cure completely as per manufacturer recommendations.
- Post Placement: Position the support posts in the concrete footings, confirming they are plumb and level. Secure them using temporary supports.
- Secure Posts: After the concrete has cured, permanently secure the posts to the footings. This may involve attaching metal brackets or using specialized fasteners.
Before proceeding, carefully check the plumbness and level of the posts. Ensure they are securely anchored to the concrete footings to prevent movement.
4. Building the Framing
The framing of the patio cover provides the skeleton for the roof.
- Beam Installation: Install the beams that run horizontally between the support posts, connecting them securely and using appropriate fasteners.
- Rafter Installation: Attach the rafters to the beams, spacing them according to the chosen roof style and design.
- Roof Sheathing: Install the roof sheathing over the rafters, creating a solid base for the roofing material.
Ensure the framing is built according to the design plans and building codes. Secure all connections with appropriate screws or nails.
5. Roofing and Finishing
The final step involves adding the roofing material and any decorative elements to complete the patio cover.
- Roofing Material Installation: Apply the chosen roofing material, such as shingles, metal panels, or polycarbonate sheets, over the roof sheathing.
- Fascia and Soffit Installation: Install the fascia, which hides the ends of the rafters, and the soffit, which covers the underside of the roof.
- Finishing Touches: Add decorative elements, such as trim, lighting, or fans, to enhance the appearance and functionality of the patio cover.
Follow the manufacturer's instructions for installing the chosen roofing material. Ensure all finishing touches are completed securely and aesthetically pleasing.

Building A Patio Cover Plans For An Almost Free Standing Roof

How To Build A Diy Covered Patio

How To Build A Diy Covered Patio

12x16 Lean To Pavilion Free Diy Plans Howtospecialist How Build Step By Covered Patio Design Backyard

Building A Patio Cover Plans For An Almost Free Standing Roof

Screened In Porch Build Free Standing Roof For Covered Deck Diytyler

16 24 Lean To Patio Cover Plans Myoutdoorplans

Diy Covered Patio Building A Roof To Cover My Concrete P1 Foundation Framing Roofing

16 Diy Patio Cover Ideas To Transform Your Outdoor Space The Garden Glove

Screened In Porch Build Free Standing Roof For Covered Deck Diytyler
Related Posts