How to Build a Free-Standing Patio
A free-standing patio offers a versatile outdoor living space, independent of the main house structure. This allows for flexible placement in the yard, catering to specific sunlight or shade preferences. Building one requires careful planning and execution, but the resulting personalized space offers a rewarding return on investment.
Planning and Preparation
The initial phase focuses on defining the patio's purpose, desired size, and location. Consider how the space will be used – dining, lounging, or entertaining – to determine the appropriate dimensions. Analyzing the yard's topography helps identify a suitable spot. Level ground simplifies construction, but sloping areas can be accommodated with proper grading and retaining walls. Checking local building codes regarding setbacks and permits is crucial before commencing any construction.
Marking the patio’s perimeter with stakes and string defines the work area. Excavating the marked area to a depth of approximately 6 inches is necessary to create space for the base material. This excavated area should extend slightly beyond the string lines to account for the edging material. A level base is essential for a stable patio, therefore, careful attention should be paid to ensure even excavation.
Constructing the Base
A strong, well-drained base is essential for a durable and long-lasting patio. A layer of compacted gravel forms the foundation, preventing shifting and ensuring proper drainage. Spread a 4-inch layer of gravel evenly across the excavated area. Compact the gravel using a hand tamper or a plate compactor for larger areas. This process creates a stable and level surface for the subsequent layers. Checking the levelness regularly during compaction guarantees a uniform base.
On top of the compacted gravel, a layer of sand provides a bedding layer for the paving materials. Spread a 2-inch layer of sand evenly over the gravel base, smoothing it with a rake or screed. A level sand layer is crucial for even paving and preventing cracking. Compacting the sand layer, although not as rigorously as the gravel, ensures stability and minimizes settling.
Choosing and Laying Paving Materials
Various paving materials are suitable for a free-standing patio, including pavers, flagstone, or concrete slabs. The choice depends on aesthetic preferences, budget, and the surrounding landscape. Pavers offer a wide array of colors, shapes, and textures, providing design flexibility. Flagstone brings a natural, rustic look, while concrete slabs offer a cost-effective and durable option.
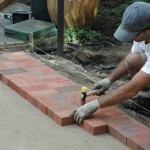
Begin laying the chosen paving material from one corner, working outward. Ensure each piece is level and tightly butted against adjacent pieces. Using a rubber mallet can help settle the pavers into the sand. Maintain consistent spacing between pavers if desired, using spacers for uniform gaps. Regularly check the levelness of the laid paving material to ensure a smooth and even surface.
Edging and Finishing
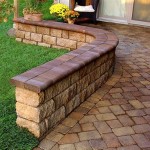
Edging materials such as plastic, metal, or brick help contain the paving materials and provide a clean, finished look. Install the edging around the perimeter of the patio, securing it firmly in place according to the manufacturer’s instructions. Backfilling the area behind the edging with soil helps stabilize it further.
Once the edging is in place, fill the gaps between the paving materials with jointing sand. Sweep the sand across the surface, ensuring it fills all the joints completely. This process locks the pavers in place and prevents weed growth. Lightly water the patio after applying the jointing sand to help it settle into the joints. Repeating this process may be necessary to completely fill all gaps.
Maintenance
Regular maintenance ensures the longevity and beauty of the free-standing patio. Sweeping the patio regularly removes debris and prevents staining. Periodically cleaning the patio with a mild detergent and water removes dirt and grime. Resealing the pavers every few years, depending on the material and climate, helps protect them from the elements and maintain their appearance.

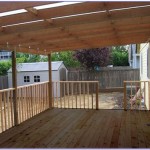
Building A Patio Cover Plans For An Almost Free Standing Roof

Building A Patio Cover Plans For An Almost Free Standing Roof

Patio Roof Gazebo Construction Hometips Diy

6 Free Pergola Plans Plus Pavilions Patios And Arbors Building Strong

How To Build A Freestanding Patio Cover With Best 10 Samples Ideas

Building A Patio Cover Plans For An Almost Free Standing Roof

How To Build A Freestanding Patio Cover With Best 10 Samples Ideas

How To Build A Freestanding Patio Cover With Best 10 Samples Ideas Homivi Covered Design Plans

Patio Cover Plans Wood S Creative Builders

How To Build A Small Freestanding Deck So Much Better With Age
Related Posts