For better understanding, write this article for a complete beginner. ## How To Build A Brick Patio On A Sloped Yard Constructing a brick patio on a sloped yard presents unique challenges compared to building on level ground. The slope introduces complexities in achieving a stable, even surface, managing drainage, and preventing erosion. However, with careful planning, appropriate techniques, and diligent execution, converting a sloped area into a beautiful and functional brick patio is entirely achievable. This article provides a comprehensive guide for beginners, outlining the necessary steps and considerations for building a brick patio on a sloped yard.
Before commencing any physical work, a thorough assessment of the yard's slope is critical. This assessment involves determining the degree of the slope, identifying any existing drainage patterns, and considering existing vegetation and structures that might influence the patio's design and construction. Accurate measurements are crucial for calculating material requirements and planning the patio's layout.
The primary challenge with a sloped yard is ensuring the patio surface is level and stable. Several methods can be employed to address this, each with its own advantages and disadvantages. These methods include terracing, creating a retaining wall, or a combination of both. The choice depends on the severity of the slope, the desired aesthetic, and the available budget.
Building a brick patio requires a significant investment of time and resources. Careful planning, accurate measurements, and diligent execution of each step are essential for a successful project. Rushing the process or neglecting any aspect can compromise the patio's structural integrity and longevity.
Key Point 1: Planning and Preparation
The planning and preparation phase is the cornerstone of any successful patio project, especially when dealing with a sloped yard. This phase involves several critical steps that lay the foundation for subsequent construction.
First, determine the size and shape of the patio. Consider the intended use of the space, the available area, and the overall aesthetic. Sketching a rough layout can help visualize the patio's appearance and identify any potential obstacles or challenges.
Next, precisely measure the dimensions of the proposed patio area. Use a measuring tape or laser distance measurer for accuracy. Document these measurements for future reference. When dealing with a slope, measure the elevation change across the area. This measurement is crucial for determining the amount of excavation and fill required to achieve a level surface.
Consider the existing drainage patterns of the yard. Identify where water naturally flows and take steps to ensure the patio does not obstruct or disrupt these patterns. Proper drainage is essential for preventing water from pooling on the patio surface or undermining its foundation.
Determine the type of brick to use. Brick comes in various sizes, colors, and textures. Choose a brick that complements the surrounding landscape and meets the desired aesthetic. Consider the brick's durability and resistance to weathering, especially if the patio will be exposed to harsh weather conditions.
Finally, create a comprehensive materials list. This list should include the quantity of bricks, base material (gravel and sand), edging material (if desired), and any other necessary supplies. Accurate material estimation helps avoid unnecessary trips to the hardware store and ensures the project stays within budget.
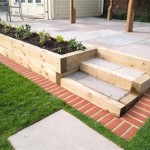
For a sloped yard, carefully consider the method of leveling the surface. Terracing involves creating a series of stepped level areas, while a retaining wall supports the higher ground and allows for a level patio area. The decision depends on the slope's steepness and design preferences. Creating a detailed plan of terracing or walls (with elevation measurements) is essential.
Obtain all necessary permits. Check with local authorities to determine if any permits are required for building a patio on a sloped yard. Obtaining the required permits ensures compliance with local building codes and regulations.
Key Point 2: Excavation and Base Preparation
Once the planning phase is complete, the next step involves excavating the area and preparing the base for the brick patio. This step is crucial for creating a stable and long-lasting foundation.
Marking the perimeter of the patio is the first step in this process. Utilize string lines and stakes to define the exact boundaries of the patio. Ensure the string lines are taut and level. Double-check the measurements to ensure accuracy.
Excavate the area to the required depth. The depth of excavation depends on the thickness of the base material and the desired level of the patio surface. A general guideline is to excavate at least 6-8 inches deep. If terracing or retaining walls are planned, the excavation will be more extensive, requiring precise measurement and careful attention to prevent soil collapse. Extra space around the walls may be needed during excavation.
Compacting the subsoil is critical for providing a stable base. Use a plate compactor to compact the exposed soil. This process helps eliminate air pockets and ensures the soil is firm and level. Uneven compaction can lead to settling and uneven patio surfaces in the future.
Adding a layer of gravel is the next step. Spread a layer of gravel, typically 4-6 inches thick, over the compacted subsoil. The gravel provides drainage and helps distribute the weight of the patio evenly. Use a rake to spread the gravel evenly and ensure it is level. Compacting the gravel layer is necessary. Use a plate compactor to compact the gravel. This creates a solid and stable base for the sand layer.
Spreading a layer of sand is the final step in base preparation. Spread a layer of sand, typically 1-2 inches thick, over the compacted gravel. The sand provides a smooth and level surface for laying the bricks. Use a screed board to level the sand. A screed board is a long, straight piece of wood or metal that is dragged across the sand to create a perfectly level surface. Work in small sections to ensure the sand is uniformly level. Lightly compact the sand layer. Use a hand tamper to lightly compact the sand. Avoid over-compacting the sand, as this can make it difficult to adjust the bricks during installation.
During the gravel and sand layering, it is crucial to maintain a consistent slope for drainage. If water will be directed away from the house, the gravel and sand base must reflect this grading during application.
Key Point 3: Laying the Bricks and Finishing
With the base properly prepared, the next step is laying the bricks and completing the patio. This step requires patience, precision, and attention to detail.
Planning the layout of the bricks is an important initial consideration. Decide on the desired pattern for the bricks. Common patterns include running bond, herringbone, and basket weave. Plan the layout to minimize the need for cutting bricks.
Begin laying the bricks along one edge of the patio. Start at a corner or along a straight line. Use a rubber mallet to gently tap the bricks into place. Ensure the bricks are level and evenly spaced. Use a level to check the level of each brick. The bricks should be flush with each other and with the surrounding ground. Use spacers to maintain uniform spacing between the bricks. This creates a consistent and aesthetically pleasing appearance.
Cutting bricks is often necessary to fit around edges or obstacles. Use a brick saw or a chisel and hammer to cut the bricks. Wear safety glasses and gloves when cutting bricks. Take accurate measurements and cut the bricks precisely to ensure a snug fit.
Sweep sand into the joints between the bricks. Use a broom or a brush to sweep sand into the joints. The sand helps lock the bricks in place and prevents them from shifting. Compact the sand with a plate compactor or hand tamper. This helps settle the sand and ensures it fills the joints completely.
Adding edging is an optional step that can enhance the appearance and stability of the patio. Install brick edging, paver edging, or other suitable materials around the perimeter of the patio. Edging helps prevent the bricks from shifting and provides a clean, finished look.
Clean the patio surface is the final step. Remove any excess sand or debris from the patio surface. Use a hose to gently rinse the patio. Allow the patio to dry completely before using it.
Consider sealing the brick patio. Sealing the bricks can help protect them from staining, fading, and weathering. Choose a sealer that is appropriate for the type of brick used. Follow the manufacturer's instructions for application.
When laying bricks, be aware of the slope and maintain a consistent grade. Slight adjustments to the sand base might be needed to ensure each brick sits level in relation to the overall patio surface. The use of a long level or laser level is recommended to check the overall grade periodically during brick laying. If terracing or retaining walls were constructed, ensure proper weep holes or drainage systems are in place behind the walls to prevent water buildup, which could compromise the structure.
Building a brick patio on a sloped yard requires careful planning, precise execution, and diligent attention to detail. However, the result is a beautiful and functional outdoor space for enjoying the outdoors.

Paver Patio Slope

Part 1 How To Build A Paver Patio On Slope And Prevent Soil Erosion

Block Patio Slope Question

How To Improve A Sloped Backyard With Grading And Clay Pavers

How To Make The Most Of Your Sloped Yard Full Circle Land Design

Part 5 How To Build A Paver Patio On Slope And Prevent Soil Erosion 1yr Later

Block Patio Slope Question Doityourself Com Community Forums

How To Install Pavers On A Slope In 10 Steps Unilock

How To Build A Raised Patio Guide By Fantastic

Paver Patio On A Slope Outdoor Living Tip Of The Day
Related Posts