How to Build a Brick Patio on Sloped Ground
A brick patio can elevate the aesthetic appeal and functionality of any outdoor space. However, constructing a patio on sloped ground presents unique challenges that require careful planning and execution. Addressing the slope effectively ensures a level and stable patio surface, enhancing both its beauty and longevity. This guide outlines the steps involved in building a brick patio on sloped ground, equipping you with the knowledge to tackle this project successfully.
1. Planning and Preparation
Before embarking on the construction process, meticulously plan the design, size, and location of the patio. Consider the existing slope, desired patio dimensions, and surrounding landscaping.
Determine the Slope's Severity: A gentle slope might only require a slight leveling adjustment, while a steeper slope necessitates more extensive modifications. Measure the slope using a level and mark the highest and lowest points to calculate the overall difference in elevation.
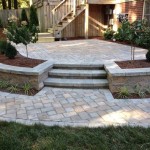
Design the Patio Layout: Sketch a layout plan depicting the patio's size, shape, and brick pattern. It's crucial to factor in the slope when planning the layout. Consider creating a series of stepped levels or utilizing a retaining wall to accommodate the uneven terrain.
Prepare the Worksite: Clear the area of any vegetation, debris, and existing structures that might interfere with the construction. Remove existing soil to the desired depth, ensuring ample room for the base layers and brick pavers.
2. Leveling the Ground
Leveling the ground is essential for creating a stable and aesthetically pleasing patio surface. Incorporate these steps to achieve a level foundation:
Excavate and Fill: If the slope is moderate, excavation and backfilling can be employed to create a level base. Excavate the higher portion of the slope and fill it with compacted gravel or crushed stone. Ensure that the backfill material is thoroughly compacted to prevent settling over time.
Construct a Retaining Wall: For steeper slopes, a retaining wall is necessary to stabilize the ground and create a level patio surface. Choose a material that complements the existing landscape and the patio's design, such as stone, concrete blocks, or timber. Ensure the wall is securely anchored to the ground to withstand soil pressure.
Use a Level and String Line: After excavating or constructing a wall, use a level and string line to check the level of the ground. Make adjustments as needed to ensure a perfectly level surface for the patio construction.
3. Building the Base
A solid base is crucial for supporting the weight of the brick patio and distributing it evenly. Constructing a well-compacted base will enhance the durability and longevity of the patio.
Lay a Compacted Layer of Gravel: The first layer should consist of a 4 to 6 inches thick layer of compacted gravel or crushed stone. This layer provides drainage and a stable foundation for the subsequent layers.
Install a Sand Bedding: Once the gravel layer is compacted, spread a 2 to 3 inches thick layer of sand on top. This layer provides a smooth surface for laying the bricks and allows for minor adjustments during the installation process.
4. Laying the Bricks
The bricklaying process requires precision and attention to detail to create a beautiful and durable patio surface.
Start at the Highest Point: Begin laying bricks from the highest point of the patio, working downwards. This facilitates a smooth and consistent layout.
Utilize String Lines: Use string lines to establish straight lines and guide the placement of the bricks. Adjust the lines as necessary to maintain uniformity throughout the patio.
Lay Bricks in a Pattern: Choose a brick pattern that suits your design preference. Common patterns include running bond, herringbone, and basketweave. Place each brick firmly into the sand bed, ensuring it's flush with the surrounding bricks.
Add Mortar or Polymeric Sand: After laying the bricks, fill in the gaps between them with joint filler, such as mortar or polymeric sand. Mortar provides a traditional look and good adhesion, while polymeric sand offers a durable, weed-resistant option.
5. Finishing Touches
Following the bricklaying, complete the finishing touches to enhance the patio's aesthetics and functionality.
Clean and Seal: Clean the patio surface with a stiff brush to remove any excess mortar or sand. Apply a sealant to protect the bricks from moisture and stains, enhancing their appearance and longevity.
Add Landscaping Elements: Incorporate landscaping elements around the patio, such as plants, trees, or decorative stones. These enhancements will create a cohesive and inviting outdoor space.
Install Lighting: Consider adding patio lighting to create ambiance and illuminate the space for evening use. Lighting options include solar-powered lights, string lights, or landscape lights.

How To Build A Paver Patio On Slope

Block Patio Slope Question Doityourself Com Community Forums Sloped Backyard Landscaping Raised

How To Improve A Sloped Backyard With Grading And Clay Pavers

Part 1 How To Build A Paver Patio On Slope And Prevent Soil Erosion

How To Lay A Brick Patio 14 Steps With Pictures Wikihow

How To Build A Brick Patio This Old House

How To Design Build A Paver Patio At Lowe S

How To Improve A Sloped Backyard With Grading And Clay Pavers

Paver Base Prep Steep Slope Clay Sub Soil Open Grade Absolutely

Avoiding Disaster Through Proper Design Of A Raised Paver Patio Stonehenge Brick Paving And Landscaping
Related Posts