How to Build a Block Patio
Constructing a block patio represents a rewarding home improvement project that enhances outdoor living spaces. This endeavor, while requiring physical exertion and careful planning, can significantly increase property value and provide an area for relaxation, entertainment, and outdoor dining. This article provides a comprehensive guide on how to build a durable and aesthetically pleasing block patio.
Before embarking on the patio construction, meticulous planning is paramount. This stage involves determining the desired size and shape of the patio, considering local building codes and regulations, and selecting the appropriate type of block. Furthermore, assessing the existing ground conditions and ensuring proper drainage are critical prerequisites.
Choosing the Right Materials and Tools
Selecting the correct materials is crucial for the longevity and visual appeal of the patio. Block selection depends on personal preference, budget, and the desired aesthetic. Common choices include concrete pavers, brick, flagstone, and interlocking blocks. Each material offers unique advantages and disadvantages regarding cost, durability, and installation complexity.
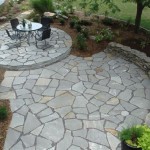
Concrete pavers are a popular choice due to their affordability, versatility, and ease of installation. They are available in various colors, shapes, and sizes, offering numerous design possibilities. Brick provides a classic and timeless look, but it can be more expensive than concrete pavers. Flagstone offers a natural and rustic aesthetic, but its irregular shapes can make installation more challenging. Interlocking blocks are designed to fit together seamlessly, simplifying the installation process and creating a durable surface.
Beyond the paving material, other essential materials include base aggregate (crushed stone or gravel), bedding sand, polymeric sand, edging material (plastic, metal, or stone), and landscape fabric. The base aggregate provides a stable foundation for the patio, while the bedding sand creates a level surface for the blocks. Polymeric sand fills the joints between the blocks, preventing weed growth and stabilizing the patio surface. Edging material prevents the blocks from shifting and defines the patio's perimeter. Landscape fabric prevents weed growth from underneath the patio.
A well-equipped toolbox is essential for efficient and accurate patio construction. The necessary tools include a shovel, a wheelbarrow, a tamper (hand or plate compactor), a level (spirit or laser), a measuring tape, a string line, stakes, a rubber mallet, a circular saw with a masonry blade (for cutting blocks), a broom, and safety glasses and gloves.
Preparing the Site
Proper site preparation is fundamental to ensuring a stable and long-lasting patio. This process involves removing existing vegetation, excavating the area, compacting the subsoil, and installing the base aggregate.
The first step is to remove all existing vegetation, including grass, weeds, and roots, from the designated patio area. This can be accomplished using a shovel, a sod cutter, or a herbicide. Next, excavate the area to a depth that accounts for the thickness of the base aggregate, bedding sand, and paving blocks. The depth of excavation will vary depending on the type of soil and the intended use of the patio. A general guideline is to excavate at least 6-8 inches for a standard patio.
After excavation, compact the subsoil using a hand tamper or a plate compactor. This step is crucial for preventing settling and ensuring a stable foundation. Compact the soil in layers, ensuring each layer is thoroughly compacted before adding the next. Use a level to ensure the excavated area is flat and even. Address any unevenness or discrepancies by adding or removing soil and re-compacting the area.
Once the subsoil is compacted, install the base aggregate. The base aggregate provides drainage and prevents the paving blocks from shifting. Spread the aggregate evenly over the excavated area and compact it thoroughly using a plate compactor. The thickness of the base aggregate should be at least 4-6 inches for a standard patio. Slope the base aggregate slightly away from the house to facilitate water drainage.
After compacting the base aggregate, install landscape fabric over the area. This fabric acts as a barrier, preventing weeds from growing up through the patio blocks. Overlap the edges of the fabric by several inches to ensure complete coverage.
Laying the Blocks
With the site properly prepared, the process of laying the blocks can commence. This stage involves installing the edging material, spreading the bedding sand, and carefully positioning the blocks according to the chosen pattern.
Begin by installing the edging material around the perimeter of the patio. The edging material prevents the blocks from shifting and defines the patio's shape. Options include plastic, metal, or stone edging. Secure the edging material in place using stakes or concrete mix.
Next, spread a layer of bedding sand evenly over the base aggregate. The bedding sand provides a level surface for the blocks and allows for minor adjustments during installation. Use a straight edge or a screed board to level the sand to a uniform depth of approximately 1 inch. Avoid compacting the bedding sand.
Start laying the blocks according to the chosen pattern. Begin at a corner or edge and work outwards. Place each block carefully onto the bedding sand, ensuring it is level and aligned with the adjacent blocks. Use a rubber mallet to gently tap the blocks into place. Maintain consistent spacing between the blocks to create uniform joints.
As the blocks are laid, continuously check for level and alignment using a level and a string line. Make any necessary adjustments by adding or removing sand underneath the blocks. If a block needs to be cut to fit, use a circular saw with a masonry blade. Wear safety glasses and a dust mask when cutting blocks.
Finishing Touches
After all the blocks have been laid, the final step involves filling the joints with polymeric sand and sweeping the patio clean. These finishing touches enhance the stability, durability, and aesthetic appeal of the finished patio.
Once all the blocks are placed, spread polymeric sand evenly over the entire patio surface. Polymeric sand is a special type of sand that contains polymers that bind together when wetted, creating a firm and stable joint that resists weed growth. Use a broom to sweep the sand into the joints between the blocks, ensuring they are completely filled. Compact the sand in the joints using a hand tamper or a plate compactor with a rubber mat.
After the joints are filled with polymeric sand, lightly water the patio surface using a garden hose with a fine spray nozzle. The water activates the polymers in the sand, causing them to bind together and create a solid joint. Avoid overwatering, as this can wash away the sand. Allow the patio to dry completely for at least 24 hours before using it.
Finally, sweep the patio clean to remove any excess sand or debris. Inspect the patio for any unevenness or discrepancies and make any necessary adjustments. The newly constructed block patio is now ready for use, providing a comfortable and attractive outdoor living space.

How To Build A Patio In Weekend Finegardening

Budget Friendly Diy Paver Block Patio Interior Frugalista

How To Build A Patio An Easy Do It Yourself Project

How To Build A Patio Block Bench At Lowe S

How To Build A Paver Patio It S Done Young House Love

Installing A Diy Paver Patio Is The Ultimate Spring Project

How To Build A Paver Patio It S Done Young House Love

Diy Pea Gravel Patio With Pavers Love Renovations

How To Build A Raised Patio With Retaining Wall Blocks

Budget Friendly Diy Paver Block Patio Interior Frugalista
Related Posts