Adding a patio awning to your home is a great way to enjoy the outdoors without being overly exposed to the elements. While there are many options for purchasing a pre-made awning, a DIY patio awning is a great way to customize the look of your outdoor space and save money at the same time. Here are a few tips and tricks to get you started on your DIY patio awning.
The first step in creating your patio awning is to choose the right material. If you want a lightweight, easy-to-install option, canvas or vinyl are great choices. If you are looking for a more permanent and durable awning, you may want to consider aluminum or steel. Whichever material you choose, make sure it is UV-resistant and waterproof.
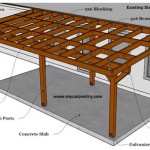
Once you have chosen the right material, you will need to measure the area where the awning will be installed. This will help you determine the size and shape of the awning you need. Additionally, you will need to take into account the height of the mounting hardware and the weight of the awning when considering how many support beams and posts you may need.
The next step is to assemble the mounting hardware and posts. Make sure to follow the instructions that come with the hardware and posts, as the installation can be complicated. If you are not confident in your DIY skills, it may be wise to hire a professional for the installation.
The last step is to attach the awning fabric to the frame. You will need to carefully measure and cut the fabric to the right size and shape. Make sure to use heavy-duty thread and a sewing machine to ensure a secure attachment. Once the awning fabric is attached, you can install the awning onto your home. With a little bit of patience and effort, you can easily create a DIY patio awning for your home.


Related Posts


