DIY Free-Standing Patio Cover Plans: A Step-by-Step Guide
Building a free-standing patio cover is a rewarding DIY project that adds value and functionality to your outdoor living space. A patio cover provides shade from the sun, protection from rain, and a stylish architectural element that enhances your home's curb appeal. While the process may seem daunting, with meticulous planning and detailed instructions, you can confidently construct a sturdy and aesthetically pleasing patio cover. This article provides a comprehensive guide to creating a DIY free-standing patio cover, encompassing critical steps, essential materials, and helpful tips.
1. Design and Planning: Laying the Foundation for Success
Before embarking on construction, thorough planning is paramount. This involves designing your patio cover, considering its dimensions, style, and materials. Start by measuring the area where you wish to install the cover. Determine the desired size and shape; common shapes include rectangular, square, and octagonal. The size should be large enough to effectively cover the patio area while allowing for comfortable movement.
Next, consider the materials. Common choices include wood, metal, or composite materials. Wood offers a natural aesthetic and is relatively easy to work with, while metal is durable and requires minimal maintenance. Composite materials provide a combination of durability and aesthetics. Think about your budget, desired style, and longevity when selecting materials.
Once you have settled on the dimensions and materials, create a detailed plan. This should include drawings, specifications, and a materials list. Consider using CAD software or drafting tools to create professional-looking plans. For complex designs, consult with a structural engineer to ensure the cover is safe and meets building codes.
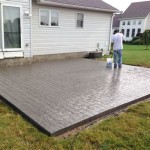
2. Site Preparation: Building a Solid Base
A sturdy foundation is essential for a free-standing patio cover. The type of foundation depends on the soil conditions, local building codes, and the weight of the cover. For lightweight covers, concrete footings may suffice. However, for heavier structures, consider using a pier and beam foundation or a concrete slab.
Begin by excavating the site and leveling the ground. Mark the locations for the footings or piers using stakes and string. If using concrete footings, dig holes to a depth of at least 12 inches and a width of 12 inches. Pour a layer of gravel in the bottom of the hole for drainage.
For pier and beam foundations, use concrete piers set in concrete footings. The piers provide support for the beams, which will be used to support the cover's frame. The beams should be made of pressure-treated lumber for durability and resistance to moisture damage.
Allow the foundation to cure completely before proceeding to the next step. This will ensure that the foundation is strong enough to support the weight of the cover.
3. Framing and Construction: Assembling the Structural Skeleton
The framing is the backbone of your patio cover. It provides the structural support for the roof and ensures stability. Use pressure-treated lumber for the framing to resist rot and decay. Begin by constructing the main posts that will support the roof. The height of the posts will determine the overall height of the cover.
Connect the posts with beams running across the top and bottom. The beams should be securely attached to the posts using joist hangers or other appropriate fasteners. Install crossbeams between the top beams for added support, especially if the cover has a large span.
For the roof structure, use joists to create a framework. These joists should be spaced according to the design and the type of roofing material you are using. Attach the joists to the beams using joist hangers or other suitable fasteners. Ensure the joists are leveled and aligned for a smooth and even roof surface.
Once the frame is assembled, ensure it is plumb and square. Secure the framing to the foundation using appropriate hardware or bolts.
4. Roofing and Finishing Touches: Encasing the Cover
The roofing material is a key element in determining the style and functionality of your patio cover. Consider your budget, desired aesthetics, and local climate when selecting a roofing material. Common choices include:
- Metal roofing: Durable, weather-resistant, and available in various styles.
- Asphalt shingles: An economical option, offering good weather protection.
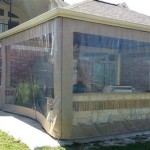
- Polycarbonate panels: Lightweight and translucent, providing diffused light.
- Fabric covers: Offer shade and are easily removable.
Install the roofing material according to the manufacturer's instructions. Ensure it is properly secured to the roof frame for optimal weather resistance. Once the roofing is complete, add any finishing touches, such as gutters, fascia boards, and soffits.
For added protection and aesthetics, consider installing a ceiling or a decorative trim. This can be made of wood, metal, or other materials that complement the style and design of the cover.

Patio Cover Plans Gardenplansfree Covered Design Diy

Diy Patio Cover Plans

Patio Roof Gazebo Construction Hometips Diy

Patio Cover Plans Build Your Or Deck

Patio Cover Plans Build Your Or Deck

Patio Cover Plans Build Your Or Deck

20 Cad Drawings For Designing An Outdoor Patio Design Ideas The Built World

Patio Cover Plans Build Your Or Deck

20 Cad Drawings To Help Design A Beautiful Garden Oasis Ideas For The Built World

Gazebo Detail 2d View Elevation And Plan Layout File In Autocad Format Floor Design Pergola Plans Rooftop Terrace
Related Posts