Creating a Patio With Cement Blocks
A patio constructed from cement blocks offers a durable, cost-effective, and aesthetically versatile outdoor living space. Cement blocks, also known as concrete masonry units (CMUs), are readily available, relatively inexpensive, and can be arranged in a variety of patterns to create a unique and functional patio. Planning and executing the project correctly ensures a long-lasting and visually appealing result.
The initial stage of patio construction centers around meticulous planning and preparation. This phase sets the foundation for a successful project and minimizes potential issues later on. It encompasses site selection, design considerations, material estimation, and securing necessary permits.
1. Site Selection and Preparation
Choosing the appropriate location for the patio is paramount. Several factors influence this decision. First, consider the proximity to the house. A patio adjacent to a back door or kitchen enhances accessibility and makes outdoor dining more convenient. The location's natural features, such as existing trees, slopes, and sunlight exposure, also play a significant role.
Assess the soil composition of the intended site. Clay soil, for instance, retains water, which can lead to settling and cracking of the patio over time. Sandy soil, on the other hand, drains well but may require more extensive compaction. Regardless of the soil type, proper drainage is crucial to prevent water accumulation under the patio. This may involve sloping the patio slightly away from the house or installing a drainage system.
Once the location is finalized, preparation begins with clearing the area. Remove any existing vegetation, including grass, weeds, and roots. This prevents organic matter from decomposing beneath the patio, which can cause uneven settling. Excavate the area to a depth of at least 6 inches, or more depending on the desired base material depth and local frost line considerations. The depth should also account for the thickness of the cement blocks themselves.
Leveling the excavated area is essential. Use a level and a long, straight board to ensure a uniform surface. A slight slope, typically about 1/4 inch per foot, away from the house is recommended for drainage. Compacting the soil base is the next crucial step. A plate compactor or hand tamper can be used to achieve a firm and stable foundation. Compaction reduces the risk of settling and provides a solid base for the subsequent layers.
2. Base Material and Cement Block Installation
The base material provides a stable and well-draining foundation for the cement blocks. Crushed stone or gravel is commonly used for this purpose. The depth of the base layer depends on the soil type and local climate conditions, especially the frost line. In regions with severe winters, a deeper base layer is necessary to prevent frost heave.
Spread the crushed stone or gravel evenly across the excavated area and compact it thoroughly using a plate compactor. This layer should be at least 4 inches thick, but may need to be thicker in areas with poor drainage or heavy loads anticipated on the patio. After compacting the base, a layer of leveling sand is applied. This sand layer helps to create a smooth and uniform surface for the cement blocks to rest on.
Spread the leveling sand evenly over the compacted base material to a depth of approximately 1 inch. Use a screed board to create a level surface. The screed board should be slightly longer than the width of the patio area. Drag the screed board across the sand, using the edges of the excavated area as guides, to create a perfectly level surface. This process ensures that the cement blocks are laid evenly and that the patio surface is flat.
With the base prepared, the cement blocks can be laid. Start at one corner of the patio and work your way across, ensuring that each block is level and properly aligned. A rubber mallet can be used to gently tap the blocks into place. Maintain consistent spacing between the blocks. This spacing can be filled with sand, gravel, or polymeric sand, which helps to lock the blocks together and prevent weed growth.
Various laying patterns can be used to create different aesthetic effects. Common patterns include running bond, herringbone, and basket weave. The choice of pattern depends on personal preference and the overall design of the outdoor space. If cutting cement blocks is necessary, use a masonry saw or a chisel and hammer. Always wear safety glasses and gloves when cutting cement blocks.
3. Finishing Touches and Maintenance
Once the cement blocks are laid, the joints between them need to be filled. Sand, gravel, or polymeric sand can be used for this purpose. Sand and gravel are relatively inexpensive and easy to install, but they may require periodic replenishment. Polymeric sand is a more durable option that helps to prevent weed growth and erosion. It is activated by water and hardens to form a flexible joint.
To install polymeric sand, sweep it into the joints between the cement blocks. Make sure that the joints are completely filled. Then, use a broom to remove any excess sand from the surface of the blocks. Finally, lightly mist the surface of the patio with water to activate the polymeric sand. Follow the manufacturer's instructions for specific water application guidelines.
After the joints are filled, consider adding edging to the patio. Edging helps to contain the cement blocks and prevent them from shifting over time. Various edging materials can be used, including plastic edging, metal edging, and brick or stone edging. Choose an edging material that complements the overall design of the patio.
Maintaining a cement block patio involves regular sweeping to remove dirt and debris. Periodically check the joints between the blocks and refill them as needed. Address any cracks or damage to the cement blocks promptly to prevent further deterioration. A pressure washer can be used to clean the patio, but avoid using excessive pressure, which can damage the blocks or the joint filler.
Consider applying a sealant to the cement blocks to protect them from staining and weathering. A sealant can also enhance the color of the blocks and make them easier to clean. Choose a sealant that is specifically designed for concrete or masonry surfaces. Regular maintenance ensures the longevity and aesthetic appeal of the cement block patio, providing a durable and enjoyable outdoor living space for years to come.
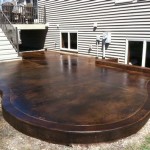
The design options for a cement block patio are varied. Considerations include the size and shape of the patio, the chosen laying pattern, the color and texture of the cement blocks, and the integration of other landscape elements. A small, square patio may be ideal for a cozy seating area, while a larger, rectangular patio can accommodate outdoor dining and entertaining. Incorporating curves and varying elevations can add visual interest and create distinct zones within the patio.
The color and texture of the cement blocks can significantly impact the overall aesthetic of the patio. Cement blocks are available in a range of colors, from natural gray to earth tones and even vibrant hues. The texture can also vary, from smooth to rough and even textured to mimic natural stone. Consider the existing architecture of the house and the surrounding landscape when selecting the color and texture of the cement blocks.
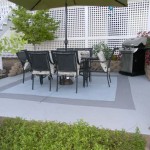
Integrating other landscape elements into the patio design can enhance its functionality and visual appeal. Raised flower beds, built-in seating, and outdoor lighting can create a welcoming and inviting space. Container gardens can add pops of color and greenery. A fire pit or outdoor fireplace can extend the use of the patio into the cooler months. Water features, such as small fountains or ponds, can add a soothing and relaxing element.
The cost of building a cement block patio varies depending on the size of the patio, the type of cement blocks used, the complexity of the design, and whether the work is done DIY or by a professional contractor. Cement blocks are generally less expensive than other patio materials, such as natural stone or pavers. However, the cost of base materials, joint filler, edging, and sealant should also be factored in. Obtaining multiple quotes from contractors and carefully estimating material costs helps to develop a realistic budget.

Concrete Thinking How To Make Mod Stackable Sculptures With Blocks The Horticult

Diy Outdoor Bench From Cinder Blocks

Diy Cinder Block Bench Only 4 Materials Somewhat Simple

Patio Blocks Make Your Own Soil Cement Diy Pavers

How To Make A Patio From Concrete Pavers

Diy Cinder Block Bench C R A F T

Create With Cement Blocks And Wood 10 Stunning Ideas To Inspire You My Desired Home Concrete Patio Designs Cinder Block Furniture Design

Create More Outdoor Seating With A Diy Cinderblock Bench

Create More Outdoor Seating With A Diy Cinderblock Bench

Diy Cinder Block And Pavers Step
Related Posts