How To Lay Patio Pavers On Gravel
Creating a patio can significantly enhance outdoor living spaces, providing areas for relaxation, entertainment, and dining. Laying patio pavers on a gravel base is a popular method due to its relative simplicity, cost-effectiveness, and excellent drainage properties. This article provides a comprehensive guide on how to successfully install pavers over a gravel foundation, ensuring a durable and aesthetically pleasing result.
Preparing the Site: Excavation and Grading
The initial stage involves careful preparation of the site. This begins with accurately defining the perimeter of the desired patio area. This can be achieved using stakes and string, ensuring that the outline corresponds to the intended design. Precise marking is crucial, as it sets the foundation for the subsequent steps.
Once the perimeter is established, excavation commences. The depth of excavation will depend on several factors, including the thickness of the pavers, the depth of the gravel base, and the desired finished height of the patio relative to the surrounding landscape. A general guideline is to excavate to a depth that allows for approximately 4-6 inches of compacted gravel base, 1 inch of leveling sand (optional), and the thickness of the pavers themselves. It is imperative to consult local building codes to ensure compliance with any applicable regulations regarding patio construction.
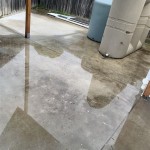
After excavation, the bottom of the excavated area must be thoroughly compacted. This is typically accomplished using a plate compactor. Compaction is vital for creating a stable base that will prevent settling or shifting of the pavers over time. The degree of compaction should be consistent across the entire excavated area to ensure uniform support. This process significantly reduces the likelihood of future patio issues.
Following compaction, the next step is to ensure proper grading and drainage. The patio surface should slope slightly away from any adjacent structures, such as houses or garages, to facilitate water runoff. A slope of approximately 1/8 inch per foot is generally recommended. This slope helps prevent water from pooling on the patio surface, which can lead to issues like moss growth, ice formation, and potential damage to the pavers. Precise grading is essential for maintaining the long-term integrity and functionality of the patio.
Installing the Gravel Base and Leveling Layer
After the excavation and grading are complete, the gravel base installation begins. The gravel base serves as a drainage layer and provides a stable platform for the pavers. The type of gravel used is important; typically, a crushed gravel or a mixture of gravel sizes is recommended. This allows for better compaction and drainage compared to rounded gravel. The gravel should be installed in layers, typically 2-3 inches thick, and each layer should be thoroughly compacted using a plate compactor.
The goal is to create a dense, well-compacted gravel base that can withstand the weight of the pavers and any foot traffic or furniture placed on the patio. Proper compaction is crucial for preventing settling and maintaining the levelness of the patio over time. Multiple passes with the plate compactor are recommended to achieve optimal compaction. Ensuring a well-compacted base is key to the longevity of the patio.
Once the gravel base is compacted to the desired thickness, an optional leveling layer of sand can be added. This layer is typically about 1 inch thick and is used to create a perfectly smooth and level surface upon which to lay the pavers. If using sand, it is important to use a coarse, angular sand, rather than a fine, round sand, as the angular sand will provide better interlock and stability. The sand should be screeded with a long, straight board to create a level surface. This process ensures that the pavers will be evenly supported and will not rock or shift over time. While optional, a sand leveling layer can significantly improve the final appearance and stability of the patio.
Laying the Pavers and Final Touches
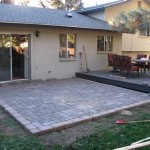
With the gravel base and leveling layer in place (if used), the process of laying the pavers can begin. Starting at a corner or edge and work outwards, placing each paver carefully and ensuring that it is level and properly aligned. A rubber mallet can be used to gently tap the pavers into place and ensure that they are firmly seated in the sand or gravel. Consistency in spacing between pavers is crucial for creating a uniform and aesthetically pleasing appearance.
Maintain designated spacing between pavers. Consistent spacing provides a uniform appearance and allows for proper joint filling. Paver spacers can be used to achieve uniform spacing between pavers, ensuring a professional look. As pavers are laid, constantly checking for levelness with a level is necessary. Any deviations should be corrected immediately by adjusting the gravel or sand beneath the paver. Minor adjustments can be made by adding or removing small amounts of sand or gravel.
Once all the pavers are laid, the joints between them need to be filled with jointing sand. This sand helps to lock the pavers together and prevents them from shifting or moving. Jointing sand should be swept into the joints with a broom and then compacted with a plate compactor (using a protective mat to prevent damage to the pavers). The joints may need to be refilled several times to ensure that they are completely filled. This process stabilizes the patio by interlocking the pavers together. The choice of jointing sand can also impact the aesthetic of the patio; polymeric sand, for example, inhibits weed growth and helps to further stabilize the pavers.
The edge of the patio should be properly restrained to prevent the pavers from shifting outwards over time. This can be done by installing edge restraints, such as plastic or metal edging, or by using a concrete curb. The edging should be securely fastened to the ground to provide a solid barrier against lateral movement. Edge restraints are essential for maintaining the integrity of the patio and preventing it from crumbling or falling apart over time. Various edging options are available, allowing for customization to match the aesthetic of the patio and the surrounding landscape.
After laying the pavers and filling the joints, the patio area should be thoroughly cleaned to remove any excess sand or debris. This can be done with a broom or a leaf blower. A final compaction with the plate compactor (using a protective mat) can help to further settle the pavers and lock them into place. Following cleaning and compaction, consider applying a sealant to the pavers to protect them from staining and weathering. Sealants can also enhance the color and appearance of the pavers. Regular maintenance, such as sweeping and occasional cleaning, will help to keep the patio looking its best for years to come.
Consider the use of permeable pavers to reduce stormwater runoff and promote groundwater recharge. Permeable pavers have wider joints that allow water to drain through the patio surface and into the gravel base. This can help to reduce the burden on municipal drainage systems and prevent flooding. It also reduces the need for extensive grading and drainage solutions. The use of permeable pavers can contribute to a more sustainable and environmentally friendly patio design. Local regulations may even incentivize or require the use of permeable paving systems.

How To Prep Lay A Base For Pavers Western Interlock

Diy Pea Gravel Patio With Pavers Love Renovations

Diy Pea Gravel Patio With Pavers Love Renovations

Dry Laying Slabs On Gravel Or Sand Instruction Kronos Ceramiche Floor Coverings In Porcelain Stoneware

Paver Installation Landscaping Network
.jpg?strip=all "How To Install Patio Pavers Lv")
How To Install Patio Pavers Lv

Paver Patios That Will Save You Time And Effort Family Handyman

How To Build A Diy Patio For Under 120 Outdoor Spaces

How To Lay A Paver Patio Gravel Sand And Stones Young House Love

Backyard Update How To Lay Patio Pavers Amber Oliver
Related Posts