How To Fix Uneven Patio Pavers On Sand
A patio built with pavers laid on a sand base offers an aesthetically pleasing and functional outdoor living space. However, over time, these pavers can become uneven, creating tripping hazards and detracting from the patio's overall appearance. This unevenness typically arises due to settling of the sand base beneath the pavers, caused by factors such as water erosion, insufficient compaction during installation, or underlying soil instability. Restoring a level paver patio requires a systematic approach, beginning with identifying the affected areas and culminating in reinstalling the pavers on a properly prepared sand base.
Before commencing any repairs, it is essential to gather the necessary tools and materials. The following items are typically required: paver removal tool (such as a paver lifter or flathead screwdriver), rubber mallet, level (either spirit level or laser level), measuring tape, safety glasses, work gloves, broom, shovel, tamper (hand tamper or plate compactor), sand (preferably the same type used during the initial installation - typically coarse concrete sand or polymeric sand depending on installation), and potentially extra pavers if any are cracked or broken. Ensuring access to these materials beforehand will streamline the repair process and minimize downtime.
Identifying and Assessing Uneven Areas
The first step in rectifying an uneven paver patio involves a thorough inspection to pinpoint the problematic areas. This process entails visually scanning the patio surface, looking for pavers that are significantly higher or lower than their neighbors. A level, placed across multiple pavers, can provide a more accurate assessment of the degree of unevenness. Mark these areas with chalk or flags to facilitate subsequent repair work. Documenting the extent and nature of the unevenness, perhaps through photographs, can also prove helpful for planning the repair strategy.
Beyond visual inspection, it is crucial to investigate the potential causes of the unevenness. Look for signs of water pooling, which could indicate areas where the sand base is eroding. Check the perimeter of the patio for evidence of shifting soil or inadequate edge restraints. Probing around the affected pavers with a screwdriver or similar tool can help determine the depth and consistency of the sand base. If the sand is overly loose or contains significant amounts of organic matter, it might need to be replaced entirely. Identifying the underlying cause is paramount to preventing future unevenness.
Furthermore, evaluate the condition of the pavers themselves. Check for cracks, chips, or other forms of damage. Damaged pavers should be replaced rather than re-leveled, as they are likely to continue deteriorating and contribute to future unevenness. If the paver type is no longer readily available, consider sourcing replacement pavers from a salvage yard or specialty landscaping supplier. Matching the color and texture of the replacement pavers as closely as possible will ensure a seamless integration with the existing patio surface.
Removing and Preparing the Pavers and Sand Base
Once the uneven areas have been identified and assessed, the next step involves removing the affected pavers. Using a paver removal tool, carefully lift each paver, taking care not to damage adjacent pavers. For pavers that are tightly interlocked, it may be necessary to use a screwdriver or similar tool to gently pry them loose. Stack the removed pavers in a safe location, keeping them in the order they were removed to facilitate re-installation. This is particularly important if the patio features a complex pattern.
After removing the pavers, the underlying sand base needs to be addressed. Remove the sand from the affected area down to the original sub-base. This sub-base should ideally consist of compacted gravel or crushed stone. If the sub-base is uneven or unstable, it may need to be re-compacted or even replaced entirely. Adding additional gravel and compacting it can improve the stability and drainage of the sub-base. A properly prepared sub-base is critical for preventing future settling and maintaining a level patio surface.
Inspect the excavated area for any signs of drainage issues. If water tends to accumulate in the area, consider installing a drainage system, such as a French drain, to redirect water away from the patio. Addressing drainage problems is essential for preventing erosion of the sand base and ensuring the long-term stability of the patio. Furthermore, it's essential to ensure proper slope for water runoff. A slight slope of approximately 1/8 inch per foot away from the house or any structures will help facilitate drainage.
Re-Leveling and Re-Installing the Pavers
With the sub-base prepared, the next step is to install a fresh layer of sand. The type of sand used should ideally be the same as the original sand used during the initial paver installation. A typical bed of concrete sand should be around 1 inch thick, while Polymeric sand is used to fill the joints between the pavers, not as bedding. Spread the sand evenly across the prepared area, using a shovel or similar tool. Use a screed board (a straight board) to level the sand, ensuring a consistent depth and a smooth surface. This step is crucial for achieving a level patio surface.
Compact the sand base using a hand tamper or plate compactor. Compacting the sand ensures that it is firm and stable, preventing future settling. After compacting, re-level the sand surface to correct any imperfections that may have arisen during compaction. The goal is to create a perfectly level bed for the pavers to rest on. A laser level can be particularly helpful in achieving a precise level across the entire area.
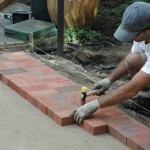
Carefully re-install the pavers, following the original pattern. Use a rubber mallet to gently tap each paver into place, ensuring that it is level with the surrounding pavers. Check the level frequently to ensure that the pavers are properly aligned. If a paver is too high, remove it and add more sand to the base. If a paver is too low, remove it and remove some sand from the base. Take your time and pay attention to detail, as this is where the quality of the repair becomes evident.
Once all the pavers have been re-installed, sweep the patio surface to remove any excess sand. Then, if polymeric sand was originally used, sweep polymeric sand into the joints between the pavers. Follow the manufacturer's instructions for activating the polymeric sand, which typically involves lightly watering the patio surface. The polymeric sand will harden over time, creating a durable and weed-resistant joint between the pavers. This helps to prevent future erosion of the sand base and maintain the stability of the patio.
Finally, inspect the repaired area one last time to ensure that all the pavers are level and properly aligned. Make any necessary adjustments to correct any remaining imperfections. Clean the patio surface thoroughly to remove any dirt or debris. With proper preparation and execution, the repaired paver patio should provide a level and aesthetically pleasing outdoor living space for years to come.

How To Fix Uneven Patio Pavers

How To Fix Uneven Pavers Fixing Sinking Guide

How To Reset Pavers The Potato

Diy Guide To Fixing Uneven Patio Stones Easily

How To Fix Sinking Pavers Davel Construction Inc

How To Fix Uneven Pavers A Step By Guide

Raise Sunken Patio Pavers

Fixing Sunken Or Crooked Bricks Pavers Yourself Diy

Raising And Leveling Sunken Patio Pavers Toolbox Divas

How To Repair Sinking Patio Pavers Splendour In Stone
Related Posts