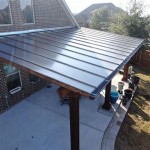
How to Repair Patio Slabs
Patio slabs, also known as pavers, are frequently used in outdoor spaces to create patios, walkways, and driveways. Over time, these slabs can become damaged due to a variety of factors, including weather exposure, heavy foot traffic, shifting soil, and tree root intrusion. Addressing these issues promptly is crucial for maintaining the aesthetic appeal and structural integrity of the patio. Repairing patio slabs is a manageable task for many homeowners, and this article provides a comprehensive guide to the process.
Before beginning any repair work, a thorough assessment of the damage is required. This involves identifying the types of issues present, evaluating the extent of the damage, and determining the underlying causes. Common problems include cracks, chips, uneven settling, loose slabs, and weed growth between the joints. Understanding the root cause of the problem is essential for ensuring that the repairs are effective and long-lasting. Ignoring underlying issues will inevitably lead to the recurrence of the damage.
Once the damage has been thoroughly assessed, appropriate repair methods can be selected. The selection of repair techniques depends on the severity of the damage, the type of material the slabs are made of (concrete, brick, stone, etc.), and the desired aesthetic outcome. The following sections delve into the specific techniques for addressing common patio slab issues.
Addressing Cracks and Chips in Patio Slabs
Cracks and chips are among the most common types of damage observed in patio slabs. Small cracks and chips can often be repaired with a concrete patch compound or epoxy. These materials fill in the gaps and restore the structural integrity of the slab. For larger cracks or severely chipped areas, a more extensive repair may be necessary, potentially involving the removal and replacement of the damaged section.
The repair process for small cracks and chips begins with cleaning the area thoroughly. This involves removing any loose debris, dirt, and weeds from within the crack or chip. A wire brush or a stiff-bristled brush can be used to effectively clean the surface. After cleaning, ensure the area is dry before proceeding to the next step. Moisture can interfere with the bonding of the repair material.
Next, the concrete patch compound or epoxy should be prepared according to the manufacturer's instructions. Most compounds require mixing with water or a hardener. It is critical to follow the instructions precisely to ensure proper curing and adhesion. Using a putty knife or trowel, apply the compound to the crack or chipped area, filling it completely. Overfill slightly, as the compound may shrink as it dries.
Once the compound has been applied, smooth the surface with the putty knife or trowel to blend it seamlessly with the surrounding area. Feather the edges of the repair to create a smooth transition. Allow the compound to cure completely according to the manufacturer's instructions. Curing times vary depending on the product and the environmental conditions. Protect the repaired area from moisture and foot traffic during the curing process. For larger cracks, consider using a crack filler specifically designed for concrete, which may involve applying a backer rod before applying the filler.
For severely cracked or chipped slabs, replacement may be the most practical option. This involves carefully removing the damaged slab and replacing it with a new one. When replacing a slab, ensure that the new slab matches the existing ones in terms of size, color, and texture. This will maintain the overall aesthetic uniformity of the patio. Consider sourcing replacement slabs from the original supplier if possible.
Correcting Uneven Settling of Patio Slabs
Uneven settling is another common issue that affects patio slabs. It occurs when the soil beneath the slabs shifts or compacts, causing the slabs to sink or tilt. This can create tripping hazards and detract from the appearance of the patio. Correcting uneven settling requires lifting and leveling the affected slabs.
The process begins with identifying the settled slabs and assessing the extent of the settling. Use a level to determine the degree of unevenness. Mark the affected slabs with chalk or tape to easily identify them during the repair process. In some cases, the settling may be localized to a small area, while in other cases, it may be more widespread.
To lift the settled slabs, a flathead screwdriver or a pry bar can be used. Carefully insert the tool under the edge of the slab and gently pry it upwards. Avoid applying excessive force, as this could crack or damage the slab. Once the slab has been lifted, support it with wooden blocks or shims to prevent it from falling back into place.
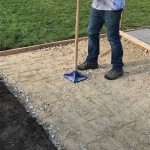
With the slab lifted, the underlying base material can be adjusted. This typically involves adding or removing sand or gravel to create a level surface. Use a trowel or shovel to carefully add or remove material as needed. Compact the base material using a hand tamper to ensure a stable foundation. Periodically check the level of the base material with a spirit level to ensure it is perfectly flat.
Once the base material is level, carefully lower the slab back into place. Remove the wooden blocks or shims gradually as the slab settles. Check the level of the slab again to ensure it is flush with the surrounding slabs. If necessary, make minor adjustments to the base material until the slab sits perfectly level. After the slab is leveled, sweep polymeric sand into the joints between the slabs. Polymeric sand hardens when wet, providing stability and preventing weed growth.
Addressing Loose Patio Slabs and Weed Growth
Loose patio slabs and weed growth are often interconnected problems. Loose slabs can create gaps that allow weeds to take root, while weed growth can further destabilize the slabs. Addressing both issues simultaneously is essential for a long-lasting repair.
Loose slabs typically result from erosion of the base material or improper installation. The first step in addressing loose slabs is to remove the slab from its position. This can be done using a flathead screwdriver or a pry bar, similar to the process for correcting uneven settling. Once the slab is removed, inspect the base material for erosion or damage.
If the base material is eroded, it will need to be replaced. Remove the old base material and replace it with fresh sand or gravel. Compact the new base material using a hand tamper to create a solid foundation. Ensure the base is level before replacing the slab. If the slab was not properly installed initially, consider adding a layer of compacted gravel to improve drainage and stability.
Before replacing the slab, thoroughly clean the surrounding area to remove any weeds or debris. Use a weeding tool or a sharp knife to remove weeds from the joints between the slabs. Ensure that the entire root system is removed to prevent regrowth. Applying a weed killer to the area can also help to prevent future weed growth, but follow the manufacturer's instructions carefully to avoid damaging the patio slabs.
Once the area is clean and the base material is prepared, replace the slab in its original position. Ensure that it sits level with the surrounding slabs. Fill the joints between the slabs with polymeric sand to prevent weed growth and provide stability. Polymeric sand hardens when wet, creating a durable barrier against weeds. Follow the manufacturer's instructions for applying and activating the polymeric sand. Typically, this involves sweeping the sand into the joints and then wetting it down with a fine spray of water.
After the polymeric sand has been applied, regularly inspect the patio for any signs of weed growth. If weeds do appear, remove them promptly to prevent them from becoming established. Consider applying a preventative weed killer periodically to maintain a weed-free patio. Regular maintenance, including sweeping and cleaning, can also help to prevent weed growth and prolong the life of the patio slabs.
Repairing patio slabs is a straightforward process that can significantly enhance the appearance and functionality of outdoor spaces. By addressing common issues such as cracks, chips, uneven settling, loose slabs, and weed growth, homeowners can maintain the integrity and aesthetic appeal of their patios for years to come. Proper assessment, careful execution, and regular maintenance are essential for achieving lasting results.

How To Repair A Patio S Grouting Sinking Checkatrade

Fixing Loose Flagstones Pavingexpert

Julian Cas S Diy Blog Archive Replacing A Broken Slab How To What Use Where Buy

How To Repair Paving Outdoor Garden B Q

How To Repair Crazy Paving Correctly Buckinghamshire Landscape Gardeners

How To Relay Loose Paving Slabs Sticking Down Rocking Pavers

How To Fix Loose Paving Slabs Hankintech

How To Repair Loose Rocking Paving Slabs Step By Buckinghamshire Landscape Gardeners

How To Repoint Paving Slabs

How To Level A Concrete Patio Homeserve Usa
Related Posts