How to Build a Patio Roof: A Comprehensive Guide
Adding a roof to a patio significantly enhances its usability and enjoyment. It provides shelter from sun, rain, and snow, allowing for outdoor relaxation and entertainment regardless of the weather. This article details the process of constructing a patio roof, outlining the necessary steps, materials, and considerations for a successful project.
Before embarking on the construction, it is crucial to obtain any required building permits from the local authorities. Permit requirements vary depending on the location and the scope of the project. Ignoring this step can result in fines and potential delays or even the dismantling of the structure. Consult with the local building department to understand the specific regulations applicable to patio roof construction.
Furthermore, proper planning is essential. A detailed design should be developed, outlining the dimensions, materials, and construction methods to be used. This design should consider the existing structure of the house, the desired aesthetic, and the local climate conditions. A well-thought-out plan will minimize errors and ensure a smooth construction process.
The materials required will depend on the chosen design, but generally include lumber for framing, roofing materials (such as shingles, metal, or polycarbonate panels), fasteners (nails, screws, bolts), and potentially posts and footings. Choosing high-quality materials will ensure the longevity and durability of the patio roof.
Key Point 1: Planning and Design
The initial planning phase is arguably the most crucial aspect of the project. This stage involves not only obtaining permits but also finalizing the design and choosing the appropriate materials. A detailed design should include accurate measurements, structural calculations, and a clear understanding of how the patio roof will integrate with the existing house.
Consider the style of the house when designing the patio roof. The roof should complement the existing architecture and enhance the overall aesthetic appeal of the property. Options include a gabled roof, a shed roof, a flat roof, or even a pergola-style structure. Each option has its own advantages and disadvantages in terms of cost, complexity, and weather protection.
Structural calculations are essential to ensure the roof can withstand the weight of snow, wind, and other environmental factors. These calculations should be performed by a qualified engineer or architect, especially for larger or more complex structures. The calculations will determine the size and spacing of the framing members, as well as the type of fasteners required.
Material selection is another critical aspect of the planning phase. Consider the durability, cost, and aesthetic appeal of different materials when making your choices. Lumber should be pressure-treated to resist rot and insect damage. Roofing materials should be chosen based on their ability to withstand the local climate conditions. Fasteners should be corrosion-resistant to prevent rust and deterioration.
Finally, ensure that the design incorporates proper drainage. The roof should be sloped to allow water to run off easily, preventing water damage and potential structural problems. Gutters and downspouts can be added to direct the water away from the house and patio.
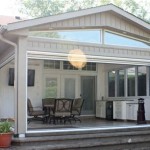
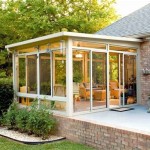
Key Point 2: Framing the Roof Structure
Framing the roof structure involves constructing the supporting framework that will hold the roofing materials. This typically includes posts, beams, rafters, and sheathing. The exact configuration will depend on the design of the roof.
If the patio roof is not attached to the house, posts will be required to support the structure. These posts should be set in concrete footings that extend below the frost line to prevent movement due to freezing and thawing. The size and spacing of the posts will depend on the load they need to carry.
Beams span between the posts and support the rafters. They should be sized appropriately to carry the load of the roof. The beams can be made of solid lumber or laminated veneer lumber (LVL), which is stronger and more stable than solid lumber.
Rafters are the angled members that extend from the beam to the house or another beam. They provide the slope for the roof and support the sheathing. The spacing of the rafters will depend on the type of roofing material used. For example, shingles typically require rafters spaced 24 inches on center, while metal roofing may require closer spacing.
Sheathing is the material that is attached to the rafters to provide a solid surface for the roofing material. Common sheathing materials include plywood and oriented strand board (OSB). The sheathing should be properly fastened to the rafters with nails or screws.
Accurate measurements and precise cuts are essential when framing the roof structure. Use a level and a square to ensure that all members are plumb, level, and square. Errors in framing can lead to problems later on, such as leaks and structural instability.
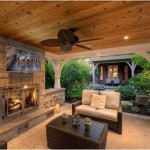
Key Point 3: Installing Roofing and Finishing Touches
Once the framing is complete, the next step is to install the roofing material. The specific installation procedures will vary depending on the type of roofing material chosen. However, some general principles apply to all roofing installations.
Start by installing an underlayment over the sheathing. This is a waterproof barrier that protects the sheathing from moisture. The underlayment should be installed according to the manufacturer's instructions, overlapping the seams to prevent water from seeping through.
Install the roofing material according to the manufacturer's instructions. Shingles should be overlapped properly to provide a watertight seal. Metal roofing should be fastened securely to the sheathing with screws or clips. Polycarbonate panels should be installed with appropriate fasteners and sealing washers to prevent leaks.
Pay close attention to details around vents, chimneys, and other penetrations in the roof. These areas are particularly vulnerable to leaks and should be sealed carefully with flashing and sealant.
After the roofing is installed, add finishing touches to complete the project. Install gutters and downspouts to direct water away from the house and patio. Paint or stain the framing to protect it from the elements and enhance its appearance. Add decorative trim to create a finished look.
Consider adding lighting to the patio roof. This can be done by installing recessed lights in the ceiling, hanging lights from the rafters, or adding string lights around the perimeter. Lighting can create a warm and inviting atmosphere and allow the patio to be used at night.
Adding screens or curtains can provide additional protection from insects and the elements. Screens can be installed permanently or temporarily, depending on the desired level of flexibility. Curtains can be used to block sunlight and create privacy.
Finally, inspect the finished patio roof carefully to ensure that it is structurally sound and free of any leaks. Address any issues promptly to prevent further damage. Regular maintenance, such as cleaning gutters and inspecting the roofing, will help to prolong the life of the patio roof.
Throughout the project, prioritize safety. Wear appropriate personal protective equipment, such as safety glasses, gloves, and a hard hat. Use ladders and scaffolding safely, and be aware of potential hazards such as electrical wires and falling objects. If unsure about any aspect of the construction process, consult with a qualified professional.
Building a patio roof is a significant undertaking, but with careful planning, proper execution, and attention to detail, it can be a rewarding project that enhances the enjoyment of the outdoor living space. The result is a valuable addition to the home, providing a comfortable and protected area for relaxation and entertainment.

Patio Cover Plans Build Your Or Deck

Patio Cover Plans Build Your Or Deck

How To Build A Diy Covered Patio

How To Build Patio Cover Pt 2 Framing

Building A Covered Patio With 30ft Span The Awesome Orange

How To Build Small Covered Patio Roof And Concrete Floor Do It Better Yourself Save Money

Building A Patio Cover Plans For An Almost Free Standing Roof

Patio Cover Free Diy Plans Howtospecialist How To Build Step By

How To Build A Roof Over My Existing Deck Costs Designs

Diy Patio Roof Handybros
Related Posts