How To Install Small Paver Patio Slabs
Installing a small paver patio can significantly enhance any outdoor living space. It provides a functional and aesthetically pleasing area for relaxation, entertainment, or simply enjoying the surrounding landscape. While professional installation is always an option, a dedicated homeowner can successfully complete this project with careful planning, preparation, and execution. This article details the steps involved in installing small paver patio slabs, providing a comprehensive guide for a durable and visually appealing result.
Before commencing the installation process, it is crucial to develop a comprehensive plan. This includes determining the desired size and shape of the patio, selecting the paver slabs, and accounting for any existing landscape features or utilities. Careful planning minimizes potential issues during the installation phase and ensures the final patio meets expectations.
Planning and Preparation
The initial step involves accurately measuring the intended patio area and marking it using stakes and string. This outline delineates the boundaries of the excavation and serves as a visual guide throughout the installation process. Consider the surrounding landscape and ensure the patio complements the existing aesthetic. Mark the perimeter of your desired patio area using stakes and string lines. Ensure the string is taut and accurately reflects the intended dimensions.
Choosing the appropriate paver slabs is essential for both the aesthetic appeal and the durability of the patio. Pavers are available in various materials, sizes, shapes, and colors. Select pavers that complement the existing landscape and are suitable for the intended use of the patio. Consider factors such as foot traffic, exposure to the elements, and personal preferences when making the selection. Ensure the chosen pavers are of consistent thickness to facilitate a level surface.
Before excavation, it is imperative to check for underground utilities. Contacting the local utility companies to locate and mark any buried lines prevents accidental damage and ensures safety. This step is non-negotiable and should be prioritized before any digging commences. Call your local "Call Before You Dig" service to mark utility lines in your yard to avoid potential hazards during excavation.
Excavating the area forms the foundation for the patio. The depth of the excavation depends on the thickness of the paver slabs, the base materials, and the desired finished height of the patio. Typically, an excavation depth of 6-8 inches is sufficient for most small patio installations. Ensure the excavation extends slightly beyond the marked boundaries to accommodate the edge restraints. Use a shovel and pickaxe to remove the soil within the marked area. Maintain a consistent depth to ensure a uniform base for the pavers. Dispose of the excavated soil appropriately.
Compacting the subgrade is crucial for creating a stable foundation for the patio. Use a plate compactor to thoroughly compact the excavated area. This step prevents settling and ensures the pavers remain level over time. Overlapping passes with the plate compactor will achieve the most effective compaction. Rent a plate compactor from a local equipment rental store. Apply multiple passes with the compactor, paying particular attention to the edges and corners of the excavated area.
Base Layer Installation
The base layer provides a stable and well-draining foundation for the paver slabs. Typically, a base of crushed stone or gravel is used, with a recommended thickness of 4-6 inches. The base material should be evenly distributed and compacted using a plate compactor. This layer is essential for preventing frost heave and ensuring the long-term stability of the patio.
Spread the crushed stone or gravel evenly over the compacted subgrade. Ensure the layer is of consistent thickness throughout the excavated area. Use a rake or shovel to distribute the material uniformly. Employ a plate compactor to compact the base layer thoroughly. As with the subgrade compaction, make overlapping passes to ensure consistent compaction. Use a level to check the surface for any inconsistencies. Address any low spots by adding more base material and re-compacting.
Edge restraints are essential for containing the paver slabs and preventing them from shifting over time. These restraints can be made of plastic, metal, or concrete and are typically installed around the perimeter of the patio. Secure the edge restraints to the compacted base layer using stakes or spikes. Install edge restraints around the perimeter of the patio, ensuring they are flush with the finished grade. Use stakes or spikes to secure the restraints in place, following the manufacturer's instructions. Verify that the edge restraints are level and aligned correctly. These edge restraints lock pavers in tight to further prevent shifting.
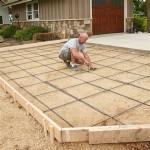
A layer of bedding sand provides a smooth and level surface for the paver slabs. This layer is typically 1-2 inches thick and is screeded to create a perfectly flat surface. Avoid using too much sand, as this can lead to instability and settling. Use a clean, coarse sand specifically designed for paver installation. Spread the bedding sand evenly over the compacted base layer. Use two lengths of pipe to create a level bedding plane. Lay 1" diameter steel pipes in parallel 1' apart and add extra sand to the patio area. Use a flat board or screed to drag the sand over the pipes. Remove the pipes and fill the gaps. This will give a consistent 1" of sand.
Paver Installation and Finishing
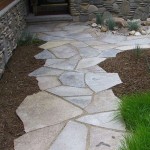
With the preparation complete, paver installation can commence. Start by placing the paver slabs along one edge of the patio and work your way across, maintaining consistent spacing between the pavers. Use a rubber mallet to gently tap each paver into place, ensuring it is level with the surrounding pavers. Employ a consistent paver pattern to enhance the visual appeal of the patio.
Lay the paver slabs according to the chosen pattern. Maintain consistent spacing between the pavers, typically around 1/8 to 1/4 inch. Use paver spacers to ensure uniform gaps. Use a rubber mallet to gently tap each paver into place, ensuring it is level with the surrounding pavers. Check the level of each paver using a level and adjust as needed by adding or removing sand underneath.
Once all the pavers are installed, sweep polymeric sand into the joints between the pavers. Polymeric sand hardens when wetted, creating a strong and durable joint that prevents weed growth and paver movement. Follow the manufacturer's instructions for applying and activating the polymeric sand. Pour polymeric sand over the pavers to fill the joints. Use a broom to sweep the sand into the joints, ensuring they are completely filled. Compact the sand using a plate compactor with a rubber pad attachment to avoid damaging the pavers. Lightly mist the patio with water to activate the polymeric sand, following the manufacturer's instructions. Avoid overwatering, as this can weaken the sand.
After the polymeric sand has cured, thoroughly clean the patio surface to remove any residual sand or debris. Use a broom or leaf blower to sweep the patio clean. Inspect the patio for any imperfections or uneven pavers. Address any issues promptly to ensure the long-term durability and aesthetic appeal of the patio. After cleaning, the newly installed small paver patio is ready for use. Enjoy the enhanced outdoor living space.
Maintaining a small paver patio is essential for preserving its structural integrity and aesthetics. Regular cleaning, joint maintenance, and weed control are crucial for ensuring long-term durability. Preventing staining and addressing any issues promptly will contribute to the longevity and beauty of the patio. Regularly sweep the patio to remove dirt, leaves, and debris. Hose down the patio periodically to wash away any accumulated grime. Inspect the joints between the pavers for any cracks or erosion. Reapply polymeric sand as needed to maintain the integrity of the joints. Remove any weeds that sprout between the pavers using a weeding tool or herbicide. Avoid using harsh chemicals or abrasive cleaning agents that can damage the pavers. By following these maintenance practices, the small paver patio will provide years of enjoyment and add value to your property.

Paver Installation Landscaping Network

Base For Pavers How To Prep Lay A Paver Diy

How To Lay Patio Pavers

How To Build A Paver Patio Rogue Engineer

How To Build A Patio An Easy Do It Yourself Project

How To Build A Paver Patio Young House Love

How To Lay A Patio With Pavers Diy Over Dirt No Concrete Needed Amber Oliver

Easiest Patio Pavers You Ll Ever Install

How To Lay Pavers On A Sand Base Brickworks Diy Landscaping Guide

How To Build A Paver Path The Home Depot
Related Posts