Leveling Patio Pavers: The Perfect Finishing Touch
Achieving a perfectly level patio surface is crucial not only for aesthetic appeal but also for functionality and longevity. Uneven pavers can create tripping hazards, cause water pooling, and ultimately lead to premature structural deterioration. Mastering the art of leveling pavers involves understanding the fundamental principles of ground preparation, the proper techniques for setting pavers, and the utilization of appropriate tools to ensure a flawless finish. This article provides a comprehensive guide to leveling patio pavers, emphasizing key techniques and detailing the essential tools required for success.
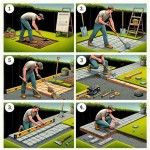
Proper preparation is the cornerstone of any successful paver project. The importance of a stable and evenly compacted base cannot be overstated. This base provides the necessary support for the pavers, preventing settling and shifting over time. A well-prepared base will greatly simplify the leveling process during the paver installation phase.
Preparing the Base Layer: The Foundation for Level Pavers
The first step in preparing the base layer involves excavating the area to the appropriate depth. The depth will depend on the type of pavers being used and the anticipated load the patio will bear. A general guideline is to excavate at least 6 to 8 inches below the desired finished level. This allows for a sufficient amount of base material and a leveling sand layer.
After excavation, the subgrade should be compacted thoroughly using a plate compactor. This process eliminates air pockets and ensures a solid foundation. Any soft or unstable areas should be addressed by removing the problematic soil and replacing it with compacted aggregate.
The next layer consists of a base material, typically crushed gravel or stone. The type of base material will depend on local soil conditions and drainage requirements. This layer should be spread evenly and compacted in lifts, or layers, of no more than 2 to 3 inches. Each lift should be thoroughly compacted before adding the next layer. Maintaining a consistent thickness and compaction level across the entire base is critical for achieving a level patio surface.
A final layer of bedding sand, typically 1 inch thick, is then applied over the compacted base material. This layer provides a smooth and even surface for setting the pavers. The bedding sand should be screeded to create a perfectly level surface before placing the pavers. This screeding process utilizes screed rails and a screed board to ensure consistent depth and levelness.
It's important to use a proper base material and compaction equipment. The right base material is crucial for longevity of patio. The wrong base material will drain improperly or may not give the best foundation.
The Art of Setting Pavers: Achieving a Level Surface During Installation
The process of setting pavers involves carefully placing each paver onto the prepared bedding sand layer. Maintaining a consistent joint spacing between pavers is essential for both aesthetic appeal and structural integrity. This can be achieved by using paver spacers, which ensure uniform gaps between each paver.
As each paver is placed, it should be gently tapped into the bedding sand using a rubber mallet. This helps to seat the paver and ensure that it is properly aligned with adjacent pavers. A level should be used frequently to check the levelness of each paver and make adjustments as necessary. This may involve adding or removing small amounts of bedding sand beneath the paver.
One of the most common mistakes is to rely solely on visual assessment when leveling pavers. The human eye can be easily deceived, especially over larger areas. Therefore, it is essential to use a level and string lines to establish a consistent reference plane. String lines can be stretched across the patio area and used as a guide for setting the pavers at the correct height. A long level, at least 4 feet in length, is recommended for checking the levelness of multiple pavers at once.
If a paver is significantly out of level, it may be necessary to remove the paver and readjust the bedding sand underneath. This is a common occurrence, especially when working with irregular or handmade pavers. Patience and attention to detail are key to achieving a perfectly level surface. It's important to consider the slope to facilitate water drainage, this prevent pooling of the water.
During the installation process, constantly check the level and alignment of pavers. Do not hesitate to remove and reset pavers that are not perfectly level. Maintaining proper joint spacing is as important as achieving levelness.
Essential Tools for Leveling Pavers: Precision and Efficiency
The right tools can significantly improve the efficiency and accuracy of the paver leveling process. Investing in high-quality tools will not only make the job easier but also ensure a professional-looking result. Here are some of the essential tools for leveling pavers, emphasizing the importance of each one:
Shovels and Rakes: These tools are essential for excavating the area and spreading the base material and bedding sand evenly. A square-nosed shovel is ideal for digging and moving materials, while a landscape rake is perfect for leveling and smoothing the surface. Invest in quality, long-handled tools to reduce back strain and improve efficiency.
Plate Compactor: A plate compactor is crucial for compacting the subgrade and base material. This ensures a stable and solid foundation for the pavers. Renting a plate compactor is a viable option for smaller projects, while larger projects may warrant purchasing one.
Screed Rails and Screed Board: These tools are used to create a perfectly level bedding sand layer. Screed rails are typically metal pipes or wooden boards that are set at the desired height and spacing. A screed board, which is a straight piece of lumber or metal, is then pulled across the rails to level the sand. A laser level can be used to ensure the screed rails are perfectly level.
Rubber Mallet: A rubber mallet is used to gently tap the pavers into the bedding sand. This helps to seat the paver and ensure that it is properly aligned with adjacent pavers. A rubber mallet is preferred over a metal hammer to avoid damaging the pavers.
Levels: A variety of levels are essential for checking the levelness of the pavers. A torpedo level is useful for checking individual pavers, while a longer level (4 feet or more) is ideal for checking the levelness of multiple pavers at once. A laser level can also be used to establish a consistent reference plane.
String Lines: String lines can be stretched across the patio area and used as a guide for setting the pavers at the correct height. This is especially useful for larger patios or patios with complex designs. Use masonry string, as it is durable and resistant to stretching.
Paver Spacers: Paver spacers are small plastic or rubber pieces that are inserted between the pavers to maintain a consistent joint spacing. This is essential for both aesthetic appeal and structural integrity. Different sizes of paver spacers are available to accommodate different paver sizes and joint widths.
Measuring Tape: Essential for accurately measuring the project area, calculating material needs, and ensuring precise paver placement. A long measuring tape is preferable for larger projects.
Wheelbarrow: For transporting materials such as base gravel and sand to the work area. Choose a wheelbarrow with a sturdy frame and a large, puncture-resistant tire.
Safety Glasses and Gloves: Protecting eyes and hands is paramount. Safety glasses prevent dust and debris from entering the eyes, while gloves protect hands from abrasions and cuts. Ear protection is also recommended when operating a plate compactor.
Investing in the right tools will not only improve the quality of the finished patio but also save time and effort. Regularly maintain your tools to ensure they are in good working condition for future projects.
The successful leveling of patio pavers is a testament to thorough preparation, meticulous installation techniques, and the proper application of specialized tools. By prioritizing a stable base, paying close attention to detail during paver placement, and utilizing the appropriate tools to ensure precision, a flawlessly level, aesthetically pleasing, and durable patio can be achieved. Each step, from excavation to fine-tuning, plays a crucial role in determining the overall outcome and longevity of the patio surface.

Grading Tools Level For Best Hardscaping Equipment

How To Pave The Ultimate Guide N Paving Centre

Essential Tools For Laying Block Pavers The Paving Experts

What Tools Do You Need To Pave Your Garden Smiths Hire

Base For Pavers How To Prep Lay A Paver Diy

How To Pave The Ultimate Guide N Paving Centre

How To Get Your Yard Leveled For Paverspavestone Brick Paving

Base For Pavers How To Prep Lay A Paver Diy

Why Everyone Is Switching To Pavers How Lay The Perfect

Paver Leveling Gilbert Company
Related Posts