Creating a Crushed Granite Patio Area
A crushed granite patio offers an attractive, durable, and cost-effective alternative to conventional paving materials such as concrete, brick, or flagstone. Crushed granite, also known as decomposed granite (DG), is a versatile material comprised of finely ground granite particles and small granite stones. Its natural beauty, permeability, and ease of installation make it a popular choice for homeowners looking to enhance their outdoor living spaces. This article will provide a comprehensive guide to creating a crushed granite patio area, covering essential considerations, preparation steps, installation techniques, and maintenance recommendations.
Before embarking on a crushed granite patio project, it is crucial to assess the site and determine its suitability. Factors such as soil type, drainage, existing vegetation, and anticipated usage should be taken into account. Proper planning and preparation will contribute significantly to the longevity and aesthetic appeal of the finished patio.
Key Point 1: Site Assessment and Planning
The initial step in creating a crushed granite patio involves a thorough site assessment. This process entails evaluating the soil composition, drainage patterns, and potential obstacles that may hinder the installation process.
Soil Composition: Different soil types possess varying degrees of stability and drainage capabilities. Sandy soils generally drain well but may lack the necessary compaction to support a crushed granite patio. Clay soils, on the other hand, tend to retain water, potentially leading to drainage issues and patio instability. Loamy soils, a mixture of sand, silt, and clay, offer a balanced combination of drainage and stability. A soil test can provide valuable insights into the soil's composition and pH level, guiding the selection of appropriate base materials and amendments.
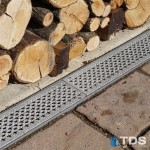
Drainage Patterns: Adequate drainage is essential to prevent water from pooling on the patio surface or infiltrating the base material. Poor drainage can lead to erosion, weed growth, and structural damage. Observe the site during and after rainfall to identify areas where water tends to accumulate. If drainage is inadequate, consider installing subsurface drainage systems, such as French drains or perforated pipes, to redirect water away from the patio area. Sloping the patio slightly away from the house or other structures can also improve drainage.
Existing Vegetation: Remove any existing vegetation, including grass, weeds, and shrubs, from the patio area. The roots of these plants can disrupt the patio surface and contribute to weed growth. Herbicides can be used to kill vegetation, but it is essential to follow the manufacturer's instructions carefully and take precautions to protect surrounding plants and wildlife. Mechanical removal of vegetation, such as digging or tilling, is a more environmentally friendly alternative.
Accessibility and Utilities: Confirm the accessibility of the site for material delivery and equipment operation. Ensure that there are no underground utilities, such as gas lines, water pipes, or electrical cables, in the patio area before excavation begins. Contact local utility companies to mark the locations of underground utilities to prevent damage during construction.
After the site assessment is complete, it is time to plan the patio's layout and design. Consider the size, shape, and orientation of the patio, as well as its relationship to the surrounding landscape. A well-designed patio should complement the architectural style of the house and provide a comfortable and functional outdoor living space. Mark the perimeter of the patio area using stakes and string or spray paint. Consider creating a slightly larger area than you initially planned, as it's easier to remove DG than to add more later. Consult with a landscape architect or designer for assistance with complex patio designs or challenging site conditions.
Key Point 2: Excavation, Base Preparation, and Edging
Proper excavation and base preparation are critical for the long-term stability and performance of a crushed granite patio. A well-compacted base will prevent settling, shifting, and weed growth.
Excavation: Excavate the patio area to a depth of at least 6-8 inches. The exact depth will depend on the anticipated usage of the patio, the soil conditions, and the type of base material used. Remove all excavated material from the site. Ensure that the excavation is level and uniform. Use a level and string to check the grade. A slight slope (approximately 1/4 inch per foot) away from the house or other structures will improve drainage.
Base Material: The base material provides a stable foundation for the crushed granite surface. Crushed gravel, road base (also known as aggregate base), or compacted rock are commonly used base materials. Choose a base material that is well-draining and compactable. Spread the base material evenly over the excavated area, using a shovel or wheelbarrow. Rake the base material to create a smooth, level surface. Compact the base material using a plate compactor or hand tamper. Multiple passes with the compactor may be necessary to achieve adequate compaction. Add additional base material and compact again as needed to achieve the desired depth and levelness.
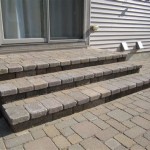
Edging: Edging prevents the crushed granite from migrating beyond the patio area and helps to maintain the patio's shape and appearance. Edging can be made from a variety of materials, including plastic, metal, wood, stone, brick, or concrete. Choose an edging material that complements the style of the patio and the surrounding landscape. Install the edging along the perimeter of the patio area, ensuring that it is securely anchored in the ground. Use stakes or concrete to hold the edging in place. Backfill the edging with soil or base material to provide additional support.
Key Point 3: Crushed Granite Installation and Maintenance
The final step in creating a crushed granite patio is the installation of the crushed granite surface. Proper installation techniques and ongoing maintenance will ensure a long-lasting and aesthetically pleasing patio.
Crushed Granite Application: Spread the crushed granite evenly over the prepared base material, using a shovel or wheelbarrow. Aim for a layer thickness of 2-4 inches. Rake the crushed granite to create a smooth, level surface. Multiple layers may be required to achieve the desired depth and compaction. Lightly water the crushed granite to help it settle and compact. Avoid overwatering, as this can lead to erosion and puddling.
Compaction: Compact the crushed granite using a plate compactor or hand tamper. Multiple passes with the compactor may be necessary to achieve adequate compaction. Pay particular attention to the edges of the patio, where the crushed granite may be more prone to shifting. Add additional crushed granite and compact again as needed to achieve the desired levelness and compaction.
Stabilizer (Optional): A stabilizer can be added to the crushed granite to improve its stability and reduce dust. Stabilizers are typically liquid or powder-based products that are mixed with the crushed granite and then compacted. Follow the manufacturer's instructions carefully when applying a stabilizer. Stabilizers can be helpful for patios that will experience heavy foot traffic or vehicular use.
Maintenance: Crushed granite patios require minimal maintenance. Regularly rake the patio to remove debris, such as leaves, twigs, and weeds. Replenish the crushed granite as needed to maintain the desired depth and levelness. Address any drainage issues promptly to prevent erosion and weed growth. Periodically compact the crushed granite to maintain its stability and prevent settling. Apply a weed killer as needed to control weed growth. Avoid using harsh chemicals or abrasive cleaners on the crushed granite surface, as these can damage the material.
By following these guidelines, homeowners can create a beautiful, durable, and functional crushed granite patio that will enhance their outdoor living space for years to come. Remember to research local building codes and regulations before starting any construction project.
The successful creation of a crushed granite patio hinges on careful planning, meticulous execution, and diligent maintenance. By addressing these aspects, homeowners can enjoy a durable and aesthetically pleasing outdoor space for years to come.

How To Build A Decomposed Granite Patio Wild Bloom

How To Install A Beautiful Decomposed Granite Patio South House Designs

Decomposed Granite Landscaping Installation And Ideas

How To Build A Diy Patio And Fire Pit Seating Area

Decomposed Granite Ideas For Your Landscape

Decomposed Granite Paving For Your Landscape Landscaping Network

What Is Crushed Granite Walkways Driveways Patio Guide

Great Landscaping Ideas Diffe Ways To Edge Your Decomposed Granite Paths Kafka

What Is Crushed Granite Walkways Driveways Patio Guide

Decomposed Granite Patio Contemporary Landscape Austin By Eden Garden Design Houzz
Related Posts