How To Mix Cement For Patio Pointing: A Comprehensive Guide
Patio pointing, the process of filling the gaps between patio slabs or pavers, is crucial for maintaining the integrity and aesthetics of outdoor spaces. Properly applied pointing prevents water ingress, which can lead to erosion and destabilization of the patio surface. Incorrectly mixed cement, however, can result in cracking, crumbling, and an overall weakened structure. This article provides a detailed guide on how to mix cement specifically for patio pointing, ensuring a durable and visually appealing finish.
The selection of appropriate materials is paramount. Ordinary Portland Cement (OPC) is the standard choice for patio pointing mortar. It provides adequate strength and workability for this application. Fine sand, specifically mortar sand or builder's sand, is essential as an aggregate. The sand should be clean and free from debris, organic matter, and large particles, which can compromise the cement mixture. A plasticizer is often added to improve the mortar's workability and reduce the risk of cracking. Water is the activating agent that binds the cement and sand together.
Key Point 1: Understanding the Cement to Sand Ratio
The correct ratio of cement to sand is fundamental to achieving a durable and workable mortar. An excessively rich mix (too much cement) will be strong but prone to cracking due to shrinkage as it cures. A lean mix (too little cement) will be weak and crumbly, lacking the necessary binding properties. The recommended ratio for patio pointing is typically 3:1 or 4:1 sand to cement. This means for every one part of cement, three or four parts of sand are used. The specific ratio may need slight adjustments based on the sand's grading and the desired workability.
To illustrate, consider using a bucket as the measuring unit. If opting for a 3:1 ratio, one bucket of cement should be combined with three buckets of sand. Precision is not necessarily required, but maintaining consistency in the measurement is essential for a uniform mortar mix. A measuring container, such as a bucket, should be used consistently throughout the mixing process, rather than relying on estimations.
Prior to mixing, it is beneficial to dry-mix the cement and sand thoroughly. This ensures that the cement is evenly distributed throughout the sand before water is added. This dry mixing can be achieved using a shovel or spade in a wheelbarrow or on a mixing board. The goal is to obtain a homogenous mixture where the cement and sand are indistinguishable from each other in terms of color and texture. Ensure any lumps of cement or sand are broken down during this stage.
Once the dry mix is thoroughly combined, the water can be added gradually. The amount of water required will vary depending on the moisture content of the sand and the atmospheric conditions. The objective is to achieve a workable consistency – a mix that is neither too wet and soupy, nor too dry and crumbly. Start by adding a small amount of water and mix thoroughly. Continue adding water incrementally until the desired consistency is reached. A useful test is to form a ball of mortar in your hand. It should hold its shape without being excessively sticky or dripping water.
The addition of a plasticizer can improve the workability of the mortar and reduce the likelihood of cracking. Plasticizers are readily available at building supply stores in liquid or powder form. Follow the manufacturer's instructions regarding the dosage. Typically, a small amount of plasticizer is added to the water before it is introduced to the dry mix. This ensures that the plasticizer is evenly distributed throughout the mortar.
Key Point 2: Mixing Techniques: Hand Mixing vs. Machine Mixing
The choice between hand mixing and machine mixing depends on the quantity of mortar required and the available resources. For small patios or minor repairs, hand mixing is often sufficient. For larger projects, a mechanical mixer significantly reduces the labor and ensures a more consistent mix.
Hand mixing involves using a shovel or spade to combine the ingredients in a wheelbarrow or on a mixing board. The process requires physical effort and careful attention to ensure that the cement, sand, and water are thoroughly integrated. The dry ingredients are mixed first, followed by the gradual addition of water. The mixture is then turned over repeatedly, scraping the bottom and sides of the wheelbarrow or mixing board, until a consistent and uniform mortar is achieved.
Machine mixing, using a concrete mixer, is more efficient and produces a more consistent mix. The dry ingredients are added to the mixer in the correct proportions, followed by the gradual addition of water. The mixer is then allowed to run for several minutes, ensuring that the ingredients are thoroughly combined. The user must monitor the consistency of the mix and add water or dry ingredients as needed to achieve the desired workability.
When using a concrete mixer, care must be taken not to overload the machine. Overloading can strain the motor and result in an uneven mix. It is also important to clean the mixer thoroughly after each use to prevent the cement from hardening and damaging the drum.
Regardless of the mixing method used, it is crucial to mix the mortar thoroughly until it is homogenous and free from lumps. This ensures that the cement is properly hydrated and that the mortar will set correctly. The consistency of the mortar should be checked regularly during the mixing process to ensure that it remains workable.
Key Point 3: Achieving the Right Consistency and Testing
The consistency of the mortar is critical for successful patio pointing. The mortar should be plastic and workable, allowing it to be easily applied and compacted into the joints between the patio slabs. A mortar that is too wet will be difficult to work with and will shrink excessively as it dries, leading to cracking. A mortar that is too dry will be difficult to compact and will not adhere properly to the patio slabs.
A useful test to determine the consistency of the mortar is the "squeeze test." Take a handful of mortar and squeeze it firmly in your hand. If the mortar holds its shape without crumbling or dripping water, it is likely to be the correct consistency. If the mortar crumbles, it is too dry and needs more water. If the mortar drips water, it is too wet and needs more dry ingredients.
Another test is to place a small amount of mortar on a clean, flat surface. If the mortar spreads out and loses its shape, it is too wet. If the mortar remains in a cohesive lump, it is likely to be the correct consistency. The mortar should be workable enough to be applied easily with a pointing trowel and compacted firmly into the joints.
Once the mortar has been mixed to the correct consistency, it is important to use it promptly. Mortar begins to set as soon as it is mixed, and its workability will decrease over time. It is best to mix only as much mortar as can be used within a couple of hours. If the mortar begins to dry out, it can be re-tempered by adding a small amount of water and mixing it thoroughly. However, repeatedly re-tempering the mortar can weaken its strength and should be avoided.
Proper curing is also essential for the long-term durability of the patio pointing. Curing involves keeping the mortar moist for several days after it has been applied. This allows the cement to hydrate fully and develop its maximum strength. The mortar can be kept moist by covering it with plastic sheeting or by misting it with water regularly. The curing process should continue for at least three days, and longer in hot or dry conditions.
In addition to these fundamental principles, several other factors can influence the success of patio pointing. The ambient temperature and humidity can affect the setting time and curing process. Wind can cause the mortar to dry out too quickly, leading to cracking. Direct sunlight can also accelerate the drying process and cause the mortar to shrink excessively. It is best to apply patio pointing in mild, overcast conditions.
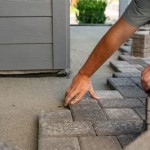
The cleanliness of the joints between the patio slabs is also crucial. The joints should be free from dirt, debris, and loose mortar. This will ensure that the new mortar adheres properly to the existing surfaces. The joints can be cleaned using a wire brush or a pressure washer. Before applying the mortar, the joints should be slightly dampened to improve adhesion.
By adhering to these guidelines, individuals can effectively mix cement for patio pointing, ensuring a resilient and visually pleasing result that will withstand the test of time and environmental factors.

How To Repoint A Patio Create Neat Finish Checkatrade

Jointing And Pointing For Stone Paving Dry Grouting Pavingexpert

How To Mix Up Mortar For Patio Pointing In 6 Mins

How To Repoint Paving Slabs

Jointing And Pointing For Paving Sand Cement Mix

Pointing And Sealing N Stone Edecks Blog

Julian Cas S Diy Blog Archive Repointing Patio Slabs How To What Use Where Buy

Patio Pointing Anglia Surface Care

Pointing And Sealing N Stone Edecks Blog

How To Dry Point A Patio Simple Tutorial
Related Posts