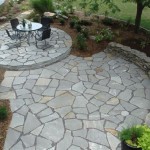
How To Paint a Concrete Patio to Look Like Stone
Transforming a plain concrete patio into a visually appealing, stone-like surface is a cost-effective way to enhance outdoor living spaces. This process, achieved through specialized painting techniques, allows homeowners to replicate the aesthetic of natural stone without the expense and labor associated with installing actual stone pavers or slabs. Success hinges on proper preparation, material selection, and the application of layering and texturing methods.
This article outlines the steps necessary to effectively paint a concrete patio, creating a durable and realistic stone appearance. It encompasses everything from initial surface cleaning to the final sealing coat, ensuring longevity and visual appeal. By following these instructions, individuals can significantly elevate the look of their patios, adding value and charm to their property.
Surface Preparation: The Foundation for a Lasting Finish
The initial stage of any painting project, particularly one exposed to outdoor elements, is meticulous surface preparation. This phase directly impacts the adhesion and longevity of the paint application. Neglecting this step can result in premature peeling, cracking, and ultimately, a less-than-desirable aesthetic outcome. The concrete surface must be thoroughly cleaned and any existing imperfections addressed before the painting process begins.
Begin by clearing the patio of all furniture, planters, and any other obstructions. A thorough sweeping with a stiff-bristled broom removes loose debris, dirt, and leaves. Following this, a more aggressive cleaning method is required to eliminate ingrained dirt, grease, and mildew. A pressure washer is highly recommended for this purpose. Direct the nozzle at a moderate angle to avoid damaging the concrete surface while effectively removing contaminants. If a pressure washer is unavailable, a scrub brush and a solution of trisodium phosphate (TSP) or a specialized concrete cleaner can be used, followed by a thorough rinsing with a garden hose.
Inspect the concrete surface for cracks, chips, or other imperfections. Small cracks can be filled with a concrete patching compound designed for exterior use. Apply the compound according to the manufacturer's instructions, ensuring it is fully cured before proceeding. Larger cracks or significant damage may require professional repair to ensure structural integrity. Once the patching compound is dry, sand the repaired areas smooth to blend seamlessly with the surrounding concrete. Remove all sanding dust with a damp cloth.
Allow the concrete to dry completely before proceeding to the next step. This is crucial for proper paint adhesion. Depending on the weather conditions, this may take several hours or even a full day. Verify dryness by using a moisture meter or by taping a plastic sheet to the surface. If condensation forms under the plastic sheet after a few hours, the concrete is not yet dry enough to paint.
Once dry, apply a concrete primer specifically designed for exterior use. The primer serves several important functions. It enhances adhesion between the concrete and the paint, seals the porous surface, and provides a uniform base for the topcoat. Apply the primer evenly using a roller or brush, following the manufacturer's instructions regarding coverage and drying time. Allow the primer to dry completely before proceeding.
Selecting the Right Materials: Durability and Aesthetics
Choosing the appropriate materials is vital for achieving both a realistic stone appearance and a durable finish that can withstand outdoor conditions. The type of paint, textures, and sealers employed will significantly impact the final result and the longevity of the painted patio.
For the base coat, an exterior-grade acrylic latex paint is recommended. This type of paint is durable, weather-resistant, and provides good adhesion to primed concrete. Select a color that closely resembles the base color of the desired stone, such as a light gray, beige, or tan. Avoid using oil-based paints, as they can become brittle and prone to cracking over time.
To create the stone-like texture, consider using various tools and techniques. Sponges, sea sponges in particular, can be used to dab different colors onto the base coat, creating variations in tone and texture. Stencils, readily available in stone or brick patterns, can be used to apply grout lines or other stone details. A textured paint additive can be mixed into the paint to create a slightly rough surface. Experiment with different tools and techniques on a test area to determine the desired effect before applying it to the entire patio.
For highlighting and shading, use a variety of acrylic latex paints in slightly darker and lighter shades than the base color. These colors will be used to create depth and dimension, replicating the natural variations found in real stone. Choose colors that complement the base color and the overall aesthetic you are trying to achieve. Consider using a faux finishing glaze to add translucency and subtle color variations.
A high-quality exterior concrete sealer is crucial for protecting the painted surface from moisture, UV damage, and abrasion. Choose a sealer that is specifically designed for painted concrete and that provides a durable, long-lasting finish. Options include water-based acrylic sealers and solvent-based epoxy sealers. Water-based sealers are easier to apply and clean up, while solvent-based sealers offer superior durability and resistance to chemicals. Read the product labels carefully and choose the sealer that best suits your needs and local climate.
In addition to the paints and sealers, gather the necessary tools, including paint rollers, paint brushes of various sizes, paint trays, sponges, stencils (if desired), painter's tape, a mixing bucket, and safety glasses and gloves. Having all the necessary materials readily available will streamline the painting process and ensure a more efficient and professional result.
Painting Techniques: Replicating the Look of Natural Stone
The actual painting process involves several steps to achieve a realistic stone appearance. These include applying the base coat, creating texture with sponges and stencils, and adding highlights and shadows to enhance depth and dimension. Careful attention to detail and a willingness to experiment are key to achieving a satisfactory result.
Begin by applying the base coat of acrylic latex paint to the entire patio surface. Use a paint roller for larger areas and a brush for edges and corners. Apply the paint in thin, even coats, allowing each coat to dry completely before applying the next. Two coats of base coat are typically recommended to ensure full coverage and durability. Allow the final coat to dry thoroughly according to the manufacturer's instructions.
Once the base coat is dry, begin adding texture and detail. This is where the creative process comes into play. Use a sponge to dab different colors onto the surface, creating variations in tone and texture. Start with lighter colors and gradually add darker colors to create depth and dimension. Experiment with different sponge techniques, such as dabbing, rolling, and stippling, to achieve the desired effect. If using stencils, secure them to the surface with painter's tape and apply the paint with a stencil brush or sponge. Be careful not to apply too much paint, as this can cause the paint to bleed under the stencil. Remove the stencil immediately after applying the paint and allow the paint to dry completely.
After applying the texture and detail, add highlights and shadows to enhance the three-dimensional appearance of the stone. Use a small brush to apply lighter shades of paint to the raised areas and darker shades to the recessed areas. This technique will create the illusion of depth and dimension, making the painted surface look more like natural stone. Consider using a faux finishing glaze to add translucency and subtle color variations. Apply the glaze with a brush or sponge, blending it carefully to avoid harsh lines or edges.
Allow all the paint and glaze to dry completely before applying the concrete sealer. This is crucial for protecting the painted surface and ensuring its longevity. Apply the sealer according to the manufacturer's instructions, typically using a roller or brush. Apply two coats of sealer, allowing each coat to dry completely before applying the next. Pay particular attention to edges and corners, ensuring that they are fully sealed. Avoid applying the sealer in direct sunlight or during extreme temperatures, as this can affect its drying time and performance.
Once the final coat of sealer is dry, allow the patio to cure for at least 24 hours before placing furniture or other items on the surface. This will allow the sealer to fully harden and protect the painted surface from scratches and abrasions. Regularly clean the patio with a mild soap and water solution to remove dirt and debris. Avoid using harsh chemicals or abrasive cleaners, as these can damage the painted surface. With proper care and maintenance, a painted concrete patio can provide years of enjoyment and beauty.

How To Create Faux Tile Look On Concrete Patio Southern Hospitality

Paint Concrete Patio To Look Like Stone Painted Cement

How To Create Faux Tile Look On Concrete Patio Southern Hospitality

Backyard Makeover How To Paint Concrete Look Like Oversize Pavers A House Full Of Sunshine

How To Paint On Cement

Paint Concrete Patio To Look Like Slate Google Search Stamped Designs Diy

How To Create Faux Tile Look On Concrete Patio Southern Hospitality

How To Fake An Expensive Looking Patio With Spray Paint

Paint Concrete Patio Painted
:max_bytes(150000):strip_icc()/painted-concrete-patio-1-2cb8e70c07074006b34800edbf090eba.jpg?strip=all)
15 Painted Concrete Patio Designs
Related Posts

