How to Make a Patio Cover Out of Wood
A patio cover can transform an outdoor space, providing shade from the sun, shelter from rain, and a sense of enclosure. Building a patio cover out of wood offers a classic look and allows for customization in size and style. While a complex project, it can be accomplished with careful planning, the right tools, and a bit of DIY know-how. This article will guide you through the process step-by-step, covering everything from design and materials to construction and finishing.
1. Planning and Design
Before embarking on construction, take time to plan and design your patio cover. This includes determining the size, shape, and style, considering factors like the size of your patio, the surrounding architecture, and your personal preferences.
Here are some crucial aspects to consider during the planning phase:
- Size and Shape: Determine the dimensions of your patio cover, ensuring it provides adequate shade and coverage while complementing the space. Consider square, rectangular, or even a custom design based on your needs.
- Roof Style: Choose a roof style that suits your aesthetic and local climate. Popular options include flat, gable, or shed roofs. Flat roofs are simple but require proper drainage, while gable and shed roofs provide better water runoff.
- Materials: Select high-quality wood for the frame, beams, rafters, and roof sheathing. Pressure-treated lumber is ideal for outdoor applications as it resists moisture and rot.
- Roofing Material: Choose a roofing material that balances aesthetics, durability, and budget. Options include shingles, metal panels, polycarbonate sheets, or even a combination for a unique look.
- Permits: Check with your local building department for any required permits. The specific requirements vary depending on your location and the size of your patio cover.
Once you have a clear idea of your patio cover design, create a detailed plan with measurements and materials list. This will ensure a smooth construction process and minimize errors.
2. Building the Patio Cover Frame
The frame is the foundation of your patio cover, supporting the roof and providing structural integrity. Begin by preparing the site, marking out the location of the posts, and digging holes for the foundation.
Here's a step-by-step guide to building the frame:
- Prepare the Foundation: Dig holes for the posts, ensuring they are deep enough for stability. Concrete footings are highly recommended, as they provide a solid base and prevent shifting.
- Install Posts: Set the posts in the footings, ensuring they are plumb and level. Secure them with concrete or quick-setting mortar, allowing them to cure completely before proceeding.
- Attach Beams: Connect the beams to the posts using strong brackets or joist hangers. Beams are the horizontal supports that run along the length of the patio cover, spanning between the posts.
- Install Rafters: Attach the rafters to the beams, creating the framework for the roof. Rafters are the angled supports that run from the beams to the ridge board, or the highest point of the roof.
- Install The Ridge Board: Connect the ridge board to the rafters, creating the peak of the roof. This will be the central point of the roof and should be supported by the rafters.
Ensure all connections are secure and use appropriate fasteners, like lag screws or galvanized nails, for long-lasting performance.
3. Roofing and Finishing Touches
Once the frame is complete, you can move onto the roofing and finishing touches. Depending on the chosen roofing material, the installation process will vary.
Here are the steps to follow:
- Install Roof Sheathing: Attach the roof sheathing to the rafters, creating a solid base for the roofing material. Sheathing is typically made of plywood or OSB (oriented strand board) and helps distribute the weight of the roofing material evenly.
- Install Roofing Material: Install your chosen roofing material according to the manufacturer's instructions. For shingles, this involves overlapping rows and securing them with roofing nails. For metal panels, it involves fastening the panels to the sheathing with screws or rivets. And for polycarbonate sheets, it often involves snapping them into place on a specialized framing system.
- Finish the Edges: Attach trim boards around the edges of the patio cover to create a neat and finished look. You can also add decorative fascia boards to hide the edges of the roofing material.
- Paint or Stain: Apply a sealant, paint, or stain to protect the wood from the elements and enhance its appearance.
Consider adding additional features such as lighting, fans, or a weather-resistant awning depending on your specific needs and preference. These elements can further enhance the functionality and aesthetics of your patio cover.
Building a patio cover out of wood is a labor-intensive project, but with meticulous planning, quality materials, and a commitment to safety, you can enjoy a beautiful, customized outdoor space that provides shade, shelter, and enjoyment for years to come.

Patio Cover Plans Build Your Or Deck

Patio Cover Plans Build Your Or Deck

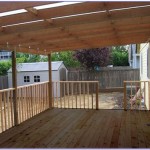
How To Build A Diy Covered Patio

Building A Covered Patio With 30ft Span The Awesome Orange

Patio Roof Gazebo Construction Hometips Diy

Patio Cover Installation 2 Diy Backyard

Diy Patio Cover Plans New Zealand

Diy Turning A Concrete Slab Into Covered Deck Catz In The Kitchen

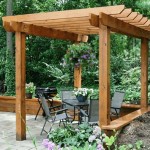
12 Beautiful Shade Structures Patio Cover Ideas A Piece Of Rainbow

Patio Cover Plans Gardenplansfree Covered Design Diy
Related Posts