How to Build a Patio Cover Out of Wood
A patio cover can transform your outdoor space, providing shade from the sun and protection from the elements. Building a wooden patio cover is a rewarding project that can add significant value to your property. With careful planning and attention to detail, you can create a functional and aesthetically pleasing structure to enjoy for years to come.
1. Planning and Preparation
Before starting construction, it is crucial to have a well-defined plan. This includes determining the size, shape, and design of your patio cover. Consider the existing dimensions of your patio and the desired coverage area. Determine the height of the cover, keeping in mind factors such as headroom and the surrounding landscape.
Obtain the necessary permits from your local building department. These permits ensure compliance with local building codes and regulations. Secure the required materials, including lumber, fasteners, roofing materials, and any additional components such as posts, beams, and rafters. Choose high-quality wood that is resistant to rot and insects, such as cedar, redwood, or pressure-treated pine.
Prepare the construction site by clearing any obstructions and leveling the ground. It is essential to have a solid foundation for the patio cover. Consider using concrete piers or a wooden frame with pressure-treated lumber for longevity.
2. Framing the Patio Cover
Begin by constructing the foundation for your patio cover. If using concrete piers, install them at the designated locations. Alternatively, create a wooden frame using pressure-treated lumber and secure it to the ground with concrete anchors or post bases.
Next, erect the posts and beams. Use treated lumber for these elements to prevent decay. Cut the posts to the desired height and secure them to the foundation using lag bolts or specialized post anchors. Connect the posts with beams, using joist hangers or strong metal brackets.
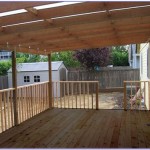
After attaching the posts and beams, install the rafters. Rafters provide support for the roofing material. Cut the rafters to the correct length and attach them to the beams using joist hangers or metal brackets. Ensure the rafters are spaced evenly and provide adequate support for the chosen roofing material.
3. Roofing and Finishing
The roofing material is a key element of your patio cover. Choose a material that suits your budget, style, and desired level of protection. Popular options include asphalt shingles, metal roofing, or polycarbonate panels. Install the roofing material according to the manufacturer's instructions, ensuring proper sealing and flashing around any penetrations or edges.
Once the roofing is complete, you can add finishing touches to enhance the appearance and functionality of your patio cover. Consider installing gutters to collect and direct rainwater. Add trim around the edges for a polished look. Apply a weather-resistant sealant to protect the wood from moisture and decay.
Finally, add any decorative elements such as latticework, lighting fixtures, or ceiling fans. These details can personalize your patio cover and create a cozy and inviting atmosphere.

Patio Cover Plans Build Your Or Deck

Building A Covered Patio With 30ft Span The Awesome Orange

Patio Cover Plans Build Your Or Deck

Patio Roof Gazebo Construction Hometips Diy

Building A Patio Cover Plans For An Almost Free Standing Roof

How To Build A Diy Covered Patio

Patio Cover Plans Build Your Or Deck

How To Build A Freestanding Patio Cover With Best 10 Samples Ideas

Patio Cover Plans Gardenplansfree Covered Design Diy

Patio Cover Plans Wood S Creative Builders
Related Posts